
 Engleză
 中文简体
中文简体 Русский
 Español
 Português
 Türkçe
 العربية
 Deutsch
 Polski
 Italiano
 Français
 한국어
한국어 ไทย
ไทย Tiếng Việt
 日本語
日本語





























Contor de ceață/Contor de turbiditate
Manual de utilizare
Aplicabil LISUN modele: HM-100、HM-120
1. Despachetarea și familiarizarea de bază cu echipamentul
1.1 Specificații tehnice cheie
| parametrii | notițe |
| Sursă de lumină | CIE-A, CIE-C |
| Conformitatea cu Standardele | ASTM D1003/D1044, JIS K7105, JIS K7361, JIS K7136, GB/T 2410-2008 |
| Parametri de măsurare | Haze (HAZE) and Transmittance (T) per ASTM Standards |
| Diametrul de măsurare | 21 mm |
| Dimensiune ecran | Ecran LCD TFT de 5 inci |
1.2 Despachetarea și verificarea conținutului
1.2.1 Despachetare și inspecție vizuală
Când despachetați dispozitivul, manipulați-l cu grijă pentru a evita zgârierea carcasei cu unelte ascuțite. După despachetare, inspectați mai întâi exteriorul dispozitivului pentru a vă asigura că nu există deformări sau lovituri vizibile și că butoanele nu sunt deteriorate sau slăbite. Dacă observați anomalii la dispozitiv sau la accesoriile sale, nu îl porniți. Vă rugăm să ne contactați imediat.
1.2.2 Unitatea principală și accesoriile
| Număr | notițe |
| ① | HM-100 Unitatea principala |
| ② | Cablu de alimentare |
| ③ | USB cable; use the USB cable to connect the device to your computer when you need to use the software |
| ④ | Dust Cover: When the equipment is not in use, please use the dust cover to seal the measuring orifice to prevent dust from entering. |
| ⑤ | Ghid de pornire rapidă |
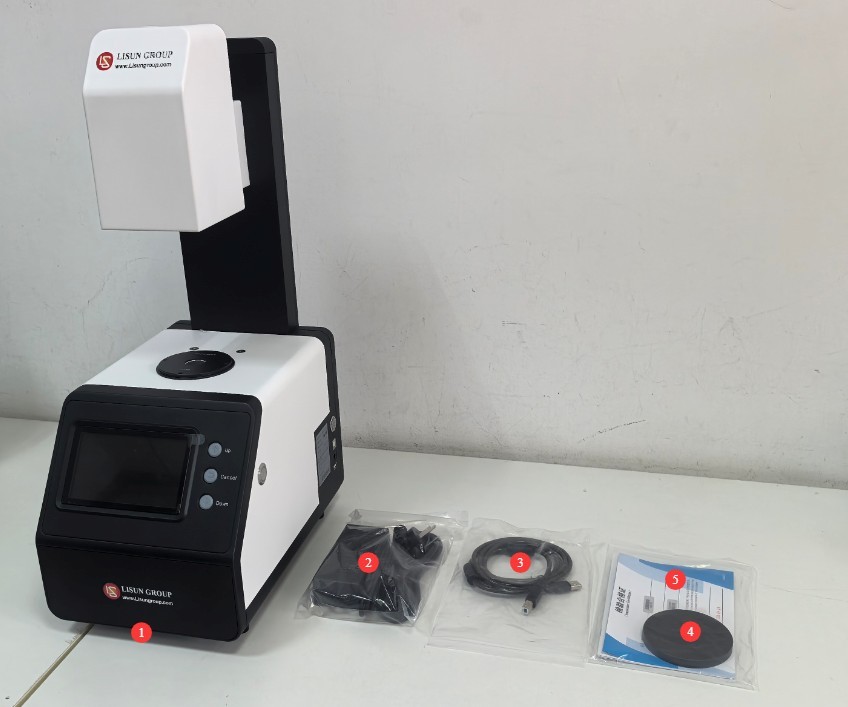
Figura 1
Note: Other optional accessories include measurement fixtures, haze/transmittance standard plates, and custom aperture plates (5 mm, 7 mm, 10 mm), among others.
Linkurile de descărcare pentru manualul de utilizare digital, software, cardul de garanție și alte materiale au fost trimise prin e-mail. Vă rugăm să le descărcați cât mai curând posibil. Dacă ați pierdut e-mailul, ne puteți contacta pentru a solicita din nou linkurile de descărcare.
1.3 Descrierea structurii echipamentului
| Număr | notițe |
| ① | Întrerupător |
| ② | USB port, used for communication with a computer |
| ③ | Conexiune cablu de alimentare |
| ④ | TEST/ENTER (Measure/Confirm) button: Confirm, access functions, and start measurement |
| ⑤⑦ | Up/Down keys: for menu selection and value adjustment |
| ⑥ | Cancel: Cancel/Back button—go back to the previous level or exit |
| ⑧ | Display screen showing parameters, the user interface, and measurement results |
| ⑨ | Measure the aperture; place the sample inside it during measurement. Note: The sample must completely cover the aperture. |
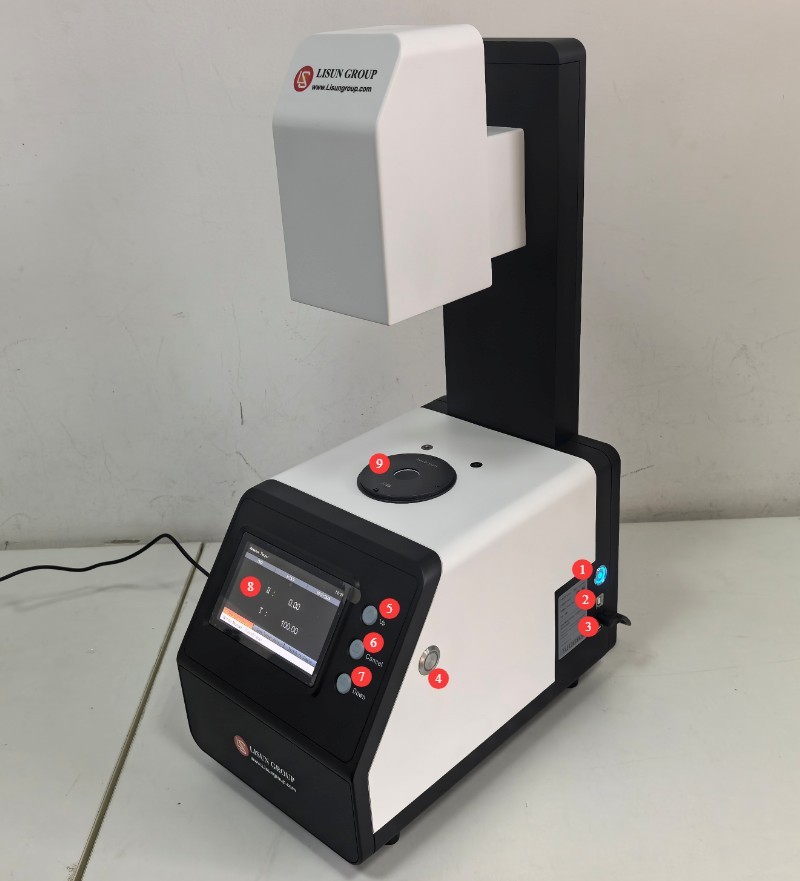
Figura 2
2. Precauții pentru utilizare
2.1 Precauții înainte de utilizare
2.1.1 Setting Up the Environment
Before taking a measurement, allow the device and the sample to rest in the same environment for at least 30 minutes to ensure they reach the same temperature. The measurement environment should be free from direct strong light; avoid operating in environments with high temperatures or high humidity. The ambient temperature should be maintained between 10°C and 35°C, with a relative humidity of ≤80% (no condensation).
Please keep the laboratory free of airborne dust; once dust enters the measurement orifice, it is difficult to clean and may affect the measurement results.
2.1.2 Pregătirea probei
The surface of the sample being tested must be flat, clean, free of stains, and free of scratches. If the sample is a powder or liquid, it must be placed in a special sample dish to ensure that the sample completely fills the measurement aperture without any gaps.
2.2 Precauții pentru utilizare
When taking a measurement, press the measurement button and keep the device still until the measurement is complete (1 second); do not move the device during the measurement process. It is recommended to take 3–5 measurements of the same sample and use the average as the final result to minimize measurement error;
When the equipment is not in use, be sure to seal the measuring orifice with a dust cover to prevent dust from entering;
Do not force a shutdown or disconnect the USB cable during device calibration or measurement;
Do not touch the optical components inside the measurement port with your hands, and do not point the measurement end toward a strong light source; do not drop, bump, or crush the device, and avoid exposing the body to water or other liquids.
2.3 Avertismente de siguranță
Do not attempt to disassemble or replace any internal parts of the device. In the event of a malfunction, contact official customer service or an authorized dealer for assistance. Unauthorized disassembly will void the warranty;
If liquid, dust, or other substances enter the device, immediately turn off the power, unplug the power cord, and contact customer service promptly. Do not continue to operate the device;
Do not place the device near heat sources or in high-temperature environments to prevent damage to its components.
3. Funcționarea echipamentelor
3.1 Power-On Calibration
The device must be recalibrated when used for the first time or after being idle for more than 8 hours. After turning on the device, the screen will display a calibration prompt. Please follow the on-screen instructions to ensure there are no foreign objects above the measurement aperture, then press the confirmation button to complete the calibration.
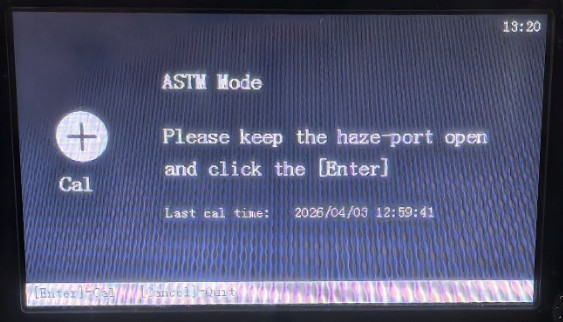
Figura 3
Note: If you have multiple measurement orifices, you must refer to Section 3.4.2 and perform a calibration each time you switch measurement orifices.
3.2 Haze/Transmittance Measurement
Place the sample on the measurement aperture so that it covers the entire aperture. Press the measurement button to complete a measurement.
| Proiect | notițe |
| H | That is, Haze; the haze measurement results show that |
| T | That is, transmittance; the transmittance measurement results show that |
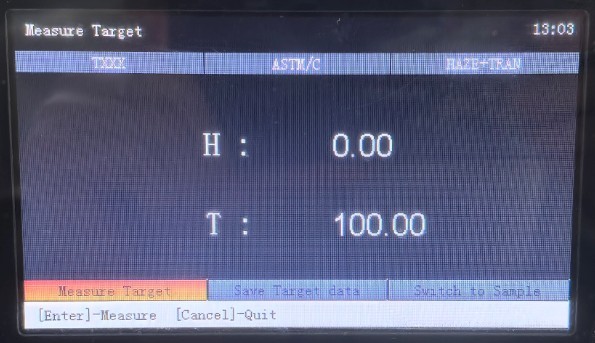
Figura 4
3.3 Comparison Test Between Reference Standards and Samples
3.3.1 Măsurarea standardelor de referință
Follow the same procedure as in Section 3.2.
Use the up and down arrows to navigate to the option to save the reference sample measurement data, then use the Enter key and the up and down arrows to edit the reference sample name and save it.
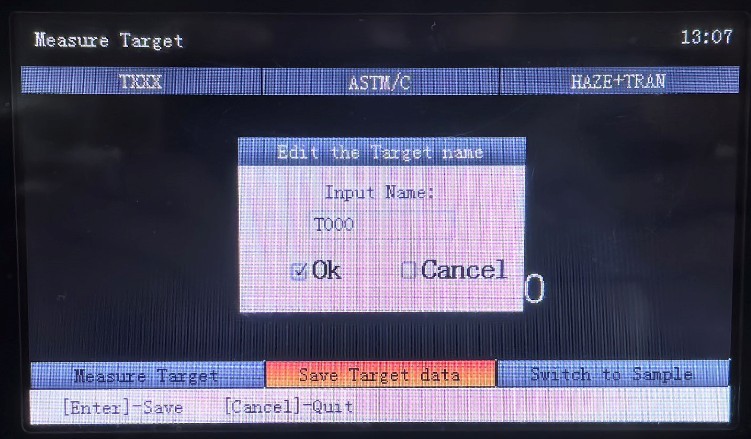
Figura 5
3.3.2 Testare comparativă
Use the up and down arrows to navigate to “Sample Measurement,” then press the Confirm button to enter the sample measurement screen.
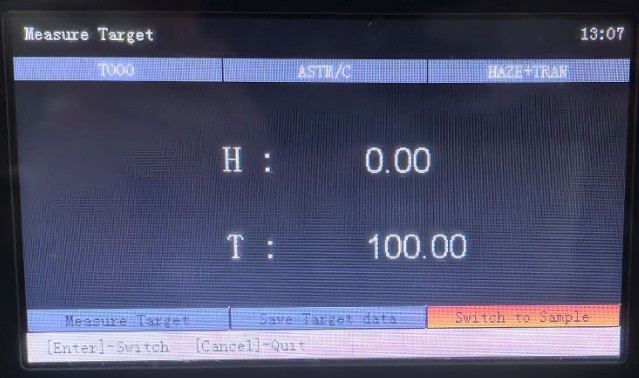
Figura 6
Place another sample on the measurement aperture so that it covers the entire aperture, then press the measurement button to complete a measurement.
| Număr | notițe |
| ① | Sample Measurement Results |
| ② | Differences Between the Sample and the Reference Standard |
| ③ | Are the sample measurement results within specifications? |
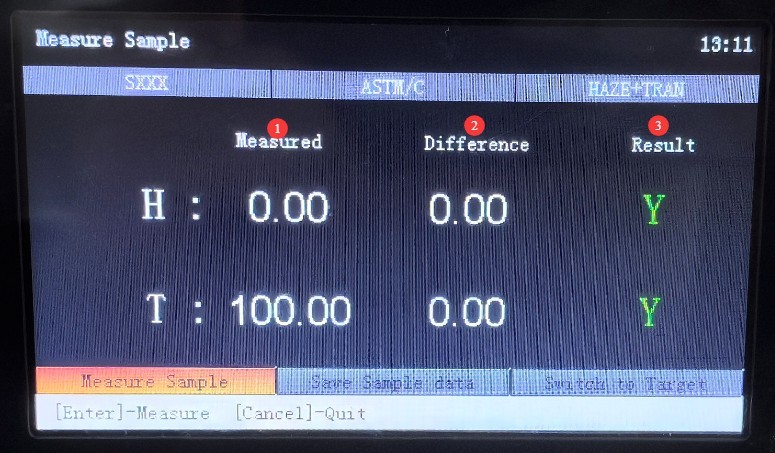
Figura 7
Use the up and down arrows to navigate to the option to save the reference sample measurement data, then use the confirm button and the up and down arrows to edit the sample name and save it.
3.3.3 Measurement of Other Reference Standards and Samples
Use the up and down arrows to select the standard sample, then press the Confirm button to return to the standard sample measurement screen. Repeat steps 3.3.1 and 3.3.2 to measure and save measurement data for other standard samples and test samples.
3.4 Overview of Other Features
3.4.1 Interfața principală
Press the Back button to return to the device’s main screen.
| Număr | notițe |
| ① | Measurement Interface, see 3.2 |
| ② | Data View: View and process saved reference standards and sample measurement data |
| ③ | Interfață de setări |
| ④ | USB Communication: When using computer software, make sure the USB connection is established. |
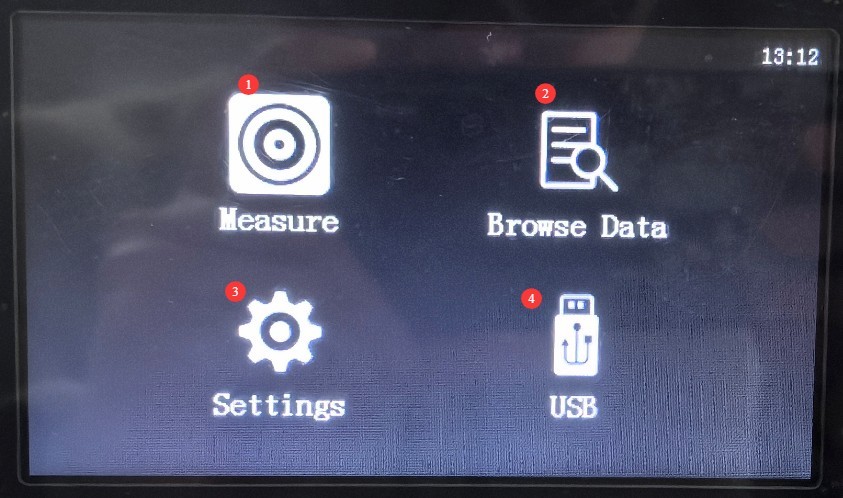
Figura 8
3.4.2 Interfață de setări
Use the up and down arrows to select the settings screen, then press the OK button.
| Număr | notițe |
| ① | Setări de măsurare |
| ② | Setarile sistemului |
| ③ | Calibration: You can run a calibration manually; the steps are the same as in Section 3.1. |
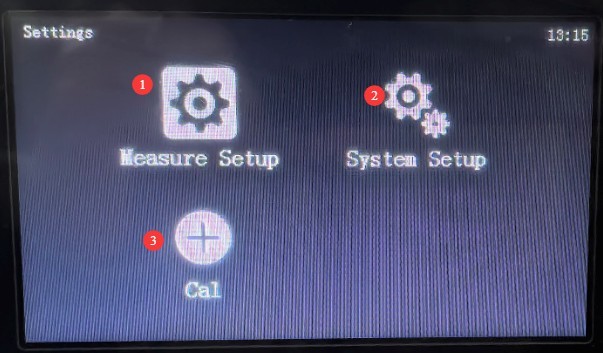
Figura 9
Measurement Settings Screen.
| Număr | notițe |
| ① | Measurement parameter settings: Choose one of the following three options—haze, transmittance, or haze + transmittance. The factory default is haze + transmittance. |
| ② | Light Source Settings: Choose either CIE-A or CIE-C; the factory default is CIE-C. |
| ③ | Measurement Mode Settings: Choose between Quick Mode and High-Precision Mode; the factory default is High-Precision Mode. |
| ④ | Tolerance setting: The factory default is 2. As stated in Section 3.3, a test result that differs from the reference standard by 2 or less is considered acceptable. |
| ⑤ | Average Count Setting: The factory default is 1. Increasing the average count will make the measurement results more accurate, but will also extend the measurement time. You can adjust this setting as needed. |
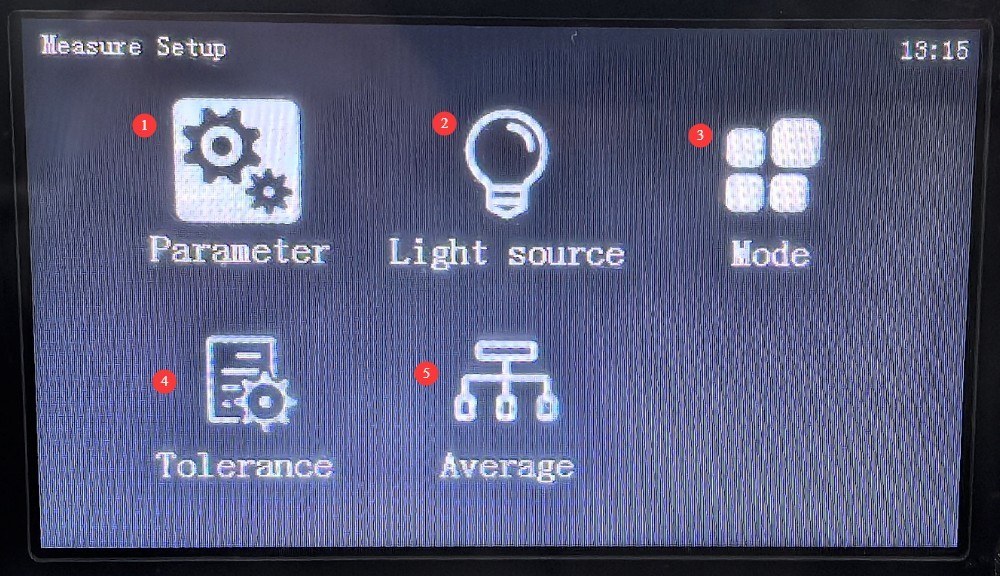
Figura 10
System Settings screen.
| Număr | notițe |
| ① | Display language selection: choose between English and Chinese; the factory default is English. |
| ② | Time Settings: The factory default is China Standard Time |
| ③ | Power Options: You can set the screen timeout. The factory default is 0, which means the screen will not turn off. |
| ④ | Restaurați setările din fabrică |
| ⑤ | Informații despre versiunea dispozitivului |
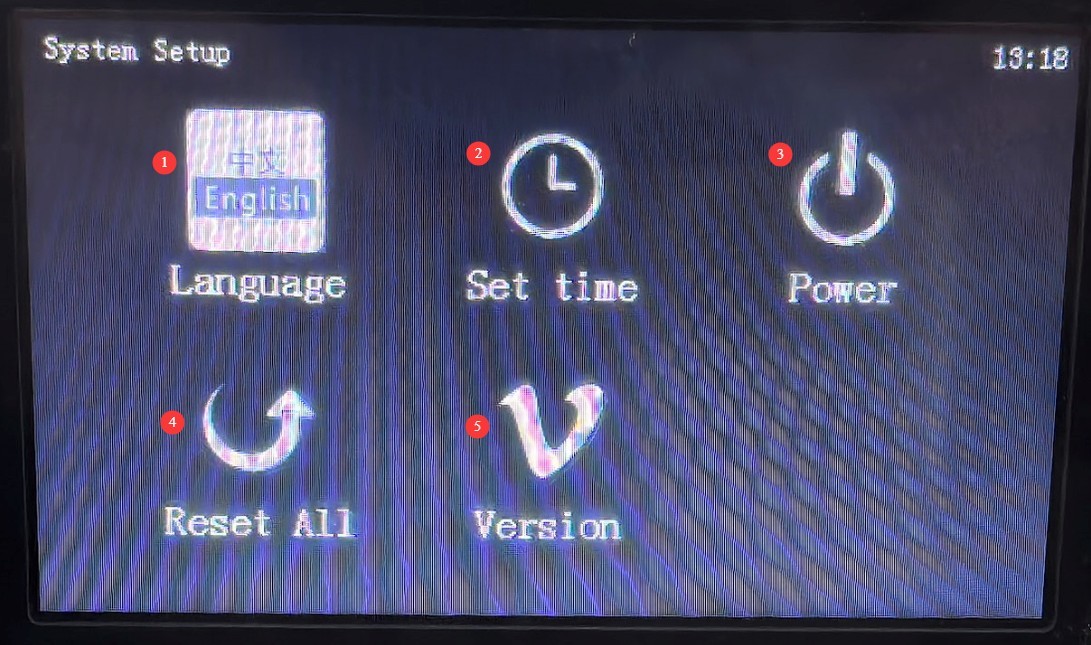
Figura 11
4. Operare software
4.1 Conectare și calibrare
Conectați HM-100 to your computer using the standard USB cable, turn it on, and follow the instructions in Section 3.4.1 to access the USB communication interface. Make sure the device’s display shows the following information.
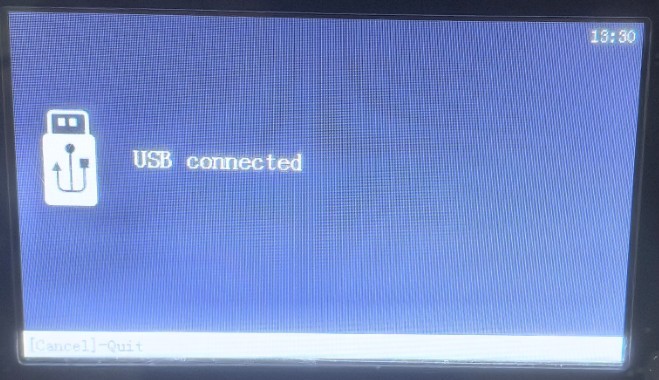
Figura 12
If you see a message stating that the USB is not connected, check the USB cable connection and try again after using a different USB port on your computer.
Install the software on your computer and open it; the software will automatically connect to the device. The first time you use the software, it will prompt you to calibrate it; simply follow the on-screen instructions to complete the calibration.
4.2 Introducere în interfața principală a software-ului
| Număr | notițe |
| ① | Standarde de măsurare |
| ② | Measuring Samples |
| ③ | Calibrarea |
| ④ | Setări de toleranță |
| ⑤ | The measurement results for the reference standards and samples show that |
| ⑥ | Print Measurement Report |
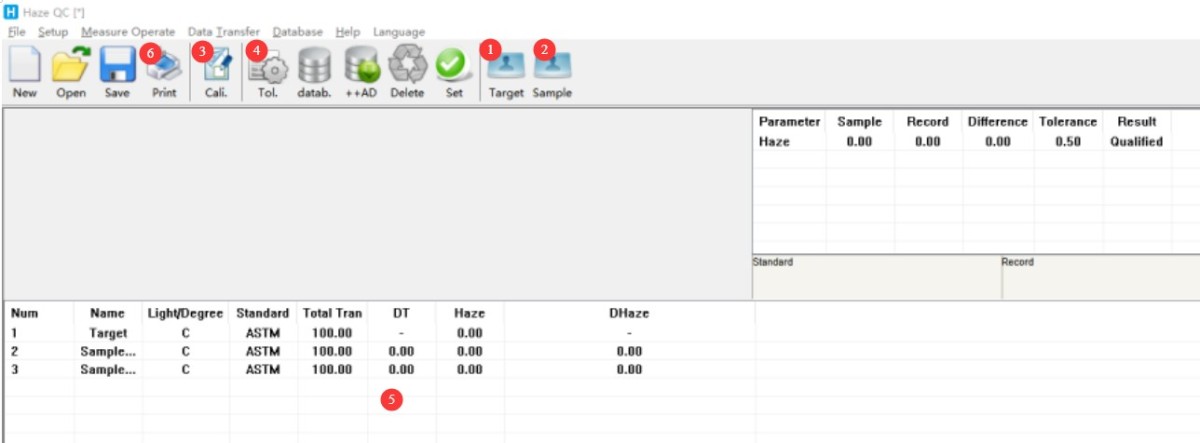
Figura 13
4.3 Overview of Other Key Features
| Număr | notițe |
| ① | Setări surse de lumină |
| ② | Print Options: You can configure the display parameters and order for printed reports, among other settings. |
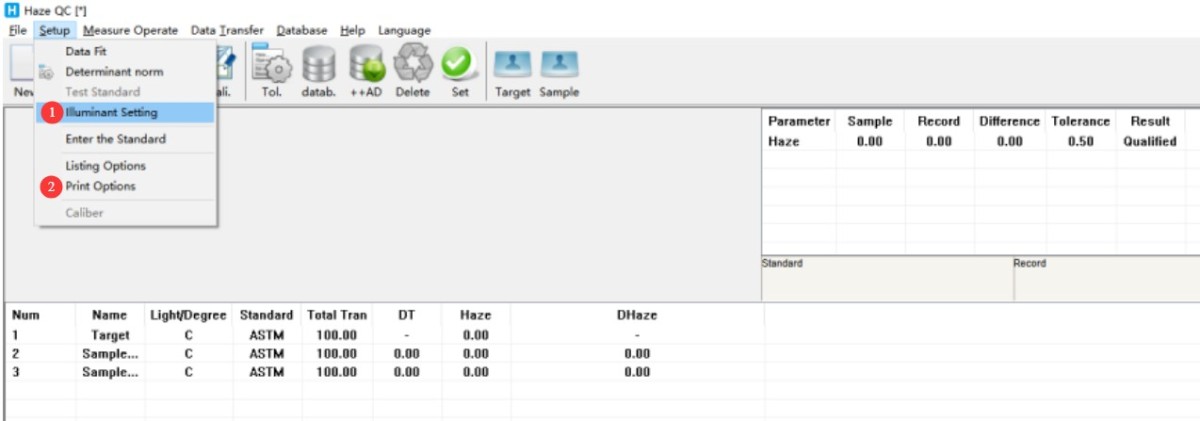
Figura 14
Print Settings: You can configure the measurement report title, sample name, operator, and more.
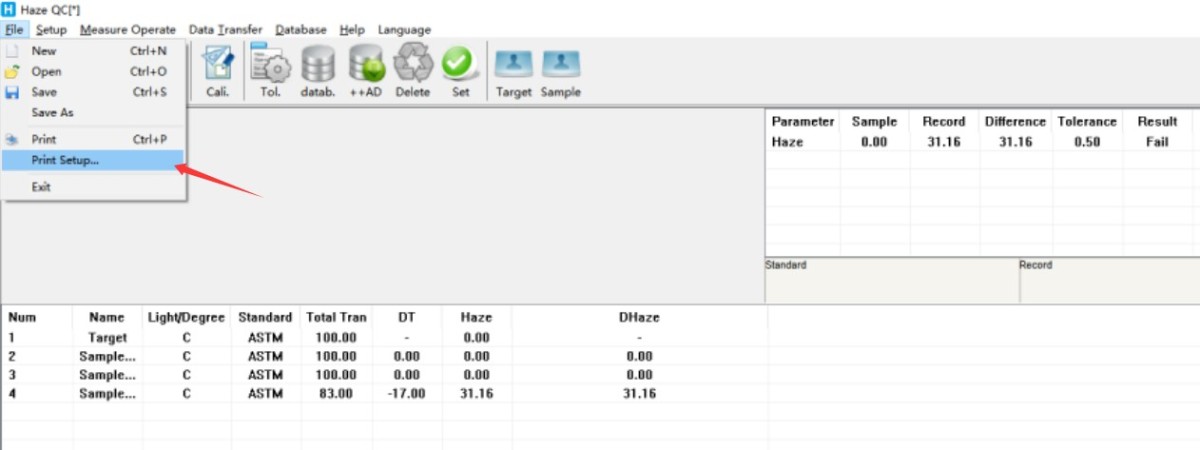
Figura 15
5. Întreținerea și îngrijirea zilnică a echipamentelor
5.1 Întreținerea de rutină
5.1.1 Protection of the Measurement Orifice
After completing the measurement, be sure to seal the measurement port with a dust cap to prevent dust from entering.
5.1.2 Curățarea și întreținerea
Unit Surface: Wipe off dust and stains from the unit’s surface with a clean, anti-static soft cloth. For stubborn stains, lightly wipe the area with a small amount of water. Do not use detergents or other corrosive liquids;
Display: Gently wipe the screen with a dedicated screen-cleaning cloth to avoid scratching it. If dust gets on the screen, gently brush it away with a lint-free brush.
5.2 Depozitare pe termen lung
When the equipment is not in use for an extended period, after completing routine maintenance, store it in a dry, well-ventilated environment to avoid moisture or direct sunlight;
Disconnect all cables, store the accessories separately, and cover the surface of the equipment with a dust-proof cloth;
Turn on the device for 30 minutes each month to prevent the internal electronic components from deteriorating.
6. Depanarea și rezolvarea problemelor comune
| Simptome de eroare | Cauze posibile | Procedură |
| Rezultate anormale ale măsurătorilor | Uncalibrated or abnormal calibration; abnormal reference sample measurement or selection; abnormal tolerance settings | Perform a calibration correctly; ensure the reference sample data is correct; reset the tolerances to appropriate levels. |