
 Engleză
 中文简体
中文简体 Русский
 Español
 Português
 Türkçe
 العربية
 Deutsch
 Polski
 Italiano
 Français
 한국어
한국어 ไทย
ไทย Tiếng Việt
 日本語
日本語





























Cutie de picurare
Manual de utilizare
Aplicabil LISUN modele: JL-12
1. Despachetarea și familiarizarea de bază cu echipamentul
1.1 Specificații tehnice cheie
| parametrii | notițe |
| Measurable Water Resistance Levels | IPX1 și IPX2 |
| Drip Tray Dimensions | 800 × 800 × 45 mm (L × L × H) |
| Drip Hole Diameter | 0.4 mm |
| Drip Hole Spacing | 20 mm |
| Maximum Load Capacity of the Turntable | 50 kg |
Note: The drip tray and test turntable can be customized based on the maximum dimensions and weight of the test object.
Echipamentul respectă cerințele de testare pentru IPX1 și IPX2 specificate în GB/T 4208-2017, Secțiunile 14.2.1–14.2.2 și Figura 3.
1.2 Despachetarea și verificarea conținutului
1.2.1 Despachetare și inspecție vizuală
Când despachetați dispozitivul, manipulați-l cu grijă pentru a evita zgârierea carcasei cu unelte ascuțite. După despachetare, inspectați mai întâi exteriorul dispozitivului pentru a vă asigura că nu există deformări sau lovituri vizibile și că butoanele nu sunt deteriorate sau slăbite. Dacă observați anomalii la dispozitiv sau la accesoriile sale, nu îl porniți. Vă rugăm să ne contactați imediat.
1.2.2 Unitatea principală și accesoriile
Componentele principale:
| Nu. | notițe |
| ① Drip tray | Includes a lifting motor, drip tray, etc. |
| ② Control Cabinet | Includes electrical cabinets, touchscreens, etc. |
| ③ Turntable | Mount the sample; it will rotate automatically during testing. |
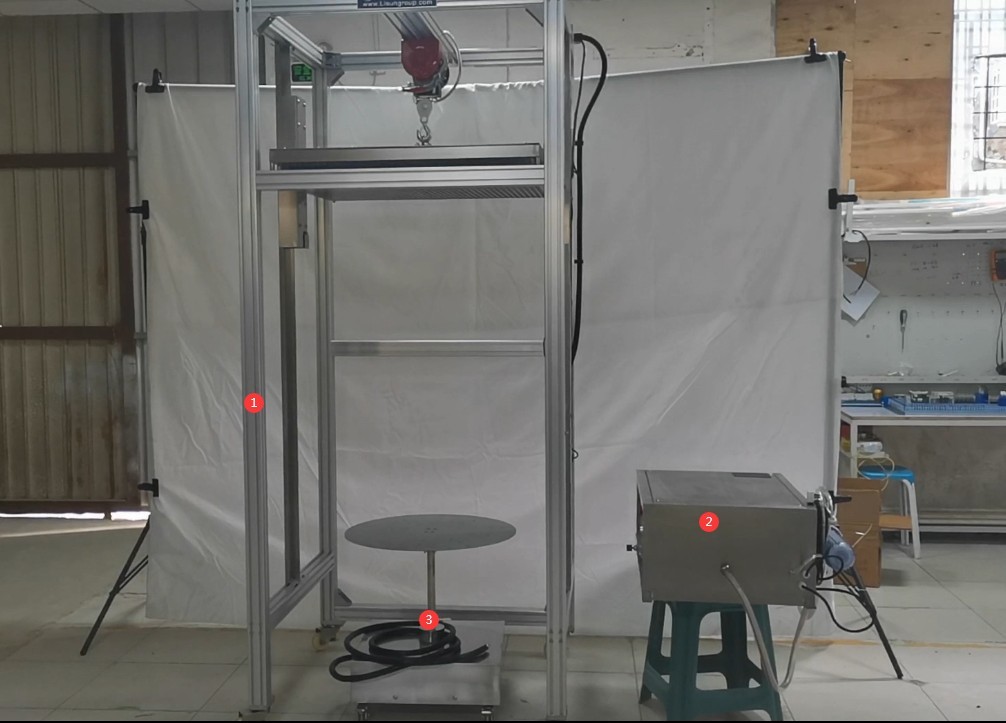
Figura 1
Other Major Components:
| Nu. | notițe |
| ① Waterproof outlets and plugs | Used to connect the turntable to the sample during electrical testing |
| ② Straps | Can be used to secure samples |
| ③ Spare copper nozzle | Used to connect the drip tray to the needle; the drip tray already has enough copper fittings, so this is a spare. |
| ④ Spare needles | There are already enough needles on the drip tray; these are spares. |
| ⑤ Hex key | For use when installing control cabinets |
| ⑥ Needle Passing | Dacă acul se înfundă, folosiți acest instrument pentru a-l curăța. |
| ⑦ Filter Wrench | Utilizați la înlocuirea cartușului filtrului |
| ⑧ Spare Filter Cartridge | Unitatea este deja echipată cu un cartuș filtrant; acesta este de rezervă. |
| ⑨ Inlet Pipe | Used to connect the water supply to the control cabinet of the Drip Box |
| ⑩ Outlet Pipe | Used to connect the control cabinet to the drip tray |
| ⑪ Clamp | Secure the hoses when installing the inlet and outlet hoses |
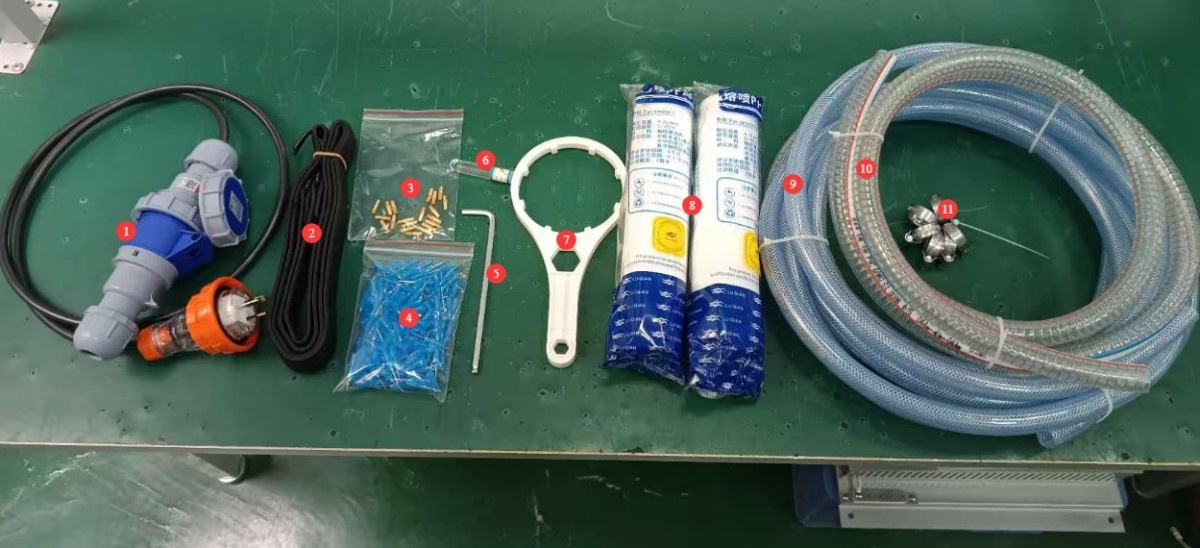
Figura 2
Linkurile de descărcare pentru manualul de utilizare electronic, software, cardul de garanție și alte materiale au fost trimise prin e-mail. Vă rugăm să le descărcați cât mai curând posibil. Dacă ați pierdut e-mailul, vă rugăm să ne contactați pentru a solicita din nou linkurile de descărcare.
2. Măsuri de siguranță
2.1 Siguranța electrică
2.1.1 Specificații de conectare la alimentare
Pe baza plăcuței de identificare, conectați camera de testare la sursa de alimentare corectă, de obicei 220 V, 50 Hz (60 Hz disponibil la cerere) și asigurați-vă că tensiunea și frecvența sunt corecte. Vă rugăm să utilizați un circuit dedicat pentru a evita partajarea circuitului cu alte echipamente de mare putere. Verificați dacă toate conexiunile sunt sigure și nu sunt slăbite.
2.1.2 Cerințe de împământare
The test chamber must be reliably grounded, with a grounding resistance of ≤4 Ω. Do not use gas pipes, non-metallic water pipes, or the neutral wire as a substitute for the grounding wire. After grounding is complete, use a Grounding Resistance Tester to measure the ground resistance. Power may only be applied after confirming that the resistance meets the requirements to prevent electric shock, test chamber malfunctions, or measurement errors caused by poor grounding.
2.1.3 Contraindicații pentru funcționarea electrică
Before wiring, servicing, or maintaining the test chamber, you must disconnect the main power supply and confirm that there is no residual voltage before proceeding;
Nu acționați întrerupătorul de alimentare, ecranul tactil sau butoanele instrumentului din camera de testare cu mâinile ude pentru a evita riscul de electrocutare;
Nu așezați obiecte străine (cum ar fi unelte sau hârtie) în interiorul tabloului de comandă electric pentru a preveni ca praful sau obiectele străine să provoace scurtcircuite sau să deterioreze componentele;
Do not plug in or unplug power cords or signal cables while the test chamber is running, to prevent short circuits that could damage the controller or electrical components.
2.2 Siguranța operațională
When the drip tray is being raised or lowered, do not touch the drip tray, the lifting motor, the steel cables, or any other parts to avoid danger;
During testing, entry into the test area is prohibited, and touching the turntable or samples is prohibited. If maintenance is required, testing must be stopped, and the power and water supply must be shut off before proceeding;
If the test chamber malfunctions, non-professionals are prohibited from disassembling or repairing it; contact LISUN Customer Service or operate the equipment under the guidance of a technician.
2.3 Siguranța mediului
The distance between the drip tray and the wall, as well as surrounding equipment (such as other test equipment and shelves), shall be at least 1500 mm to facilitate operation and maintenance;
The drip rack must be placed on a sturdy, level surface. Use a level to ensure it is level, making sure the bubble in the level is centered. If the unit is tilted, it may cause the drip tray to jam when raising or lowering it, result in uneven dripping, or even damage the equipment. Note: The legs of the drip rack are adjustable to ensure the unit is level.
2.4 Altele
Pentru aspectele care nu sunt acoperite de acest manual, vă rugăm să procedați cu prudență sau să ne contactați.
3. Equipment Assembly and Startup
3.1 Installing the Control Cabinet
There are four pre-drilled screw holes and four screws on the side of the drip tray; simply mount the control cabinet in the corresponding position.
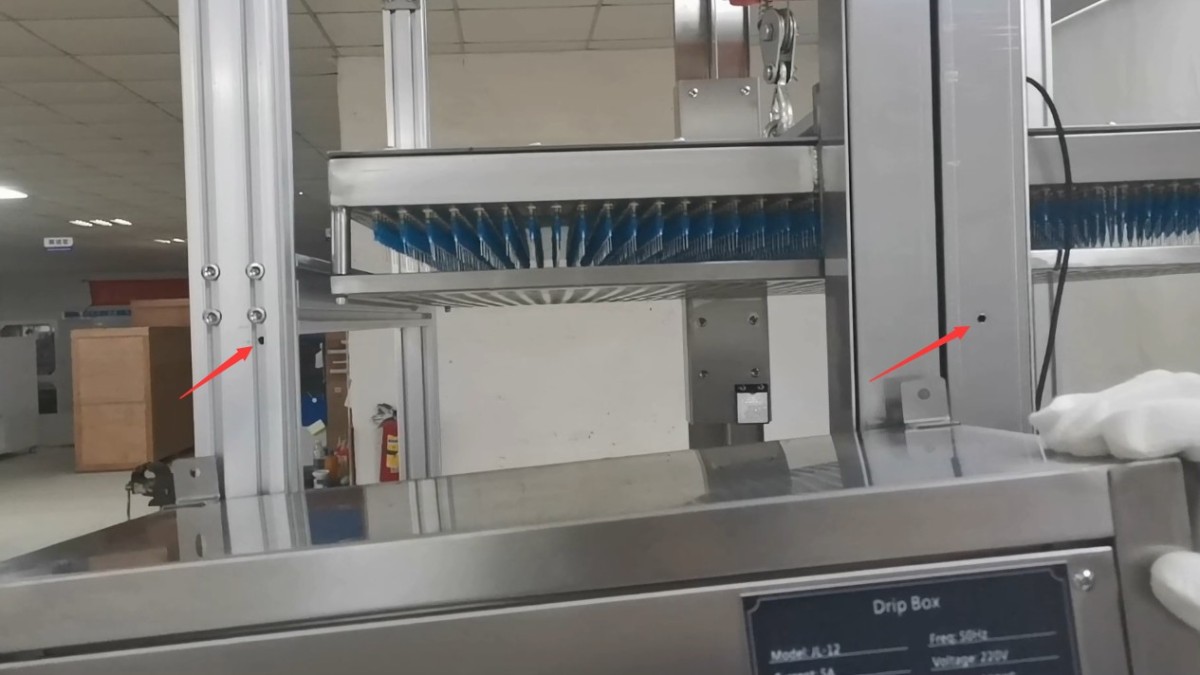
Figura 3
3.2 Conexiuni prin cablu
| Nu. | notițe |
| ① | Connect the turntable’s cable to the control cabinet |
| ② | Connect the cable from the lifting motor at the top of the drip rack to the control cabinet |
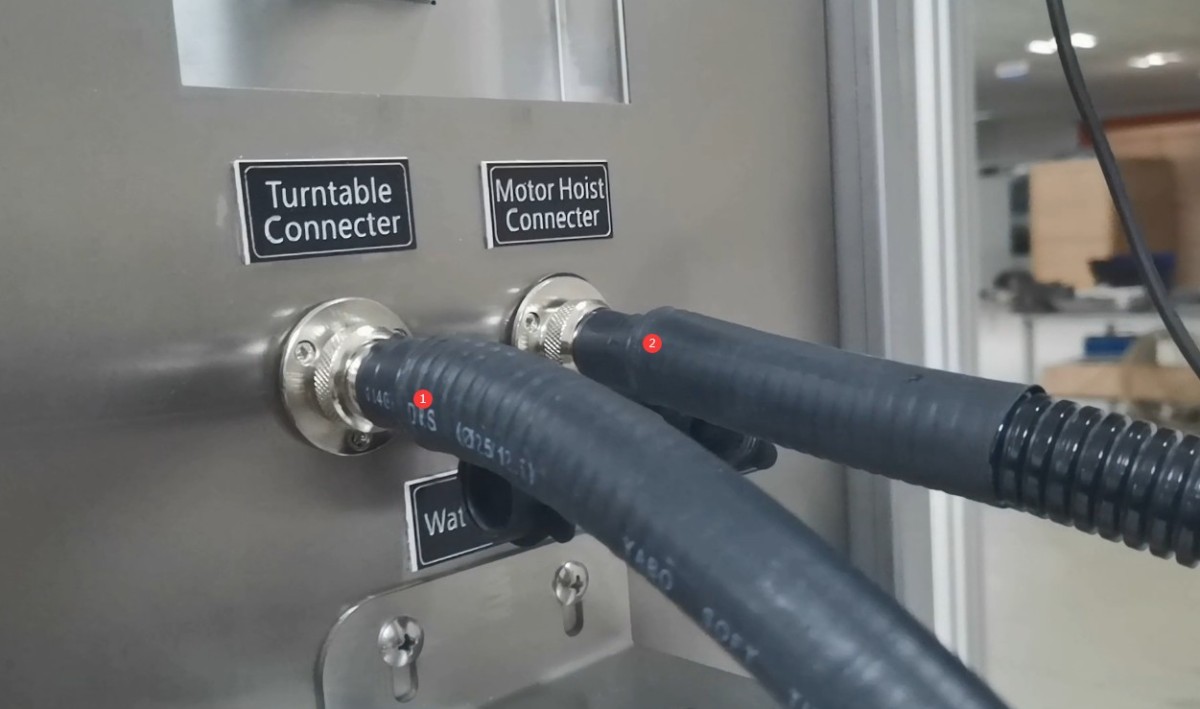
Figura 4
3.3 Air Compressor Connection (if applicable)
Air line connections at the bottom of the control cabinet. If your company has an air compressor, you can connect this hose to the air compressor (supply pressure: 0.3–0.8 MPa). After testing is complete, you can use the air compressor to remove any residual water from the drip tray.
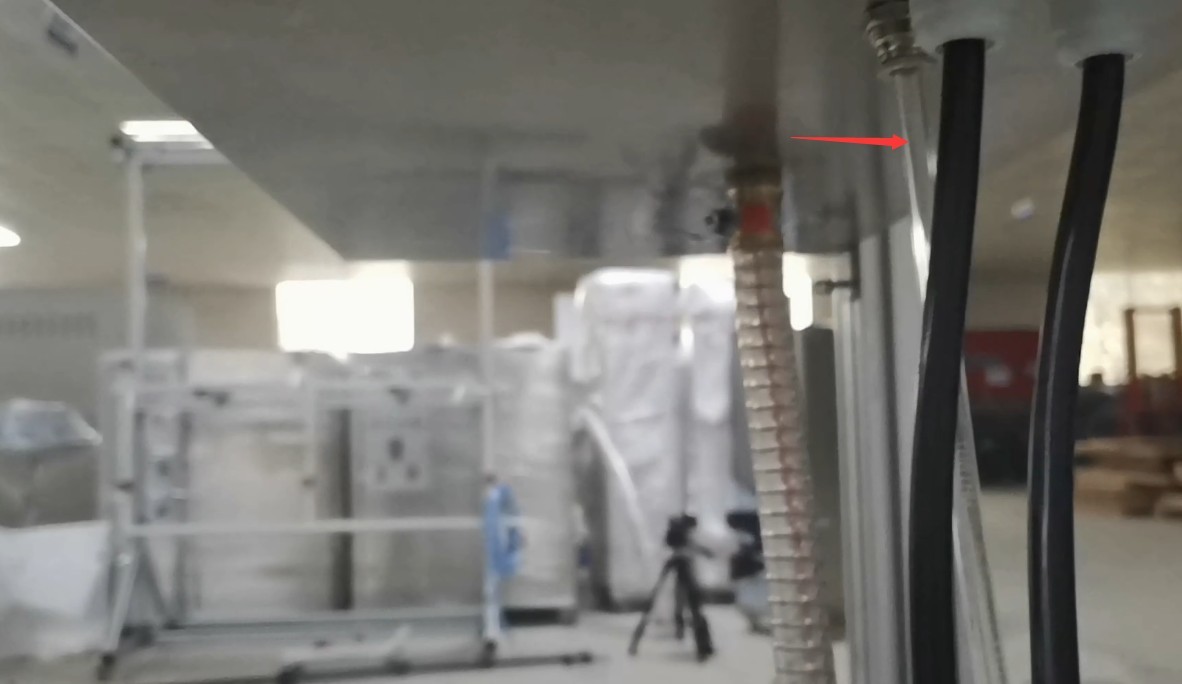
Figura 5
Note: Not connecting the air compressor does not affect the equipment’s foundation drip test function.
3.4 Conexiuni la conductele de apă
3.4.1 Inlet Pipe Connection
Simply connect the filter’s inlet to a faucet. The IPX1 and IPX2 water resistance tests do not require a water pump; normal faucet water pressure is sufficient.
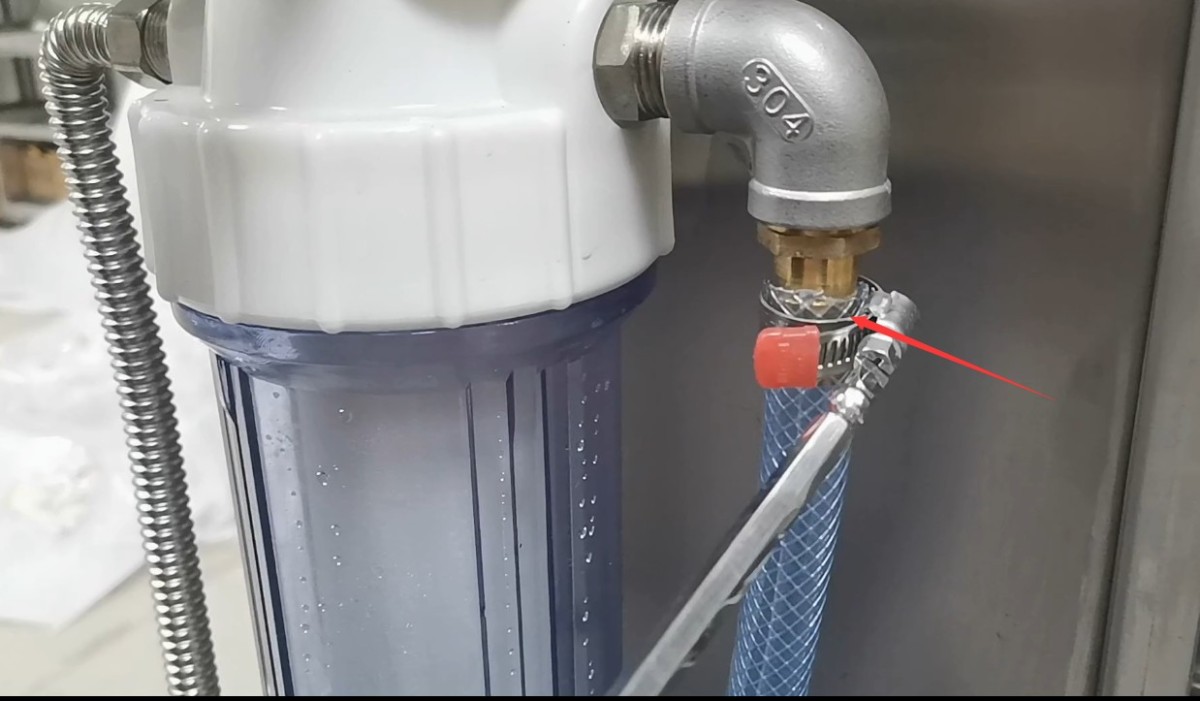
Figura 6
Note 1: The water inlet faucet may remain open. Once the equipment is started, the program uses a solenoid valve to control whether water is fed into the drip tray. At the end of the day’s testing, simply close the water inlet faucet.
Note 2: We recommend using deionized water or purified water (a water purifier may be used); if tap water containing high levels of minerals and impurities is used, it may cause scale buildup, which can affect the test water flow rate and may require frequent filter replacement and needle cleaning.
3.4.2 Outlet Pipe Connection
Connect the control cabinet’s outlet pipe to the connection point above the drip tray.
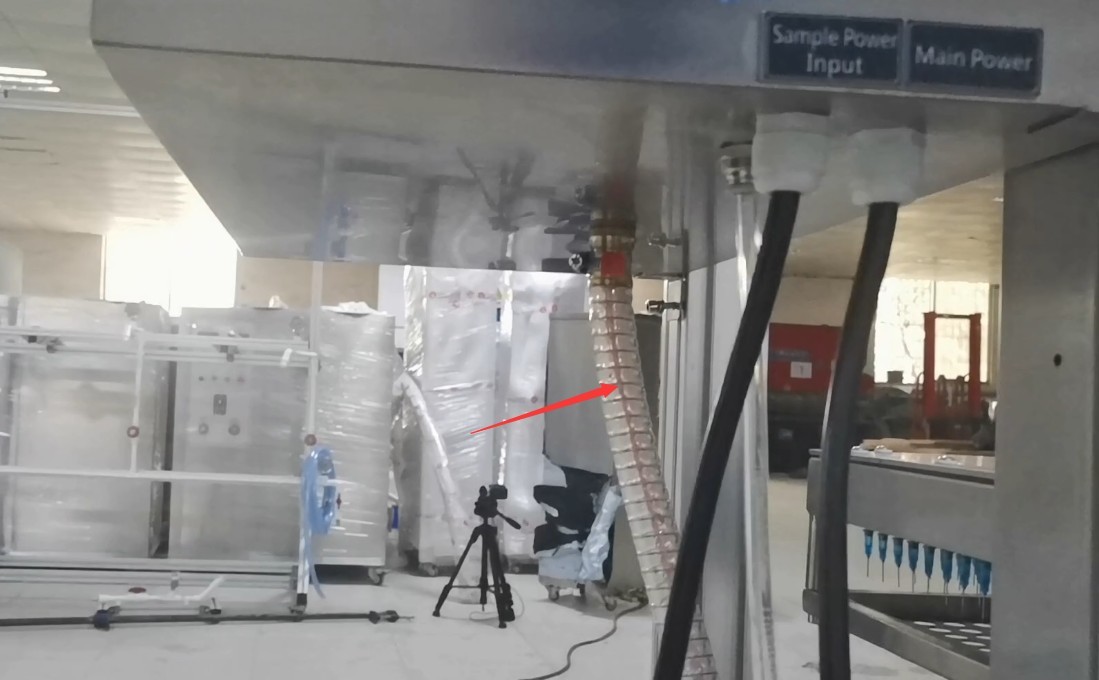
Figura 7
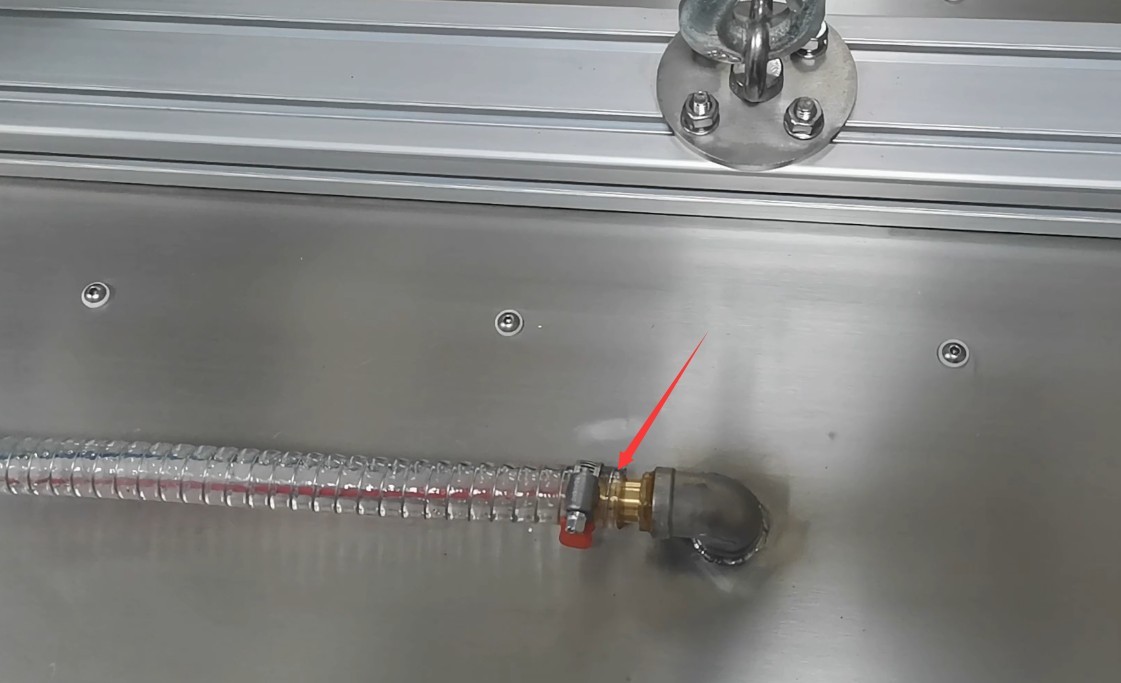
Figura 8
Note: If the drip tray is too high to connect easily, refer to Section 4.1.3 to lower the drip tray before connecting the drain pipe.
3.5 Conectarea cablului de alimentare
| Nu. | notițe |
| ① Sample power cord | Please connect the sample to an appropriate power source. Note: Abnormal conditions, such as short circuits, may occur in the sample during testing; you may connect an external ground-fault circuit interrupter here. |
| ② Main Power Supply for the Equipment | Please connect the device to the appropriate power source according to the information on the nameplate. |
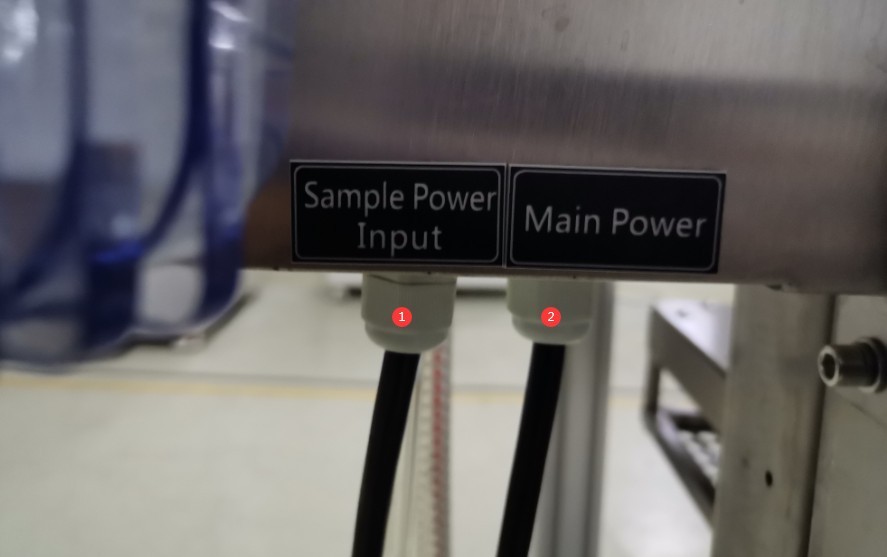
Figura 9
Once everything is assembled, it will look like the image below.
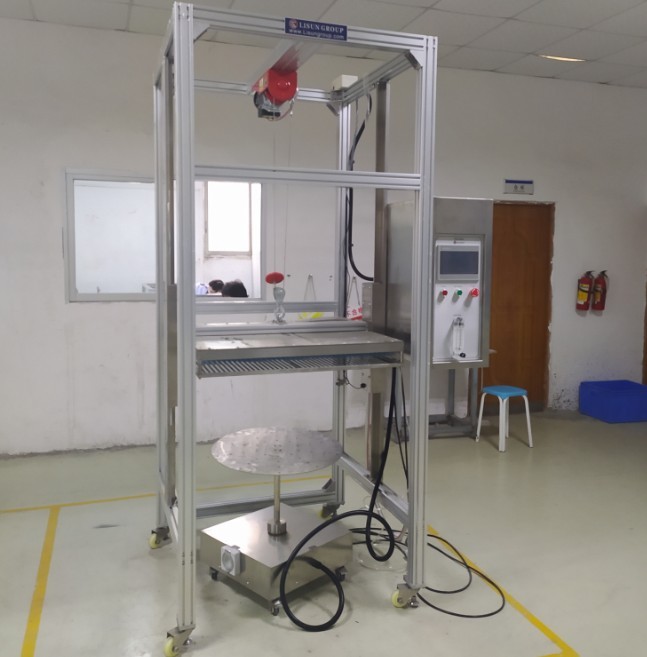
Figura 12
After verifying that all connections are correct, turn on the device.
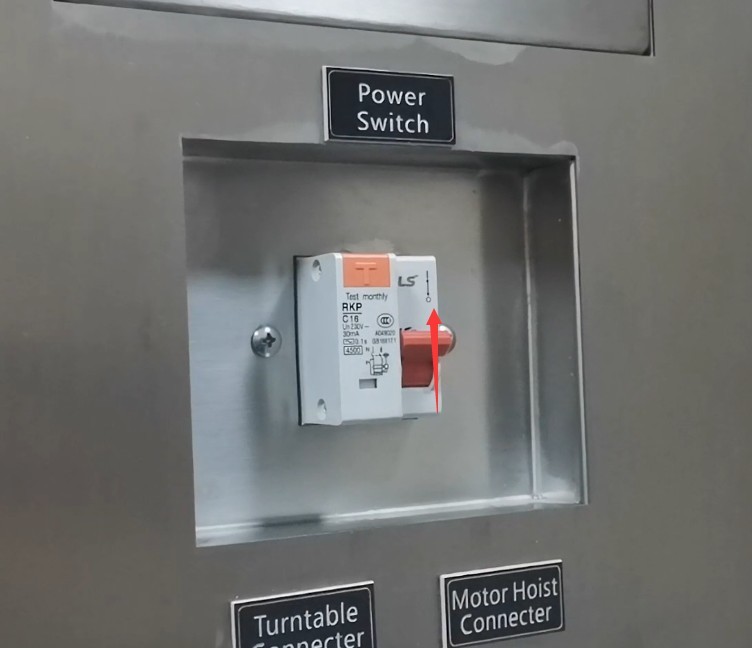
Figura 10
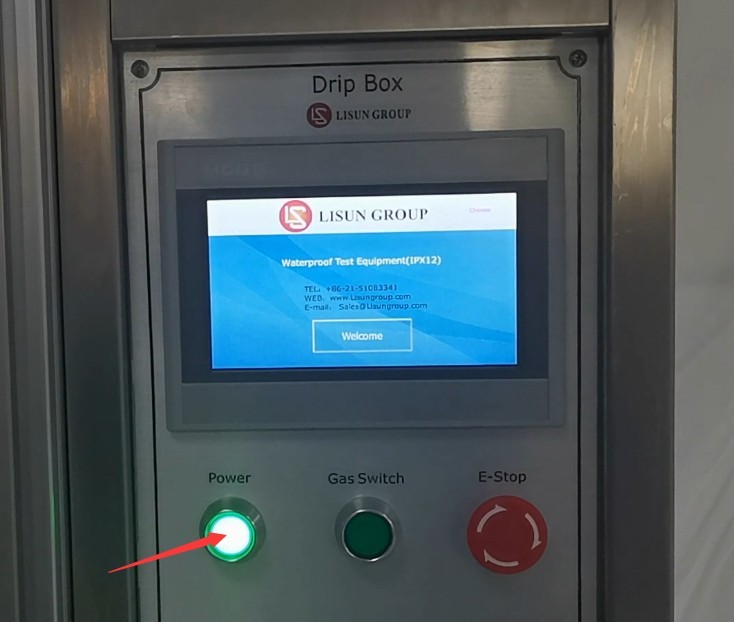
Figura 11
4. Introducere în programul cu ecran tactil
4.1 Componentele interfeței principale a programului
4.1.1 Interfața utilizator
| Nu. | notițe |
| ① Clasă de rezistență la apă: IPX1 | După selectare, puteți configura parametrii testului IPX1 și puteți efectua testul de picurare a apei IPX1. |
| ② Clasă de rezistență la apă: IPX2 | După selectare, puteți configura parametrii testului IPX2 și puteți efectua testul de picurare a apei IPX2. |
| ③ Test Parameters | Faceți clic pentru a accesa ecranul de setări ale parametrilor de testare |
| ④ Factory Settings | Când echipamentul funcționează normal, nu este nevoie să intrați în modul de depanare. Dacă parametrii de testare ai echipamentului sunt anormali, puteți intra în modul de depanare. Este necesară o parolă; vă rugăm să ne contactați. |
| ⑤ Manual Window | Înainte de testul oficial, puteți verifica dacă toate funcțiile dispozitivului funcționează corect în fereastra manualului. |
| ⑥ The drip tray rises | Press to raise the drip tray for easy sample installation. The drip tray is equipped with a limit stop and will rise no higher than the upper limit stop. |
| ⑦ The drip tray lowers | Press this button to lower the drip tray. The drip tray is equipped with an infrared sensor and will automatically lower to a position 200 mm from the sample to meet the test height required by the standard. |
| ⑧ Sample Power Supply | Alimentarea probei poate fi pornită sau oprită. Când alimentarea probei este pornită pentru testare, programul va alimenta automat proba în funcție de timpii de pornire/oprire a probei setați în interfața de setări a parametrilor. |
| ⑨ Ștergeți și resetați | Înainte de a începe un test, faceți clic aici pentru a șterge datele din testul anterior. |
| ⑩ Începerea experimentului | Click to start the water droplet test |
| ⑪ Testul a fost oprit | Faceți clic pentru a opri testul de picurare |
| ⑫ Afișajul duratei testului | Afișează durata curentă a testului |
| ⑬ Afișaj standard al debitului | Displays the required standard water flow rate under the current standard |
| ⑭ Sample Exposure Time | Afișează durata curentă de pornire pentru eșantion |
| ⑮ Sample power-off time | Display the duration of power interruption for the current sample |
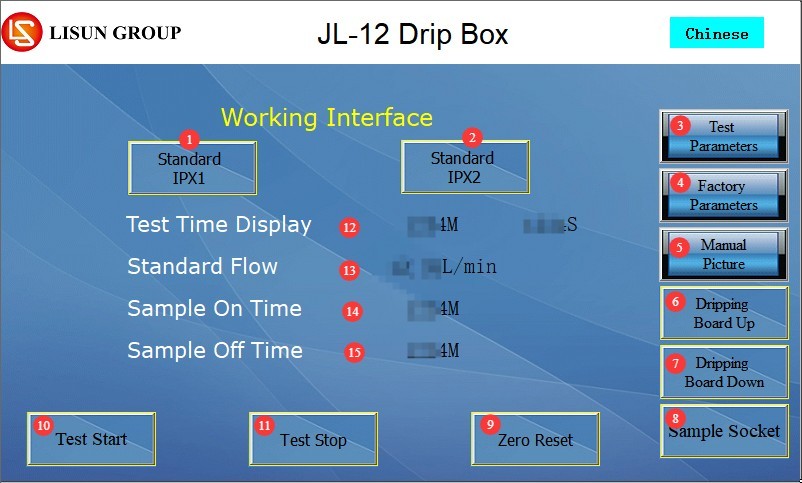
Figura 15
4.1.2 Interfața de setări a parametrilor
| Nu. | notițe |
| ① Durata testului | Durata totală a testului poate fi setată; standardul GB/T 4208-2017 specifică faptul că durata testului atât pentru IPX1, cât și pentru IPX2 este de 10 minute. |
| ② Viteza platanului | Only IPX1 can be configured; the standard is 1 r/min, with a customizable range of 0–5 r/min. IPX2 cannot be configured; rotation during testing is performed automatically according to the standard. Notă: În timpul testării IPX1, pentru probele care necesită alimentare cu energie electrică, platanul rotativ se va roti automat în ambele direcții pentru a preveni încurcarea cablului de alimentare al probei. |
| ③ Momentul în care proba este energizată | Set the duration of continuous power supply to the sample during the test, in minutes |
| ④ Time the sample is without power | Set the duration of the power outage for the sample during the test, in minutes |
| ⑤ Turntable Interval Time | Applies to IPX2. According to the standard, set the duration to 150 seconds, which means 2.5 minutes per angle, for a total of 10 minutes across all four angles. |
| ⑥ Înapoi | Faceți clic pentru a reveni la interfața de lucru |
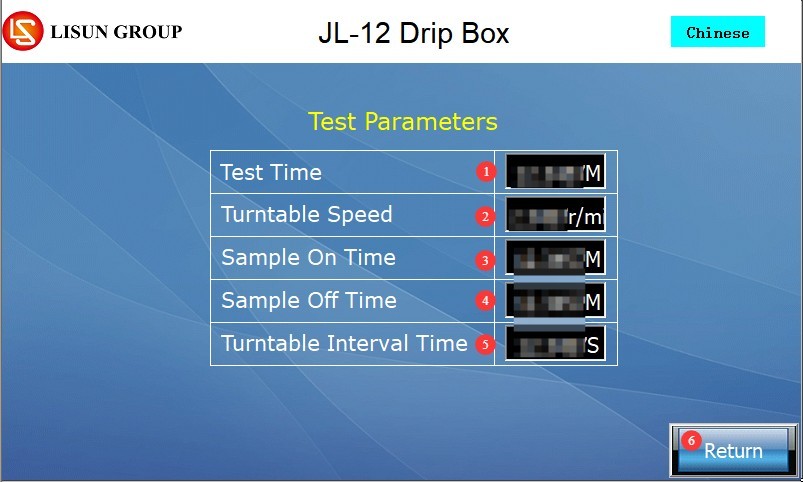
Figura 16
Notă: Alimentare continuă: Timp de pornire = durata testului; timp de oprire = 0 min; Fără alimentare: Timp de pornire = 0 min; timp de oprire = durata testului.
4.1.3 Fereastra Manuală
| Nu. | notițe |
| ① Drip Solenoid Valve | The water inlet solenoid valve can be turned on or off; once turned on, water begins to flow into the drip tray at the flow rate set by the flow meter. |
| ② Sursă de alimentare pentru mostre | Dacă sursa de alimentare a eșantionului și eșantionul sunt conectate, puteți porni sau opri sursa de alimentare a eșantionului. |
| ③ The drip tray rises | Click to raise or lower the drip tray; release to stop. |
| ④ The drip tray lowers | |
| ⑤ Platoul rotativ se rotește în sensul acelor de ceasornic | Click to rotate the turntable clockwise or counterclockwise; release to stop. Note: If there are wires between the turntable and the sample, do not rotate in one direction for an extended period to avoid tangling the wires. |
| ⑥ Inversarea platanului rotativ | |
| ⑦Înapoi | Faceți clic pentru a reveni la interfața de lucru |
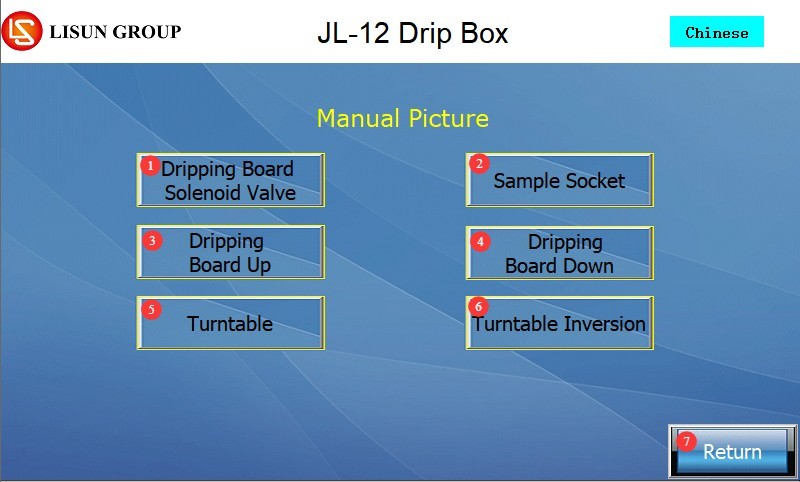
Figura 17
4.2 Descrierea interfeței de alarmă a programului
Oprirea de urgență nu a fost resetată. Rotiți butonul de oprire de urgență în sensul acelor de ceasornic pentru a o reseta, apoi încercați din nou.
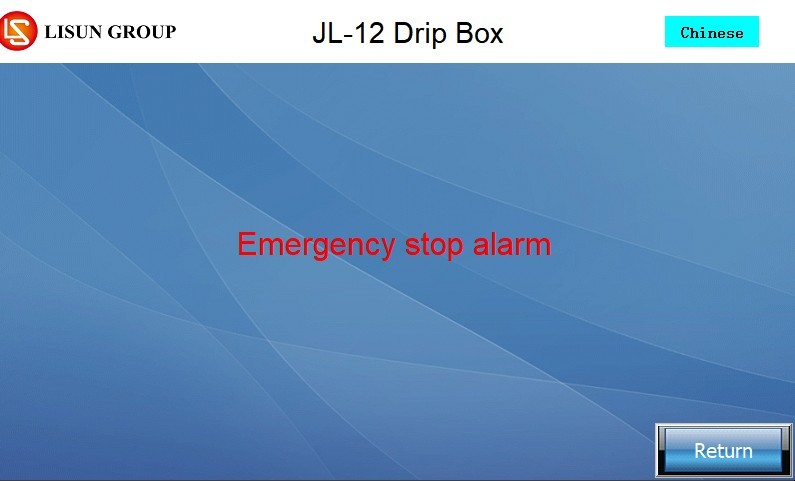
Figura 18
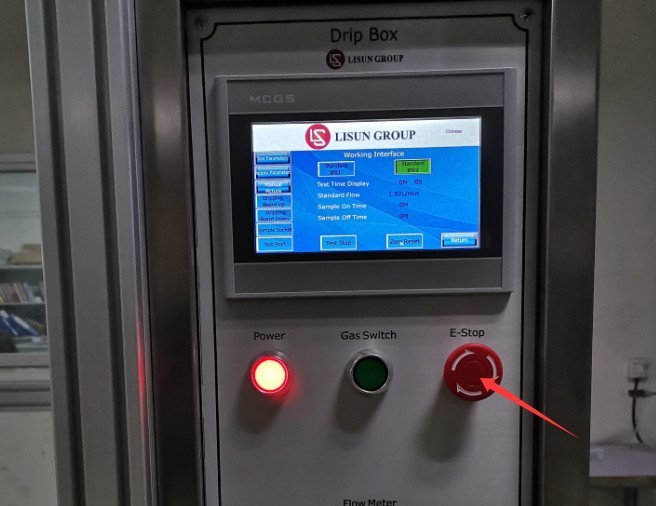
Figura 18.1
The water droplet test is complete. Click “Back” to continue.
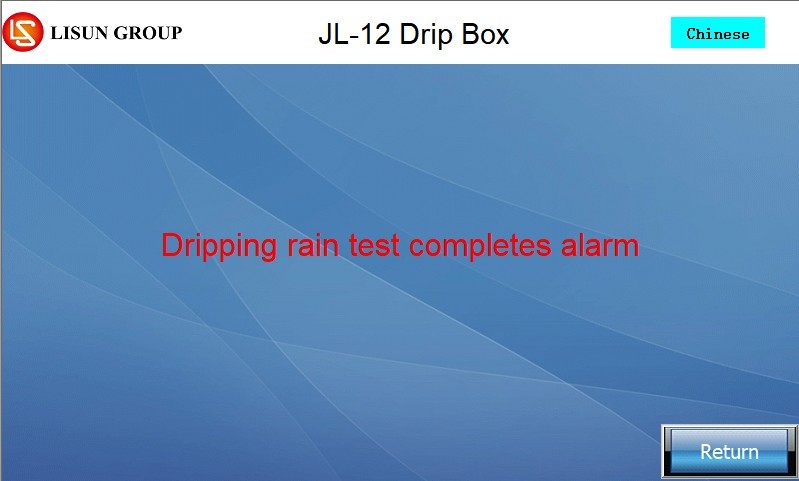
Figura 19
No water resistance rating has been selected. Please click “Back,” select the water resistance rating you want to test, and try again.
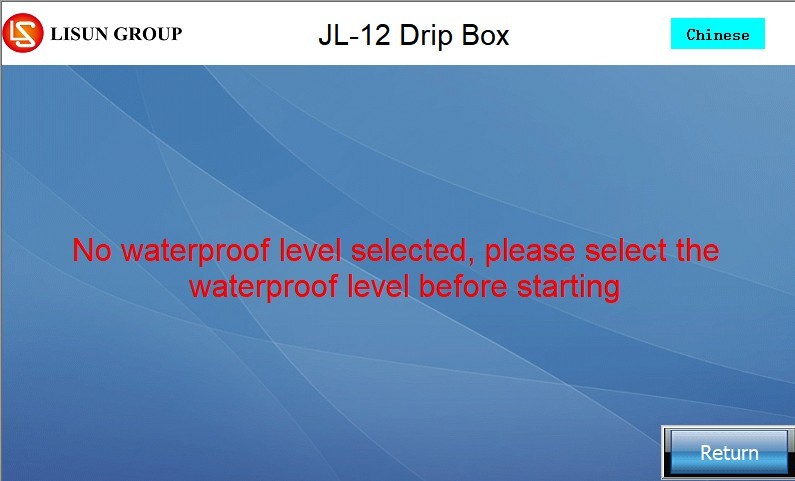
Figura 20
Timpul testului nu a fost resetat. Vă rugăm să faceți clic pe „Înapoi”, apoi pe „Resetare” pentru a șterge datele din testul anterior și a încerca din nou.
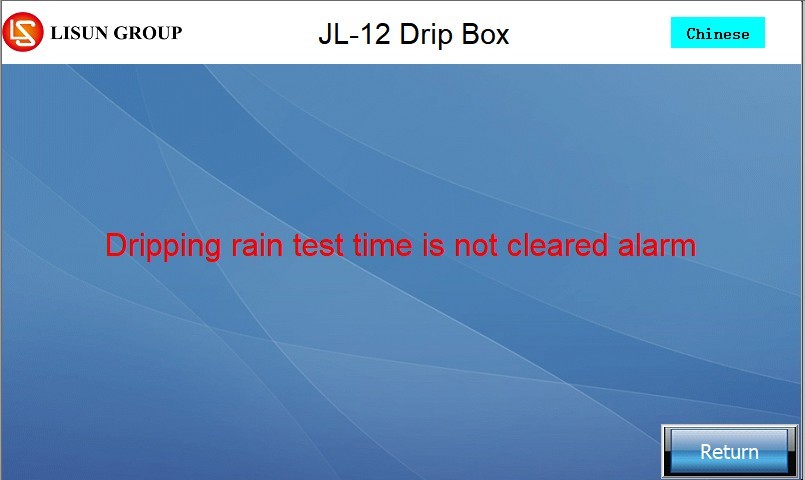
Figura 21
5. Water Drop Test Procedure
5.1 Gata
5.1.1 Test Parameter Requirements
| Rezistența la apă | IPX1 (Vertical Water Drops) | IPX2 (dripping water at a 15° angle) |
| Metode de testare | Place the specimen on the turntable with its axis 100 mm from the turntable’s axis. Note: Please manually install and secure the specimen to the turntable. | The specimen is tilted 15° at each of the four fixed positions. Note: The turntable must be manually tilted 15° and secured. |
| Durata testului | Total: 10 min | Total duration: 10 minutes (2.5 minutes per position). During the test, the turntable automatically rotates to the four positions specified in the standard and performs the test without requiring manual intervention. |
| Turntable Requirements | Rotation speed: 1 r/min, continuous rotation | No rotation, fixed position |
| Precipitații | 1–1.5 mm/min | 3–3.5 mm/min |
| Since drip plates come in a variety of sizes, the standard setting is a flow meter (L/min) rather than a rainfall gauge (mm/min). Before the equipment leaves the factory, we have already converted the rainfall rate into water flow based on the drip plate size and displayed it in the working interface. When conducting your tests, simply adjust the flow meter to the correct flow rate indicated on the screen. | ||
Note 1: How to tilt the turntable 15°.
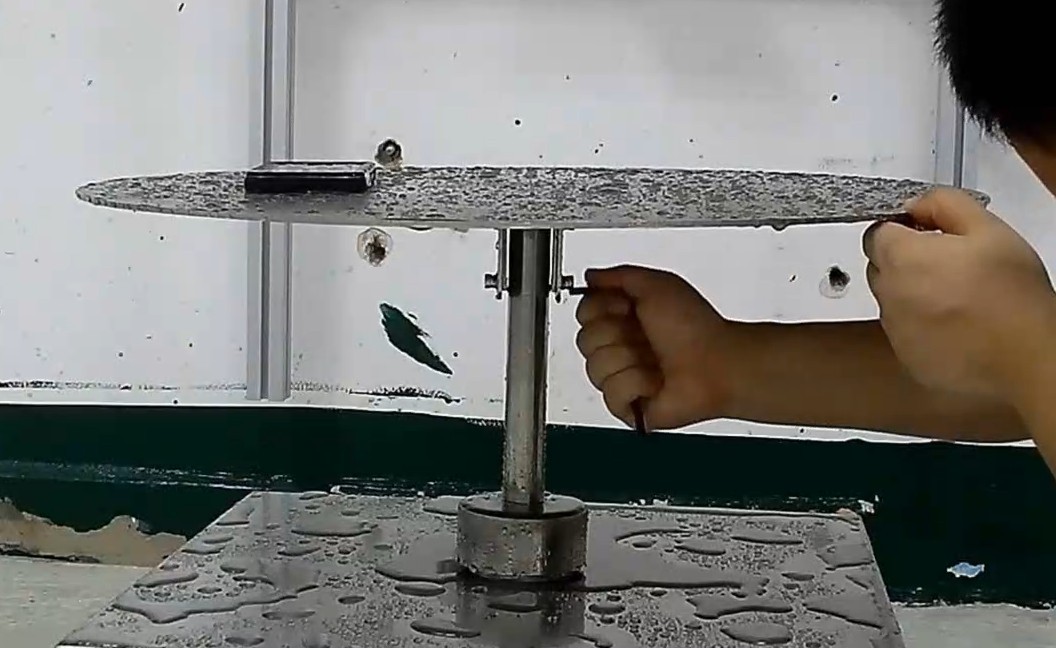
Figura 22
Note 2: Formula for converting water flow rate to rainfall: Water flow rate (L/min) = Rainfall (mm/min) × 0.001 × Rainfall area (m²) × 1000 (1 millimeter = 0.001 meter; 1 cubic meter = 1000 liters)
5.1.2 Connecting the Sample Power Cord
If the sample requires testing under power, use the standard waterproof plug and socket to make the connection, and check that the connection is secure and free of looseness.
| Nu. | notițe |
| ① | Connect the sample power cord to the waterproof plug labeled ④, then ensure the waterproof plug remains inserted into the waterproof socket. |
| ② | Connect the power cord of the waterproof plug and receptacle to power outlet ③ on the turntable. |
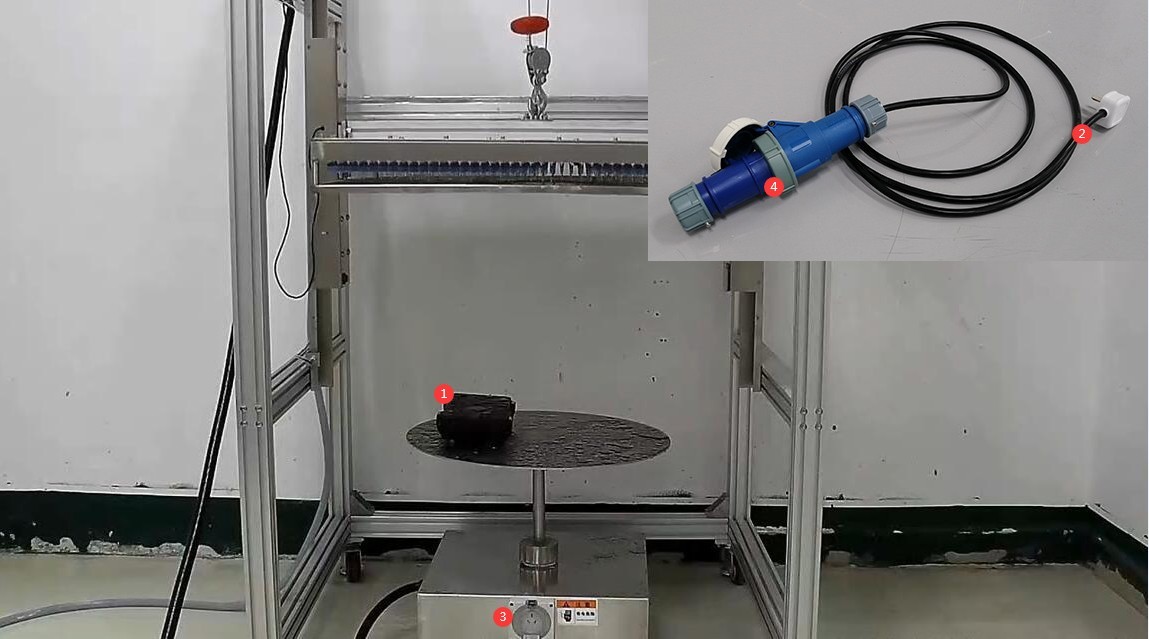
Figura 23
5.2 Test de pornire
5.2.1 Selection of Levels and Parameters
On the main touchscreen interface, tap the IPX1 or IPX2 water resistance rating selection button, and the program will automatically apply the standard parameters; tap the “Test Parameters” button to confirm that all test parameters meet the standard requirements, and then tap “Back” once the settings are complete.
5.2.2 Adjusting the Drip Tray Position
Click the “Lower Drip Tray” button on the work interface; the drip tray will lower automatically until it hits the limit switch and stops. At this point, the distance between the drip tray and the top of the sample is 200 mm (as required by the standard), and no manual adjustment is necessary.
5.2.3 Water Flow Regulation
Make sure the tap at the water inlet is turned on, then click “Start Test” to open the inlet solenoid valve. Tap water will slowly flow into the water circuit until water begins to drip from the needle on the drip tray;
Observe the standard flow rate display area on the touchscreen interface. Assuming a standard drip tray size of 800 × 800 mm, the standard water flow rate for IPX1 should be 0.64 L to 0.96 L/min, and the standard water flow rate for IPX2 should be 1.92 L to 2.24 L/min;
Turn the black knob on the flow meter in the control cabinet (turn counterclockwise to increase flow, clockwise to decrease flow). Observe the top surface of the float inside the flow meter; the water flow should remain stable within the standard range. Once adjustment is complete, keep the knob in that position.
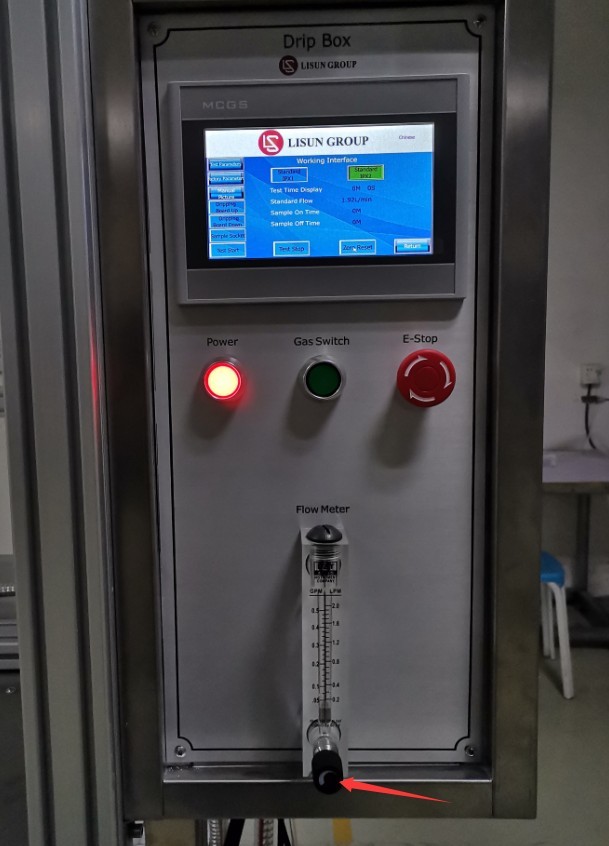
Figura 24
5.3 Monitorizarea procesului de testare
Real-time monitoring during the test: The IPX1 turntable speed is maintained at 1 r/min; for IPX2, after 2.5 minutes of testing at each position, the turntable automatically rotates to the next position until the test is complete; water drips evenly from the needle; the sample does not wobble or shift; and there are no water leaks at any interfaces;
If the sample is powered on for testing, monitor its operating status to ensure there are no abnormalities such as short circuits or tripped circuit breakers; if any problems occur, immediately click “Stop Test” or press the emergency stop button, restore the equipment and sample to normal operation, and then restart the test.
6. Proceduri post-test
6.1 Acțiuni imediate la finalizarea testului
6.1.1 Drip Tray and Sample
Press the “Stop Test” button, or wait for the test to end automatically; the water inlet solenoid valve will then close automatically. However, water will still remain in the drip tray, and dripping will continue for a short time. You may remove the sample directly from the turntable.
6.1.2 Ecran tactil
Verificați dacă afișajul timpului de testare de pe interfața de lucru funcționează corect, apoi faceți clic pe „Ștergeți și resetați” pentru a vă pregăti pentru următorul test.
6.2 Resetarea dispozitivului
6.2.1 Drip Pan Reset
If the next test will not be performed in the near future, drain the accumulated water from the drip tray to prevent the needle from clogging.
If an air compressor is connected, first remove 2–3 pins from the drip tray (Important!), then press the air-release switch on the control cabinet to quickly expel the accumulated water using compressed air.
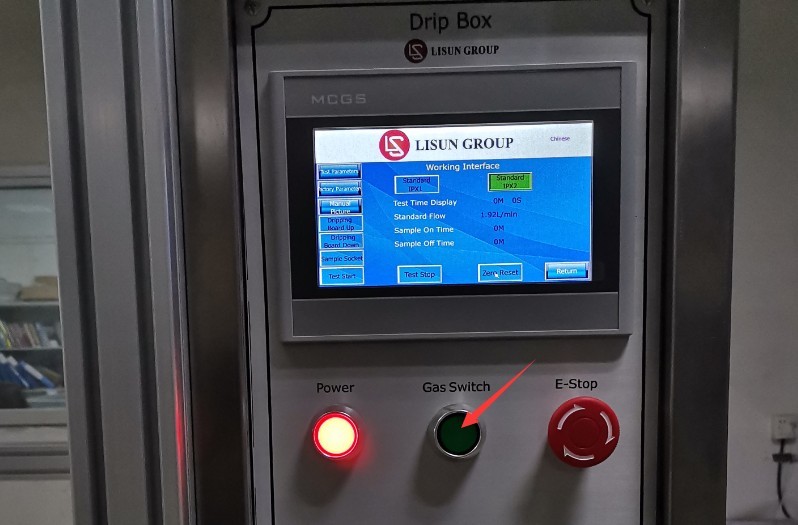
Figura 25
After draining the accumulated water, press the “Air On” switch again to cut off the air supply to the air compressor, then reinstall the removed needle.
If there is no air compressor available, remove a few needles to allow the accumulated water to drain out naturally. Once the water has drained completely, reinstall the needles.
Then tap the “Raise Drip Tray” button on the touchscreen to raise the drip tray to its highest position, preparing it for the next test.
6.2.2 Oprire
After all tests for the day are completed, close the water inlet valve and turn off the equipment’s circuit breaker and power switch.
6.3 Evaluarea rezultatelor testelor
Use a dry cloth to wipe away any water droplets from the outer surface of the sample, and then test the sample. Determine whether the sample has passed the test based on the following criteria.
| Criteriu de evaluare | Cerințe specifice |
| Siguranţă | Alimentarea insuficientă cu apă nu afectează funcționarea normală a echipamentului și nu compromite siguranța. |
| Protecția izolației | Apa nu se acumulează pe componentele izolate, unde ar putea cauza urme de-a lungul distanței de conturnare. |
| Protecția componentelor electrice | Apa nu trebuie să pătrundă în piesele sub tensiune sau în înfășurările care nu sunt proiectate să funcționeze în condiții de umiditate. |
| Protecție cablu | Apa nu se acumulează lângă capetele cablurilor și nu pătrunde în cablu |
| Eficacitatea găurilor de drenaj | If there is a drain hole, it must be verified that incoming water will not accumulate and can be drained without damaging the equipment. |
| Echipament fără orificiu de scurgere | Dacă se acumulează apă și pune în pericol piesele sub tensiune, respectați criteriile de acceptare specificate în standardele relevante ale produsului. |
7. Întreținerea și îngrijirea zilnică a echipamentelor
7.1 Curățare zilnică
Wipe away water spots and dust from the surface of the equipment, paying special attention to the turntable and drip tray areas to prevent water spots from forming limescale;
Wipe the touchscreen and control panel with a dry cloth to prevent water and dust from entering the internal circuitry.
Thoroughly clean the inside of the drip tray at least once a week. Empty any accumulated water, open the drip tray, and wipe it dry with a clean, dry cloth. After cleaning, check the inner walls for rust or scale. If there is slight rust, gently wipe it with a rust remover, then rinse thoroughly with clean water.
7.2 Inspecții și înlocuiri regulate
Nozzles: Check that the nozzles on the drip tray are not clogged, loose, or deformed, and verify that the drips are uniform. If a nozzle is clogged, use a needle cleaner to clear it.
Connections: Check all water, air, and electrical connections to ensure there are no leaks or loose connections.
Cartuș filtru: Verificați cartușul filtrului din interiorul filtrului. Dacă cartușul s-a maroniu (indicând faptul că este saturat cu impurități adsorbite), înlocuiți-l imediat cu unul nou.
7.3 Întreținerea echipamentelor inactive
7.3.1 Inactivitate pe termen scurt (în decurs de 1 lună)
Drain all standing water from the drip tray and the water lines to prevent scale buildup on the needles and tubing;
Acoperiți întreaga unitate cu o cârpă impermeabilă pentru a preveni pătrunderea prafului;
Păstrați echipamentul într-un loc uscat și bine ventilat.
7.3.2 Inactivitate pe termen lung (mai mult de 1 lună)
Complete all maintenance procedures for short-term storage; disconnect all electrical, pneumatic, and water connections from the equipment; remove the air and water hoses, let them air dry, and store them properly;
Apply a layer of rust-preventive oil to the inner walls of the drip tray and the surfaces of metal parts to prevent rust; store the equipment in a cool, dry place away from direct sunlight;
Apply a small amount of industrial lubricant to moving parts such as the turntable bearings and the lifting guide rails of the drip tray to prevent rust and jamming;
The equipment should be powered on once a month. Enter the manual screen to test all functions, then shut it down after 5 to 10 minutes of operation to prevent circuit deterioration.
8. Troubleshooting and Resolution of Common Problems
| Simptome de eroare | Cauze posibile | Procedură |
| Alarmă cu ecran tactil | Consultați 4.2 | |
| Ecranul tactil este aprins, dar butoanele nu răspund când sunt atinse. | Ecranul tactil se îngheață, pete sau urme de apă pe suprafață, defecțiune a modulului tactil intern | Turn off the device, let it sit for 5 minutes, and then restart it; wipe the touchscreen with a dry cloth to remove any stains or water marks; if it still does not respond, contact us for repair. |
| The drip tray gets stuck when raising or lowering it | The drip tray is tilted, and there is debris on the cord between the lifting motor and the drip tray. | Please use a level to make sure the drip rack is vertical and not tilted; try again after clearing away any debris. |
| Apa picură neuniform din ac | The drip stand is tilted, the needle is clogged, or the water flow is insufficient | Use a level to ensure the drip tray is vertical and not tilted; use a cleaning needle to unclog any nozzles that are not dispensing water; ensure there is sufficient water flow, and adjust the flow meter to the standard flow rate. |