
 Engleză
 中文简体
中文简体 Русский
 Español
 Português
 Türkçe
 العربية
 Deutsch
 Polski
 Italiano
 Français
 한국어
한국어 ไทย
ไทย Tiếng Việt
 日本語
日本語





























Dispozitiv de testare a impermeabilității rezervorului de imersie
Manual de utilizare
Aplicabil LISUN modele: JL-7
1. Despachetarea și familiarizarea de bază cu echipamentul
1.1 Specificații tehnice cheie
| parametrii | notițe |
| Measurable Water Resistance Ratings | IPX7 |
| Internal Dimensions of the Water Tank | 1000 × 1000 × 1200 mm (L × L × H) |
| Capacitate maximă de încărcare | 120 kg |
Note: The internal dimensions and maximum load capacity of the water tank can be customized.
Dispozitivul respectă cerințele de testare pentru IPX7 specificate în Secțiunea 14.2.7 din GB/T 4208-2017.
1.2 Unboxing and Inspection, and Introduction to the Equipment
1.2.1 Despachetare și inspecție vizuală
When unpacking the device, handle it gently to avoid scratching the outer casing with sharp tools. After unpacking, first inspect the exterior of the device to ensure there are no visible deformities, dents, or other damage. If you notice any abnormalities with the device or its accessories, please contact us immediately.
1.2.2 Unitatea principală și accesoriile
Componentele principale:
| Nu. | notițe |
| ① | IPX7 Immersion tank Waterproof test Device, featuring a tempered glass viewing window, water level gauge, top cover, and water inlet and outlet ports |
| ② | Scară, pentru recuperarea și plasarea ușoară a probelor |
| ③ | Water hose, connecting the water tank’s inlet and outlet |
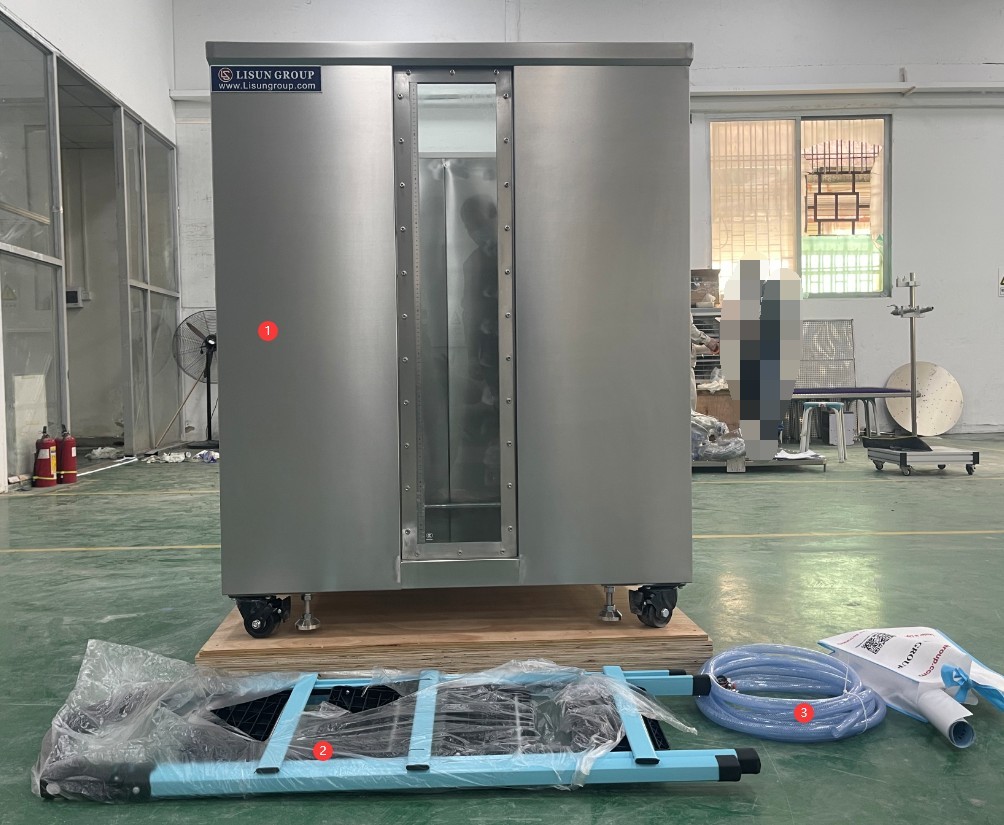
Figura 1
Links to download the electronic user manual, warranty card, and other materials have been sent via email. Please download them as soon as possible. If you missed the email, please feel free to contact us to request the download links again.
2. Măsuri de siguranță
2.1 Siguranța operațională
2.1.1 Safety Precautions for Handling Test Specimens
Handle test specimens with care when removing them from or placing them into the tank to prevent slipping and falling into the test tank; test specimens may be secured with a nylon rope or steel chain before being placed in the water to facilitate handling; ensure that the test specimens are fully submerged and do not shift during the test.
2.1.2 Safety During the Trial
When observing conditions inside the chamber during the test, it is strictly prohibited to open the water tank or adjust the position of the test specimens without authorization.
2.2 Safety in Equipment Placement and Movement
2.2.1 Equipment Placement Requirements
The equipment must be placed on a level, sturdy surface near a water source and a drain. After placement, lock the casters, level the unit, and secure the foot cups to prevent the equipment from sliding. Position the side with the water level gauge facing outward to avoid obstructing the observation area.
2.2.2 Equipment Relocation Requirements
Before moving the unit, be sure to drain all standing water from the case, loosen the foot cups, and release the casters’ brakes. Avoid collisions and jolts during transport to prevent damage to the case’s glass and metal components.
3. Pregătiri înainte de test
3.1 Pregătirea probei
Clean the surface of the test specimen thoroughly to remove dust, oil, and impurities, and prevent contaminants from entering the test water and affecting the test results; Inspect the specimen’s exterior to ensure there are no breaks or cracks, and assemble the specimen according to the manufacturer’s specified installation instructions. If the specimen requires electrical power during testing, please prepare an additional power source and a waterproof power cord as needed based on the specimen’s power requirements.
3.2 Preparation of Test Water
3.2.1 Cerințe pentru apa de testare
Prepare the test water in advance so that the temperature difference between the water and the sample to be tested is ≤5°C.
3.2.2 Injection and Drainage of Test Water
Before filling the tank with water, please clean the inside of the tank to ensure there are no foreign objects.
| Nu. | notițe |
| ① | Inlet: Connect to a pressurized water source (such as a faucet). When you need to fill the tank with water, open this valve (the handle is in the open position when parallel to the hose and in the closed position when perpendicular to it) to allow water to flow in slowly. Keep the valve closed when not in use. Note: You can also remove the cover plate on top of the tank and pour clean water directly into the tank. |
| ② | Drain Valve: If the water in the tank has been used too many times and has become cloudy, or if the tank has not been used for an extended period, the water must be drained. Open the drain valve (the valve is open when the handle is parallel to the hose and closed when it is perpendicular to the hose) to drain the water. Keep the valve closed when not in use. |
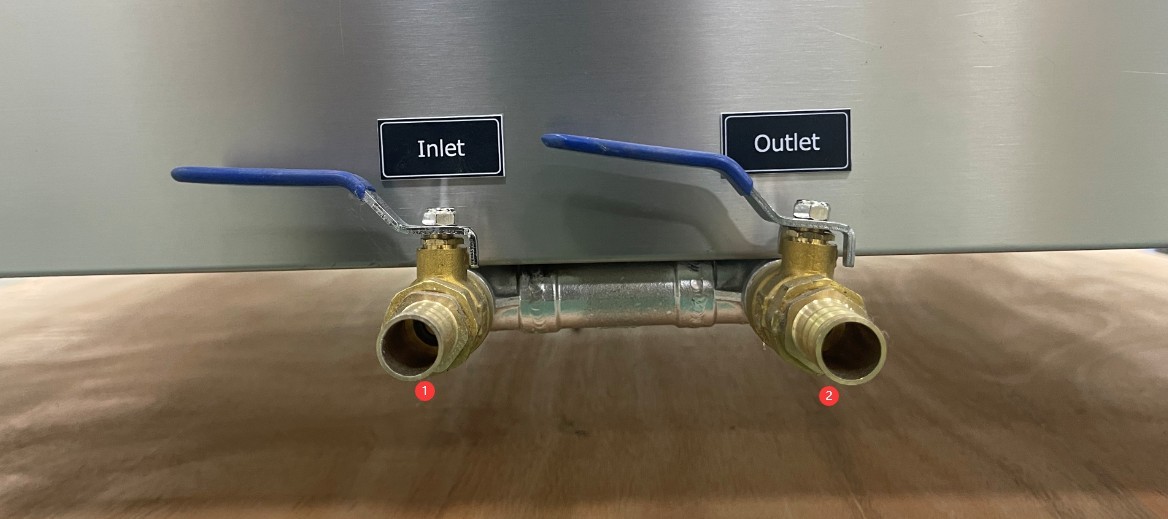
Figura 2
4. IPX7 Water Immersion Test Procedure
4.1 Placing the Test Specimens in the Chamber
Slowly place the secured test specimen into the test tank, ensuring that the specimen is positioned in accordance with the specified installation requirements and that it does not tip over or shift; Verify that the submersion condition meets the requirements of GB/T 4208-2017 based on the specimen’s height: for specimens with a height < 850 mm, the lowest point must be 1000 mm below the water surface; for specimens with a height ≥ 850 mm, the highest point must be 150 mm below the water surface.
If a test specimen must be tested while energized or in operation, the test conditions (water temperature, immersion method, etc.) must be adjusted in accordance with the relevant product standards. Ensure proper electrical safety precautions are taken during the test; do not touch energized test specimens with your hands to prevent electric shock.
4.2 Test Timing and Process Observation
Once the test specimens have been properly positioned and secured, start the timer; the test duration is 30 minutes. Once the timer has started, do not adjust the position of the test specimens or change the water level in the tank without authorization;
During the test, you can walk around the equipment to observe the condition of the test specimens inside the water tank. Look through the tempered glass window to check whether the specimens have shifted or are floating, and keep detailed records of your observations throughout the process.
4.3 End of Timing and Initial Inspection of Test Specimens
After the 30-minute test period has elapsed, stop the timer; slowly remove the test specimen from the water, allow the surface water to drain off, and conduct a preliminary visual inspection of the specimen’s outer casing for any obvious signs of water ingress, deformation, or damage.
5. Proceduri post-test
5.1 Evaluarea rezultatelor testelor
Folosiți o cârpă uscată pentru a șterge orice pete de apă de pe suprafața exterioară a eșantionului, apoi testați eșantionul. Determinați dacă eșantionul a trecut testul pe baza următoarelor criterii.
| Criteriu de evaluare | Cerințe specifice |
| Siguranţă | Alimentarea insuficientă cu apă nu afectează funcționarea normală a echipamentului și nu compromite siguranța. |
| Protecția izolației | Apa nu se acumulează pe componentele izolate, unde ar putea cauza urme de-a lungul distanței de conturnare. |
| Protecția componentelor electrice | Apa nu trebuie să pătrundă în piesele sub tensiune sau în înfășurările care nu sunt proiectate să funcționeze în condiții de umiditate. |
| Protecție cablu | Apa nu se acumulează lângă capetele cablurilor și nu pătrunde în cablu |
| Eficacitatea găurilor de drenaj | If there are drain holes, it must be verified that incoming water will not accumulate and can be drained without damaging the equipment. |
| Echipament fără orificiu de scurgere | Dacă se acumulează apă și pune în pericol piesele sub tensiune, respectați criteriile de acceptare specificate în standardele relevante ale produsului. |
5.2 Real-Time Equipment Operation
If the test water is clean and free of turbidity, the water in the tank may be retained for subsequent tests;
If the test water becomes contaminated or cloudy, or if oil or impurities from the test sample are introduced into the water, the water tank must be drained, cleaned, and refilled immediately.
6. Întreținerea și îngrijirea zilnică a echipamentelor
6.1 Curățare regulată
6.1.1 Cleaning the Inside of the Water Tank
If dirt or scale is found on the inner walls of the water tank after testing, clean it promptly with a long-handled cleaning brush to prevent the buildup of impurities. Do not use corrosive cleaning agents under any circumstances. After cleaning, rinse thoroughly with clean water to ensure no cleaning agent residue remains inside the tank.
6.1.2 Cleaning the Exterior of the Equipment
Wipe down the equipment housing, water level gauge, and glass viewing window with a dry or damp cloth to keep the equipment surfaces clean; if the glass viewing window is dirty, wipe it with a specialized glass cleaner to ensure a clear view; wipe the water level gauge regularly to prevent scale buildup from obscuring the markings.
6.2 Equipment Storage and Maintenance During Downtime
6.2.1 Short-Term Idle Maintenance (7 days or more, but less than 1 month)
Drain all water from the tank, clean it, and wipe it dry to keep the interior dry; close all valves, disconnect the water lines, and neatly coil the hoses before placing them next to the equipment; cover the equipment with a dust-proof cloth to prevent dust from entering.
6.2.2 Maintenance During Long-Term Idle Periods (1 month or longer)
In addition to meeting the requirements for short-term storage and maintenance, apply a layer of rust-preventive oil to the inner walls of the tank and the surfaces of metal components to prevent rust; store the equipment in a cool, dry place away from direct sunlight.