
 Engleză
 中文简体
中文简体 Русский
 Español
 Português
 Türkçe
 العربية
 Deutsch
 Polski
 Italiano
 Français
 한국어
한국어 ไทย
ไทย Tiếng Việt
 日本語
日本語





























Goniofotometru de înaltă precizie pentru lămpi auto și semnalizatoare rutiere
Manual de utilizare
Aplicabil LISUN modele: LSG-1950,LSG-1950B.LSG-1950BCCD、LSG-1950CCD
1. Despachetarea și familiarizarea de bază cu echipamentul
1.1 Despachetare și inspecție
When unpacking the device, handle it gently to avoid scratching the outer casing with sharp tools. After unpacking, first inspect the exterior of the device to ensure there is no visible deformation or dents, and that the buttons are not damaged or loose. If you notice any abnormalities with the device or its accessories, do not power it on. Please contact us immediately.
1.2 Configurarea și prezentarea generală a sistemului
1.2.1 Componente hardware de bază
| Nume componentă | Model | Caracteristici de baza |
| Unitatea principală Goniofotometru | LSG-1950 | Used in conjunction with a photometric probe to measure photometric parameters and their spatial distribution, such as illuminance distribution curves, etc. |
| Sondă fotometrică de câmp apropiat | PM400C | Suitable for standard darkrooms, such as those around 10 meters in length |
| Lumină standard | SLS-150W | Used to calibrate the dark chamber (photometric probe) |
| Cabinet | CASE-19 | Used to house the angle controller, power meter, and DC and AC power supplies. Includes a power strip, an RS485 communication module, and other components. |
| Controler de unghi | RT-200C | Unghiul la care este poziționat Goniofotometrul pentru afișare și control. În general, nu este necesară nicio ajustare manuală; controlul este gestionat de software. |
| Masurator de putere | Seria LS | Măsurați parametrii electrici precum tensiunea, curentul, puterea și factorul de putere al probei |
| Sursă de alimentare DC | Seria DC | Oferă o sursă de alimentare DC stabilă pentru mostre DC, lămpi standard și lămpi auxiliare |
| Putere de curent alternativ | Seria LSP | Provide a stable, pure sine-wave AC power supply for AC samples |
1.2.2 Software, manuale, certificate etc.
At the time of shipment, a download link containing all documents was sent via email. Please download them promptly. If you missed the email, you may contact us to request a new download link. The package includes important documents such as the software, user manual, warranty card, and standard lamp calibration certificate, as well as other relevant documents.
2. Note importante
2.1 Siguranța electrică
The system must be connected to a stable AC power source of 220 V ±5%, with a frequency of 50 Hz or 60 Hz, and ensure proper grounding with a grounding resistance of ≤4 Ω. Do not operate the equipment if the power connections are loose or the cables are damaged.
2.2 Siguranța mediului
Avoid using the device in environments where humidity exceeds 70% (without condensation) or where the temperature falls outside the range of 0–35°C. The optimal operating temperature is 25±2°C.
Atât camera de control, cât și camera obscură trebuie să fie păstrate uscate, bine ventilate, fără praf și fără gaze corozive, cu o temperatură ambiantă de 15–35°C și o umiditate relativă de ≤85%;
Țineți echipamentul departe de câmpuri magnetice puternice, câmpuri electrice puternice sau gaze corozive;
2.3 Proceduri de operare în camera obscură
2.3.1 Descrierea camerei obscure
Please confirm that the darkroom has been constructed strictly in accordance with the darkroom drawings we provided. If there are any deviations in the actual dimensions, please contact us promptly to discuss and confirm an adjustment plan to ensure that installation and commissioning proceed smoothly and that test results are accurate;
The interior of the darkroom must be completely painted matte black—that is, a non-reflective pure black—including all walls, ceilings, floors, partitions, doors, and so on. A small number of components, such as lights, air conditioners, and power switches, may not be painted black, provided they do not appear in the optical path between the Goniophotomoeter’s main unit and the photometer probe;
Once the equipment has been installed and commissioned, do not move any of the hardware components inside the darkroom, including the main unit base, the photometer probe base, the photometer probe orientation, and the cross-laser base, as doing so may result in inaccurate test results;
When the darkroom is in use, please keep it as dust-free as possible;
Ensure that the darkroom door is closed and that no external light enters the darkroom when the interior lights are turned off.
2.3.2 În timpul utilizării
Scoateți-vă pantofii sau puneți-vă huse pentru încălțăminte când intrați în camera obscură pentru a preveni introducerea prafului;
Set the air conditioner in the darkroom to 25°C and adjust it to the “gentle breeze” setting to prevent strong airflow from affecting the test results;
The sample luminaires must be securely mounted to prevent them from falling and damaging the Goniophotomoeter during testing;
Nu așezați obiecte pe unitatea Goniofotomoeter sau în raza sa de rotație pentru a evita deteriorarea Goniofotomoeterului;
În timpul testării, camera obscură trebuie să rămână sigilată pentru a preveni interferența luminii externe cu rezultatele testului.
2.3.3 Când nu este utilizat
Keep the darkroom closed when not in use; unauthorized persons are not allowed to enter, and take care to prevent dust from entering the darkroom.
2.4 Proceduri standard de funcționare a lămpii
The standard lamp has a lifespan of one year and is used only during installation and commissioning for calibrating the darkroom (photometric probe). If the conditions of your darkroom remain unchanged (internal coating color, internal dimensions, hardware installation location and orientation, etc.), recalibration is not necessary;
Dacă laboratorul dumneavoastră trebuie să își calibreze anual camera obscură, puteți achiziționa o nouă lampă standard;
Lampa standard este fierbinte imediat după utilizare; nu o atingeți. Lăsați-o să se răcească timp de 10 minute înainte de a o pune înapoi în carcasa lămpii;
Evitați petele pe suprafața becurilor standard; dacă există pete, acestea nu mai pot fi folosite ca becuri standard;
The standard lamp used in the darkroom is a directional standard lamp, meaning its color and luminous intensity data are specific to a particular direction. Do not remove the standard lamp bulb from its holder; doing so will render the standard lamp invalid.
2.5 Altele
Pentru aspectele care nu sunt acoperite de acest manual, vă rugăm să procedați cu prudență sau să ne contactați.
3. Ansamblu hardware
3.1 Asamblarea echipamentelor din dulap
3.1.1 Introducere în Cabinet
Place the cabinet on a level, sturdy workbench, leaving sufficient space around it for operation.
| Număr | notițe |
| ① | Schemă de conectare: Vă rugăm să asamblați echipamentul conform schemei de conectare. |
| ② | Panou de distribuție a energiei, utilizat pentru conectarea cablurilor de alimentare ale tuturor dispozitivelor din interiorul dulapului |
| ③ | Cablu de alimentare al ventilatorului de răcire: Vă rugăm să îl conectați la prelungitorul din interiorul dulapului. |
| ④ | RS-485 Communication Box, used to connect the RS-485 communication cables of all devices |
| ⑤ | Vă rugăm să conectați adaptorul de alimentare pentru cutia de comunicare RS485 la prelungitorul din interiorul dulapului. |
| ⑥ | The USB cable for the RS485 communication module must be connected to the computer. |
| ⑦ | Cablare controler unghiular RT-200C |
| ⑧ | Cablajul contorului de putere din seria LS |
| ⑨ | Conexiune de alimentare DC |
| ⑩ | Cablaj de alimentare AC |
| ⑪ | Cablul principal de alimentare al dulapului, care alimentează toate echipamentele din interiorul dulapului, trebuie trecut prin orificiul pentru cablu ② și conectat la sursa de alimentare numai după ce toate echipamentele au fost instalate complet. |
| 10 | Deschidere pentru cablu — cablul principal de alimentare poate fi trecut prin aici. Notă: Ștecărul cablului principal de alimentare este un ștecher standard chinezesc; este posibil să fie nevoie să utilizați un adaptor de alimentare. |
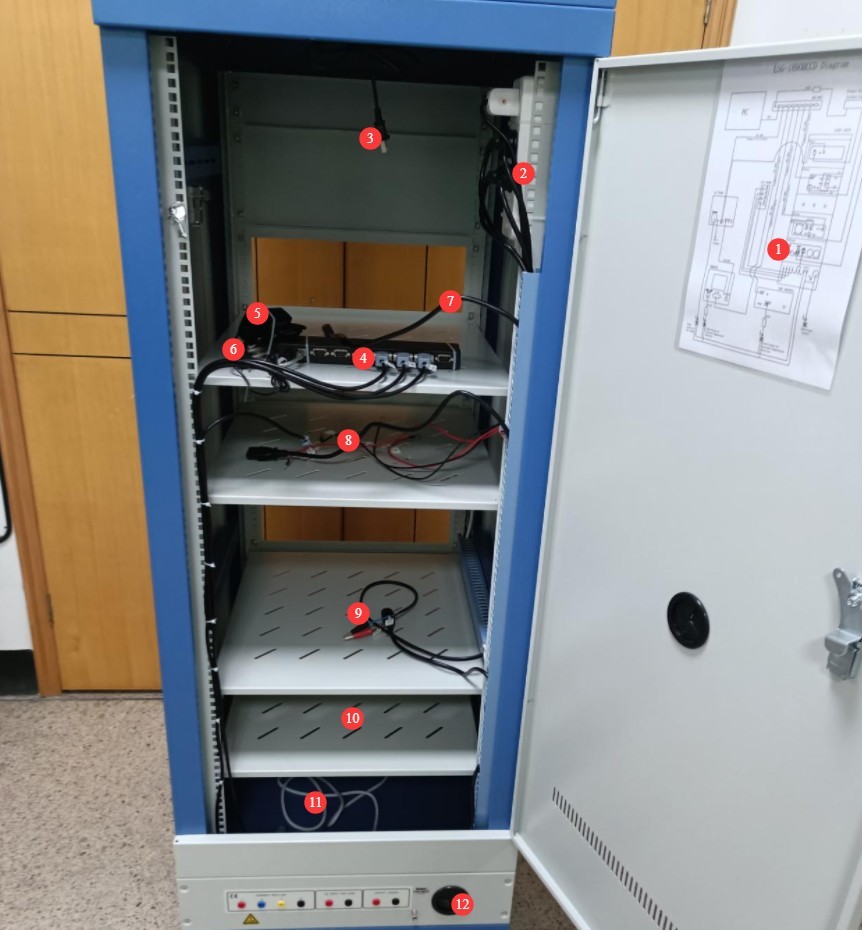
Figura 1
3.1.2 Instalarea RT-200C
Deocamdată, tot ce trebuie să faci este să îl conectezi.
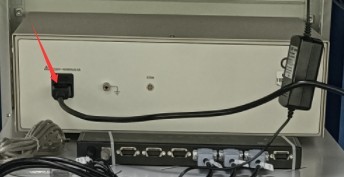
Figura 2
3.1.3 Instalarea contorului de energie LS
| Număr | notițe |
| ① | Conectat printr-un cablu de comunicație RS-485; celălalt capăt este deja conectat la cutia de comunicație RS-485 din interiorul dulapului. |
| ② | Cablul de alimentare este conectat; celălalt capăt este deja conectat la prelungitorul din interiorul dulapului. |
| ③ | Cablul de testare V1, conectat la terminalul roșu al tensiunii V a contorului de energie electrică |
| ④ | Cablul de testare V2, conectat la terminalul negru al tensiunii V a contorului de energie electrică |
| ⑤ | A1 test lead, connected to the red terminal for current A on the power meter |
| ⑥ | Cablu de testare A2, conectat la terminalul negru al contorului de curent A |
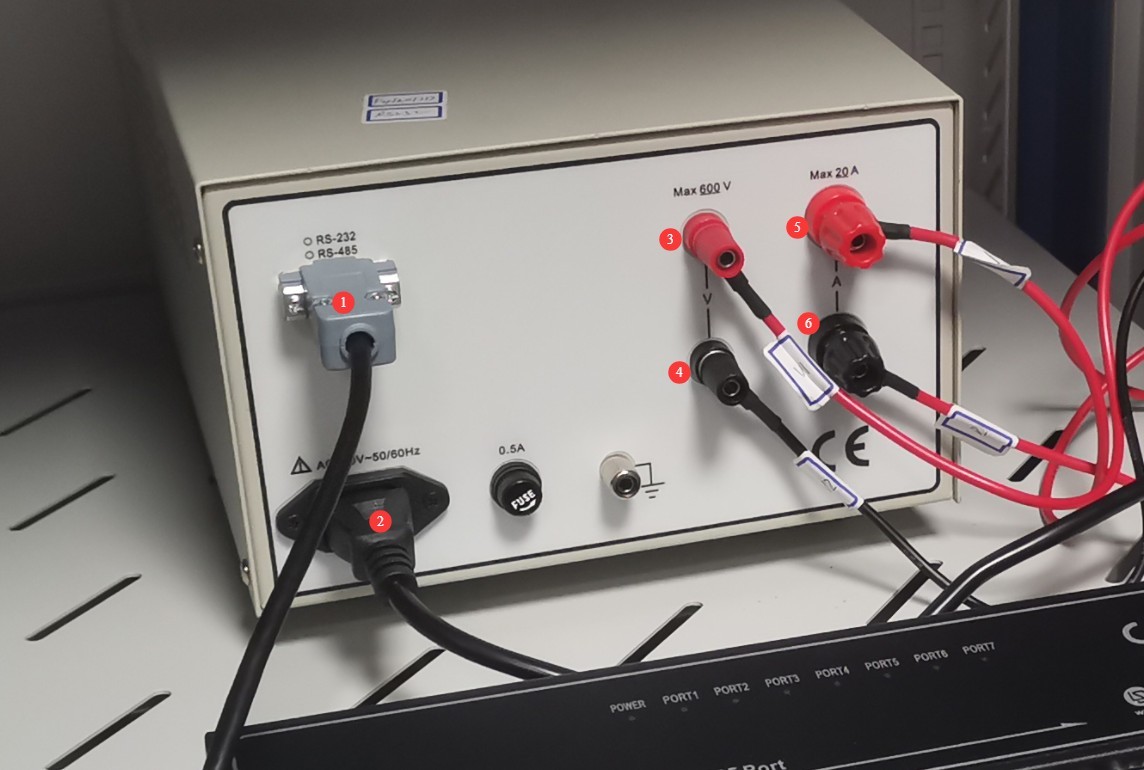
Figura 3
3.1.4 Instalarea sursei de alimentare CC
| Număr | notițe |
| ① | Conectat printr-un cablu de comunicație RS-485; celălalt capăt este deja conectat la cutia de comunicație RS-485 din interiorul dulapului. |
| ② | Conectați firele de ieșire de curent continuu, asigurându-vă că bornele pozitive și negative se potrivesc. |
| ③ | Cablul de alimentare este conectat la priză; celălalt capăt este deja conectat la prelungitorul din interiorul dulapului. |
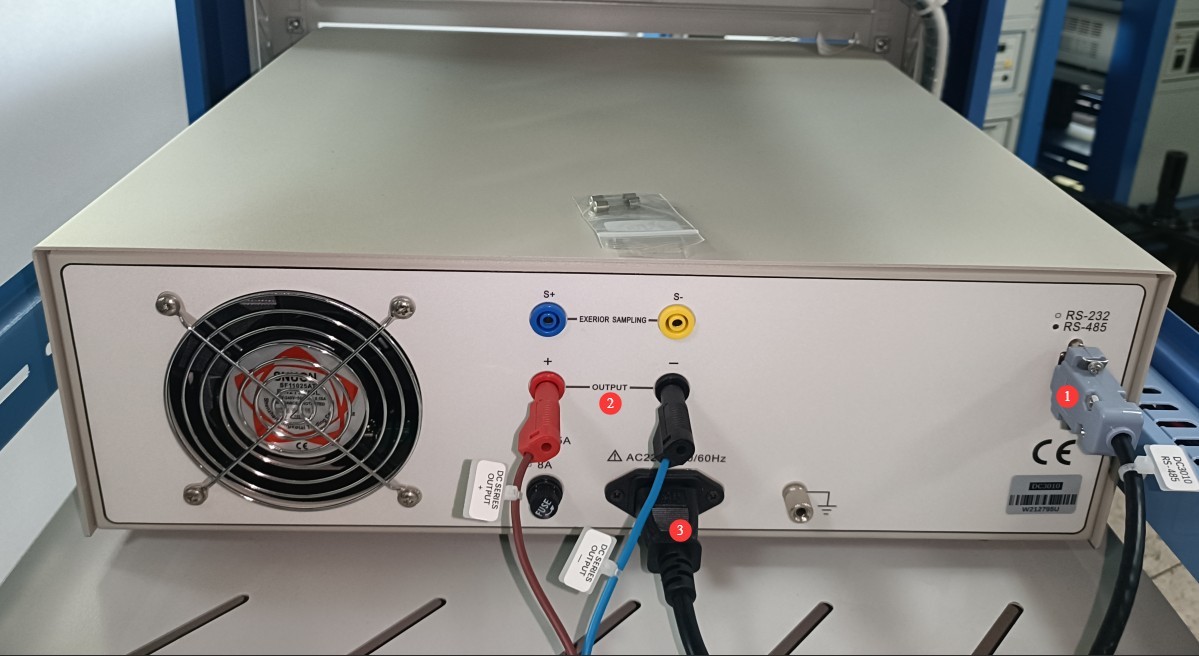
Figura 4
3.1.5 Instalarea alimentării cu curent alternativ
Please locate the following AC power output cable among the accessories:

Figura 5
| Număr | notițe |
| ① | Conectat printr-un cablu de comunicație RS-485; celălalt capăt este deja conectat la cutia de comunicație RS-485 din interiorul dulapului. |
| ② | Cablul de alimentare este conectat; celălalt capăt este deja conectat la prelungitorul din interiorul dulapului. |
| ③ | Treceți cablul de ieșire a alimentării CA prin orificiul pentru cablu ④ și conectați-l la poziția ⑤. |
| ④ | Gaura firului |
| ⑤ | Cablu de ieșire de alimentare CA: Treceți-l prin orificiul pentru cablu ④ și conectați-l la poziția ③. |
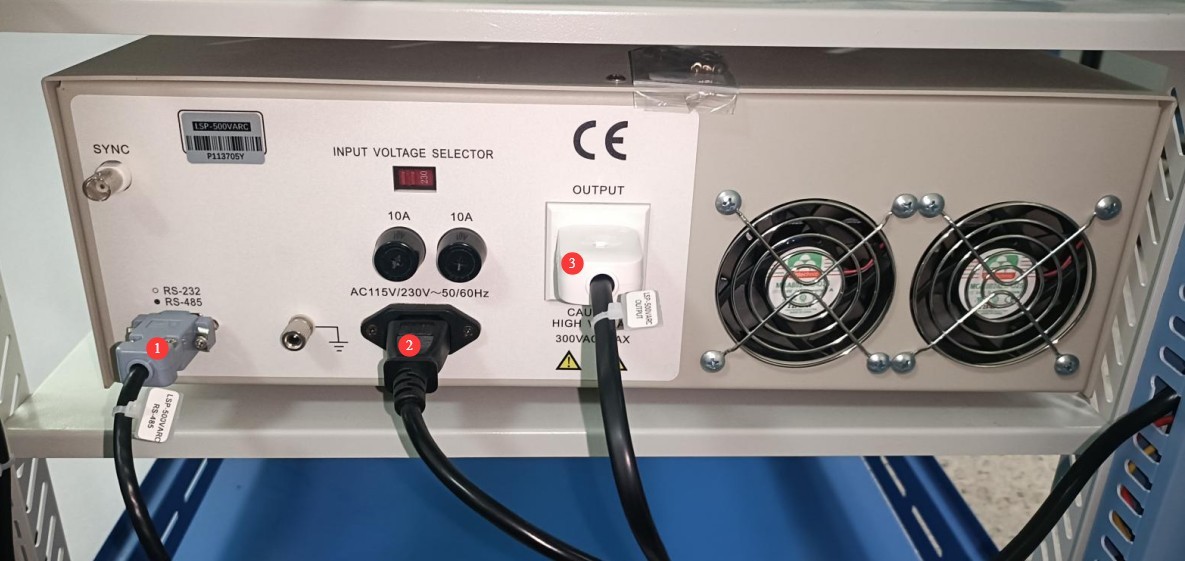
Figura 6
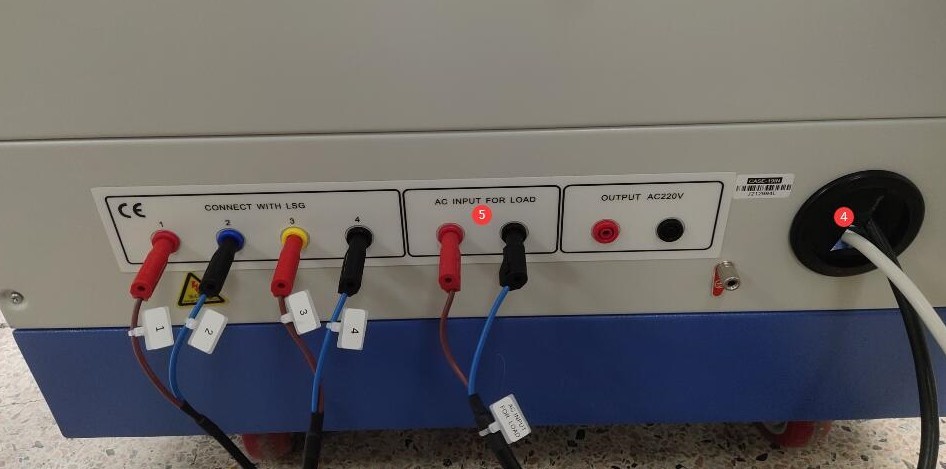
Figura 7
3.2 Installation of The Goniophotomoeter Main Unit and Goniophotomoeter Probe
3.2.1 Host
The main unit requires no assembly. The bottom of the main unit is equipped with swivel casters and feet. To move the main unit, unscrew the feet so they are off the ground, and use the swivel casters to move the unit. Position the Goniophotomoeter in the correct location according to the darkroom blueprints. Align the four sides of the base as closely as possible with the walls of the darkroom.
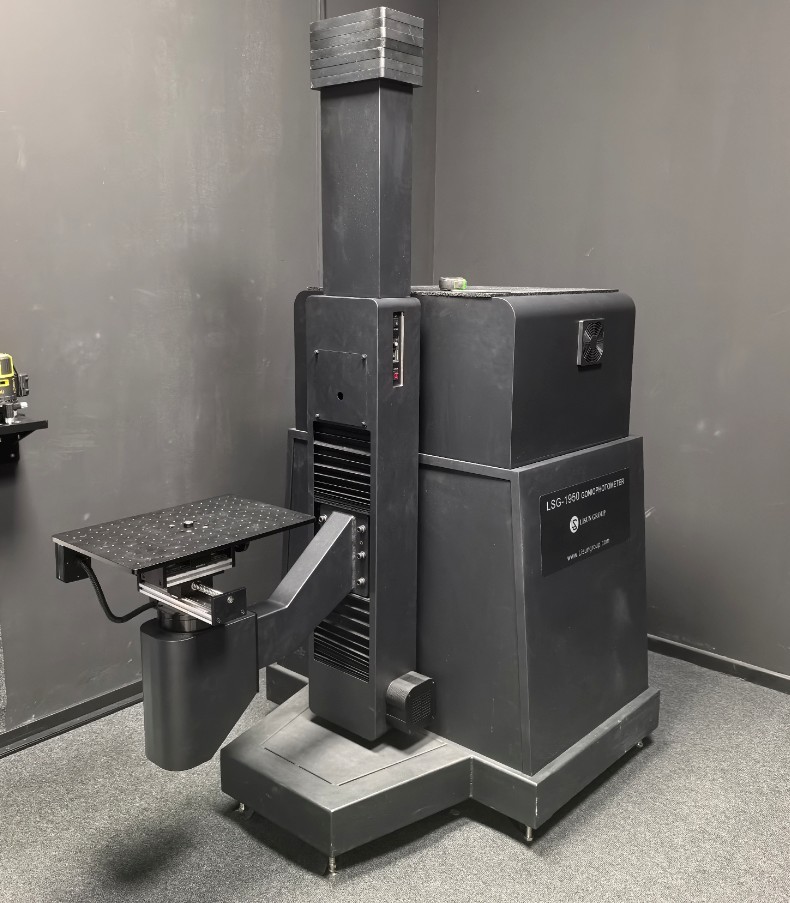
Figura 8
Next, please turn all four feet of the Goniophotomoeter until they make contact with the floor.
3.2.2 Asamblarea sondei fotometrice și a suportului sondei
Asamblați sonda fotometrică și suportul sondei și poziționați-le în locațiile corespunzătoare conform desenelor camerei obscure; nu este nevoie să le fixați cu șuruburi deocamdată.
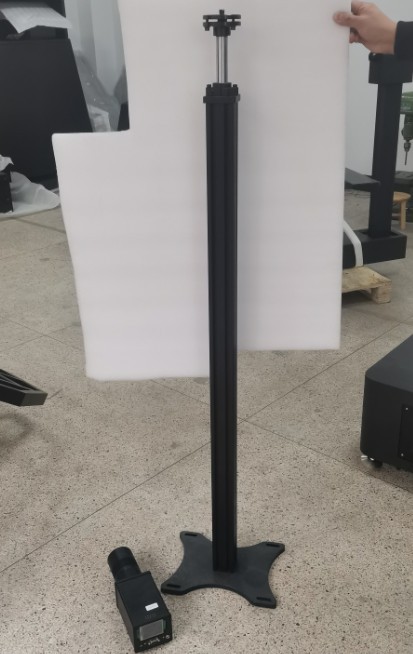
Figura 9
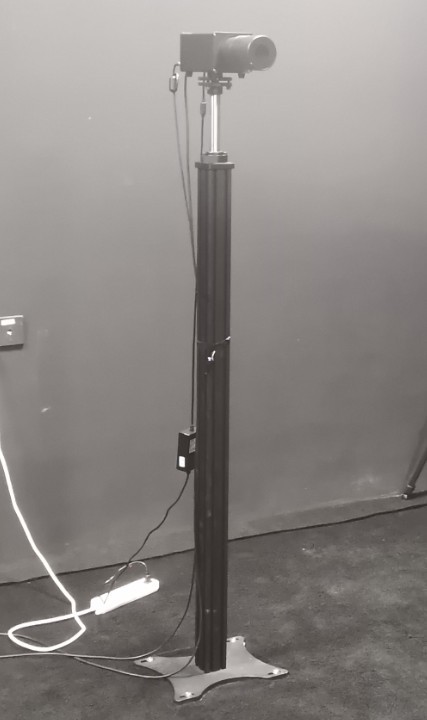
Figura 10
3.2.3 Cablajul sistemului
| Număr | notițe |
| ① | Cele patru blocuri terminale ①de pe carcasă sunt conectate la Goniofotomometru ⑩; pur și simplu potriviți-le unul cu unul conform numerelor. |
| ② | The two terminals connect to the terminal block inside the cabinet and are used to supply power to all equipment in the darkroom, including the Goniophotomoeter and photometric probes. This allows for convenient control of all darkroom equipment via the cabinet’s power switch. Note: The darkroom equipment can also be powered directly from the mains. |
| ③ | Terminal de împământare al dulapului: Vă rugăm să îl conectați la masă folosind un fir. |
| ④ | Cablu de alimentare pentru dulap, conectat la o sursă de alimentare de 220V, 50/60 Hz |
| ⑤ | Cablu de alimentare pentru unitatea principală a goniofotometrului |
| ⑥ | Conectați terminalul de împământare al Goniofotometrului la masă folosind un fir. |
| ⑦ | This is a one-to-two communication cable; one end of the RS-485 cable connects to the RS-485 communication box inside the cabinet, and the other end connects to position ⑭ on the back of the RT-200C. |
| ⑧ | Photometer probe trigger wire; connect to probe ⑬. When only one probe is used, the default setting is near-field (N). |
| ⑨ | If you have only one photometer in your darkroom, the far-field (F) connection is not required. |
| ⑩ | Cele patru blocuri terminale ⑩de pe Goniofotometru sunt conectate la carcasă①; pur și simplu potriviți-le unul cu unul conform numerelor. |
| ⑪ | Power Adapter for Photometric Probe |
| 10 | Cablu de comunicație RS-485 pentru sonda fotometrică; celălalt capăt se conectează la cutia de comunicație RS-485 din interiorul dulapului |
| 10 | Cablu de declanșare a sondei fotometrice, conectat la unitatea principală ⑧ a Goniofotometrului |
| 10 | RT-200C communication cable, with the other end connected to the main⑦ unit of the Goniophotomoeter |
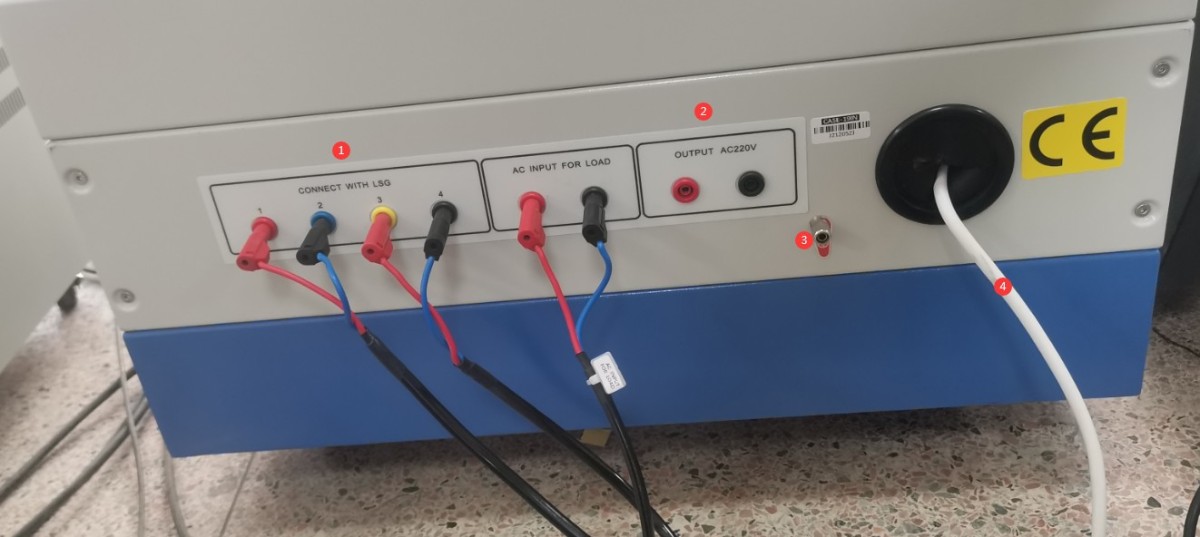
Figura 11
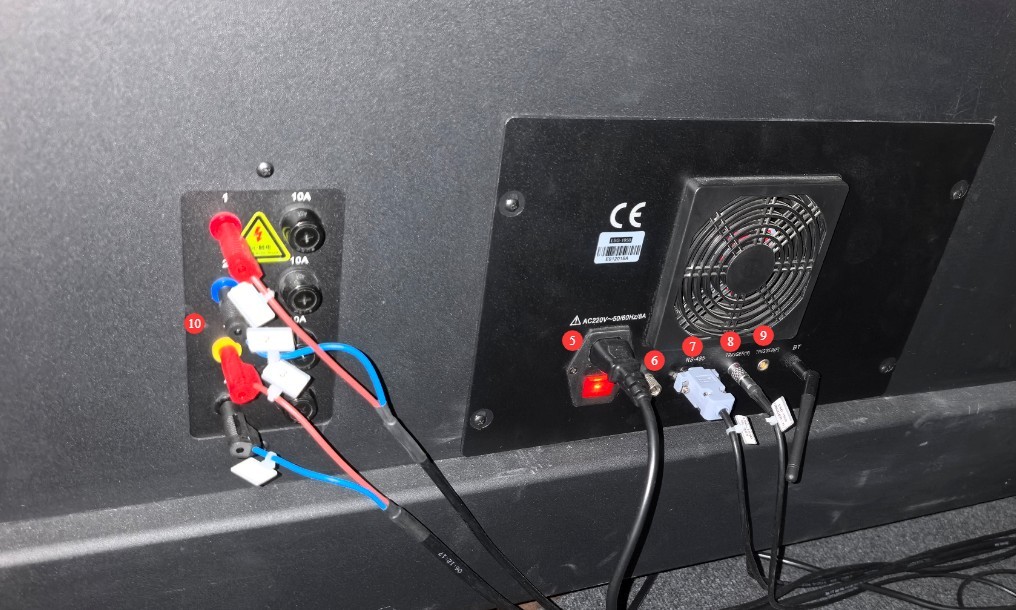
Figura 12
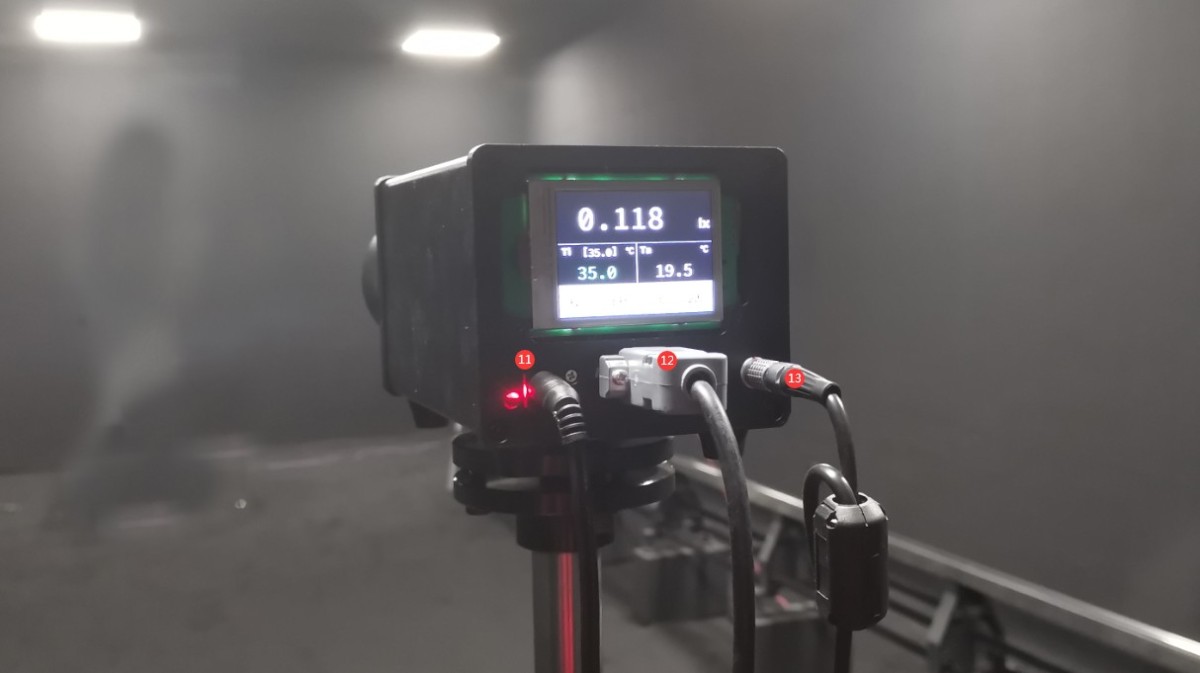
Figura 13
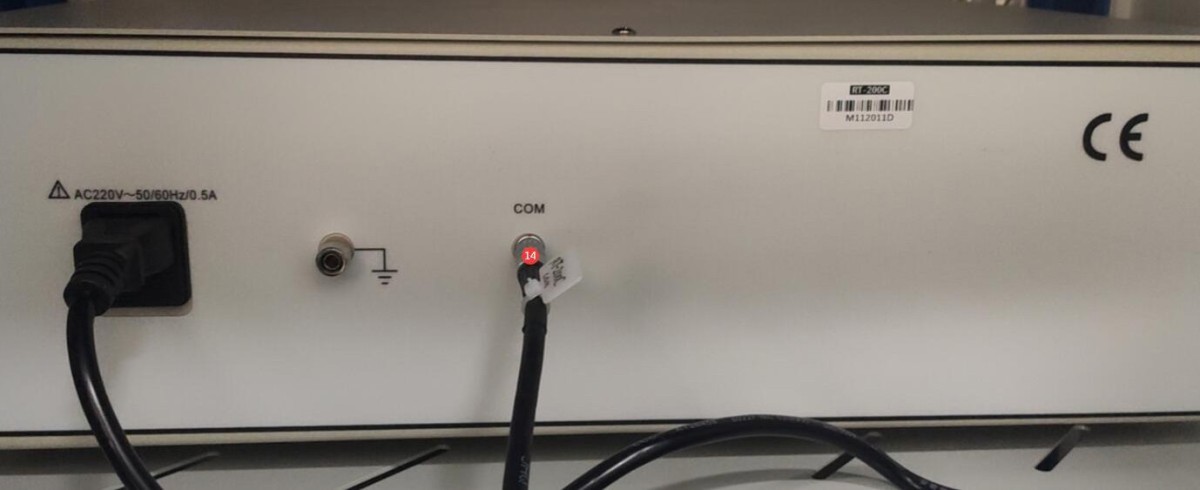
Figura 14
4. Instalarea și configurarea software-ului
4.1 Instalarea software-ului și a driverelor
4.1.1 Mediul de execuție software
Cerințe de sistem: Windows 7/8/10/11 (32 biți/64 biți); computerul trebuie să aibă cel puțin un port USB.
4.1.2 Instalare
| Număr | notițe |
| ① | LSG-1950 Goniophotomoeter Software—Please double-click to install |
| ② | RS485 Communication Box Driver—Double-click to install |
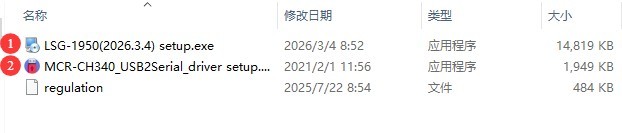
Figura 15
4.1.3 Gestionarea excepțiilor
If your antivirus software or the Windows Firewall flags a file as suspicious during the software installation process, please temporarily disable the antivirus software or the Windows Firewall and then try installing the software again.
If the software fails to open when you double-click the icon after a successful installation, please check whether you are logged in to your computer with an administrator account. If the software still does not open after logging in with an administrator account, right-click the software icon to open its Properties window. On the Compatibility tab, check the box next to “Run this program as an administrator,” click “Apply,” and then double-click the icon again to open the software.
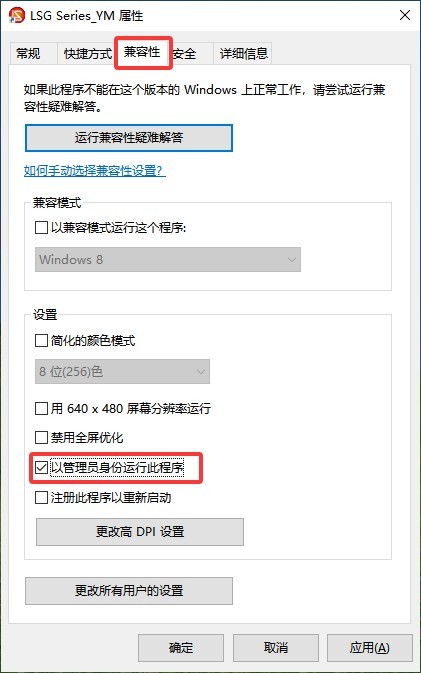
Figura 16
4.2 Setări software
First, turn on the cabinet’s power switch, then power on all system equipment, including all devices inside the cabinet, the Goniophotomoeter unit, and the photometric probe. Double-click to launch the software, and follow the steps in the order shown in the table below.
| Număr | notițe |
| ① | Click “System Settings” |
| ② | When selecting a Goniophotomoeter model, the one you purchased is the LSG-1950. |
| ③ | Select the photometric probe to be used. If you have only one photometric probe, select “Test Detector 1” and choose the model PM400C. |
| ④ | Select an AC power supply model; typically, this is from the LSP Series. |
| ⑤ | Select a DC power supply model; typically, this is the DC Series. |
| ⑥ | Select a power meter model. The model number is printed on the front panel of the power meter; please check it and select the appropriate model. |
| ⑦ | Click “Auto Search,” and the software will automatically retrieve the serial numbers and communication ports for all devices. |
| ⑧ | După finalizarea căutării tuturor porturilor, faceți clic pe „OK” pentru a salva și a ieși. |
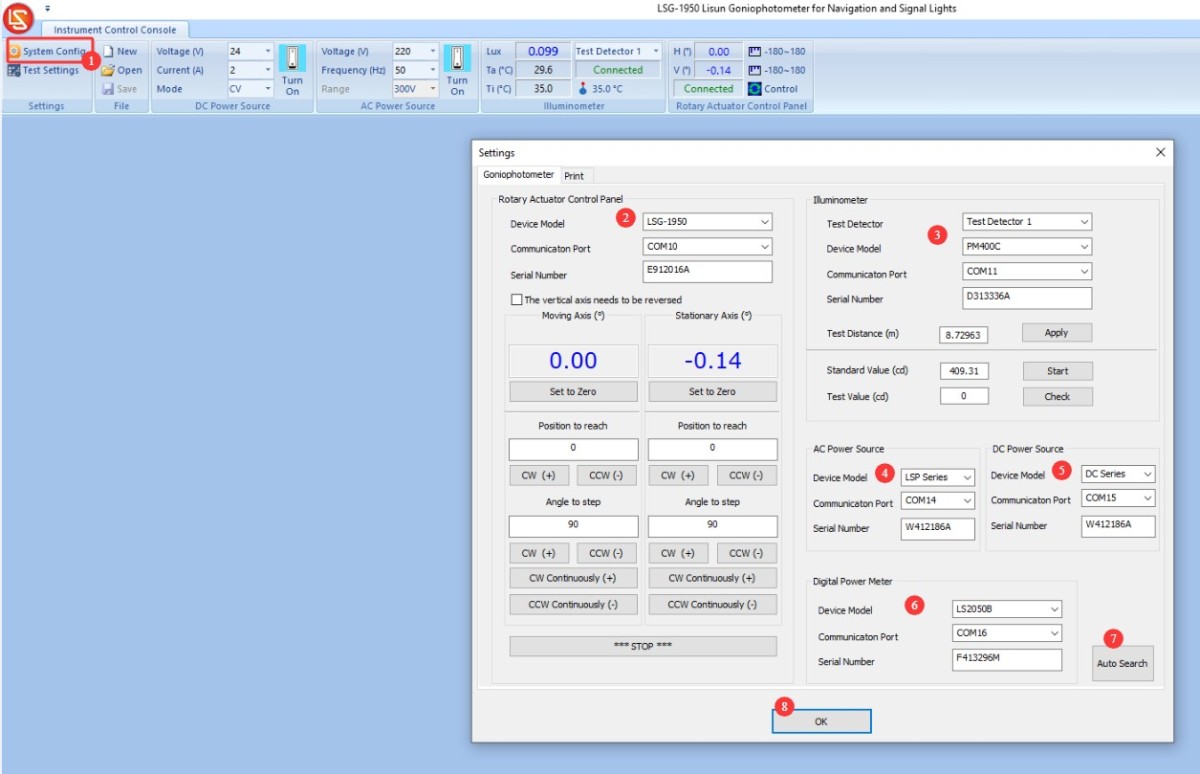
Figura 17
Note: If a communication error occurs during the automatic port search, please read the error message carefully, check whether the corresponding device is powered on, and verify that the RS485 communication cable is properly connected. After confirming these points, click “Automatic Port Search” again until communication is established with all devices.
5. Commissioning of Darkroom Equipment
5.1 Host Debugging
5.1.1 Single-line Laser In-situ Measurement
| Număr | notițe |
| ① | Remove the two screws securing the junction box. |
| ② | Remove the four screws securing the platform. |
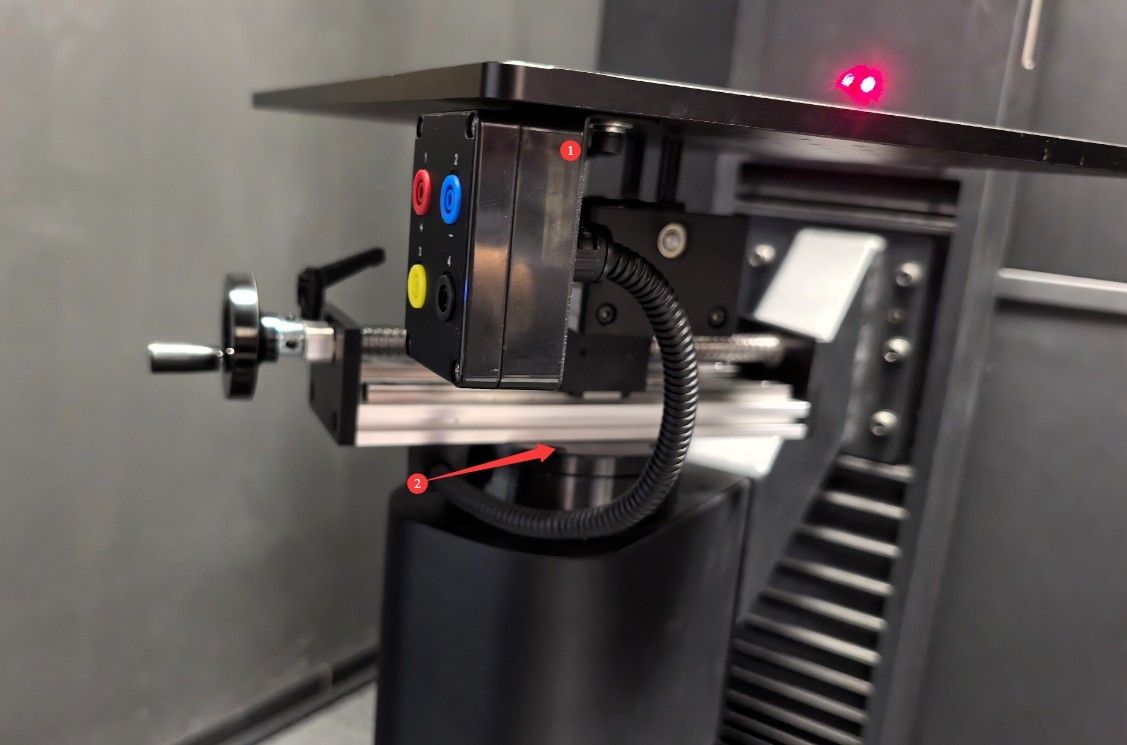
Figura 18
Then you can remove the platform.
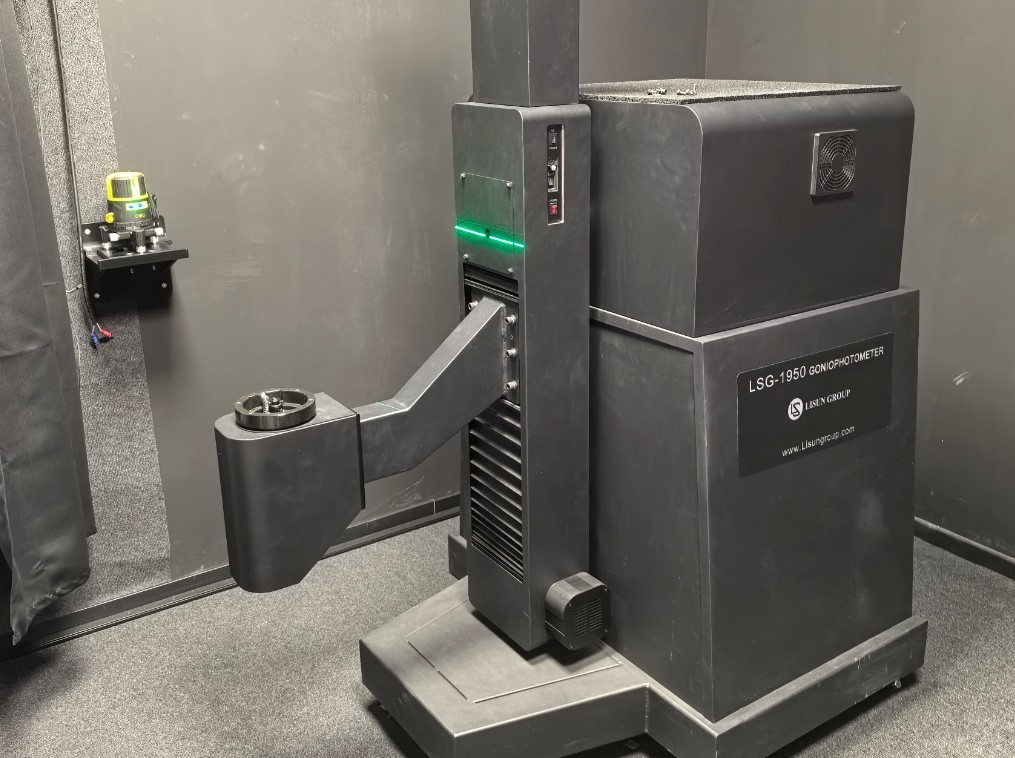
Figura 19
| Număr | notițe |
| ① | Faceți clic pentru a deschide interfața de control al unghiului |
| ② | Enter -90 (or 270) |
| ③ | Click CCW to rotate the fixed shaft counterclockwise to the -90-degree position. |
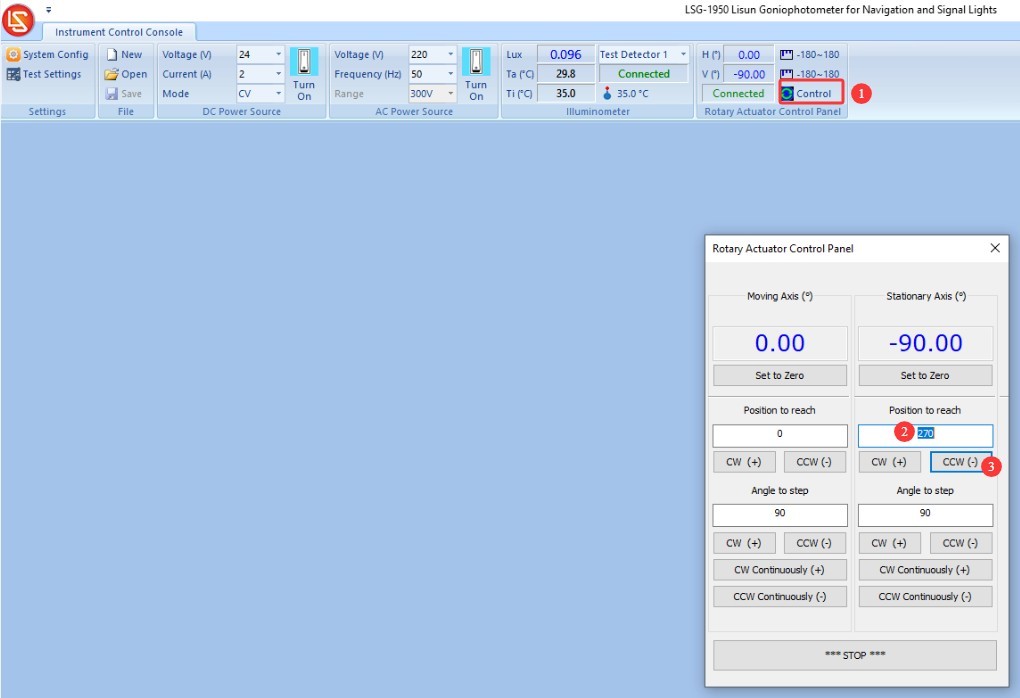
Figura 20
There is a switch on the back of the drive shaft; turn it on.
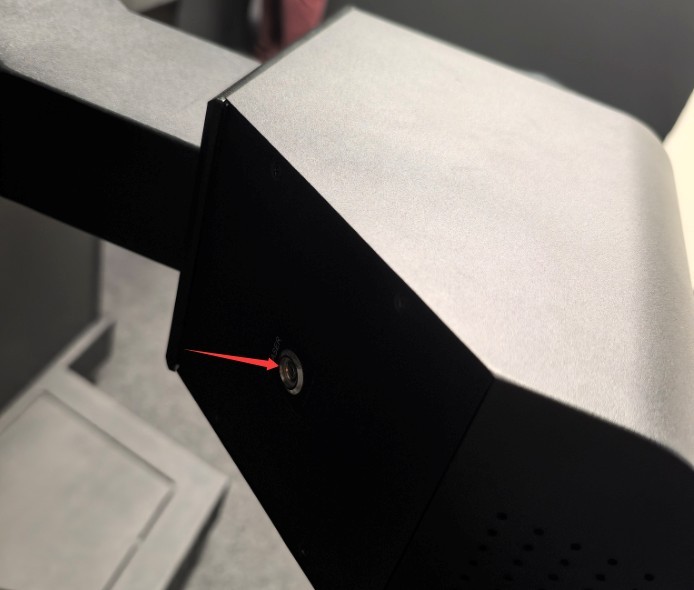
Figura 21
A straight laser beam emanated from the center of the drive shaft, shooting toward the far end of the darkroom.
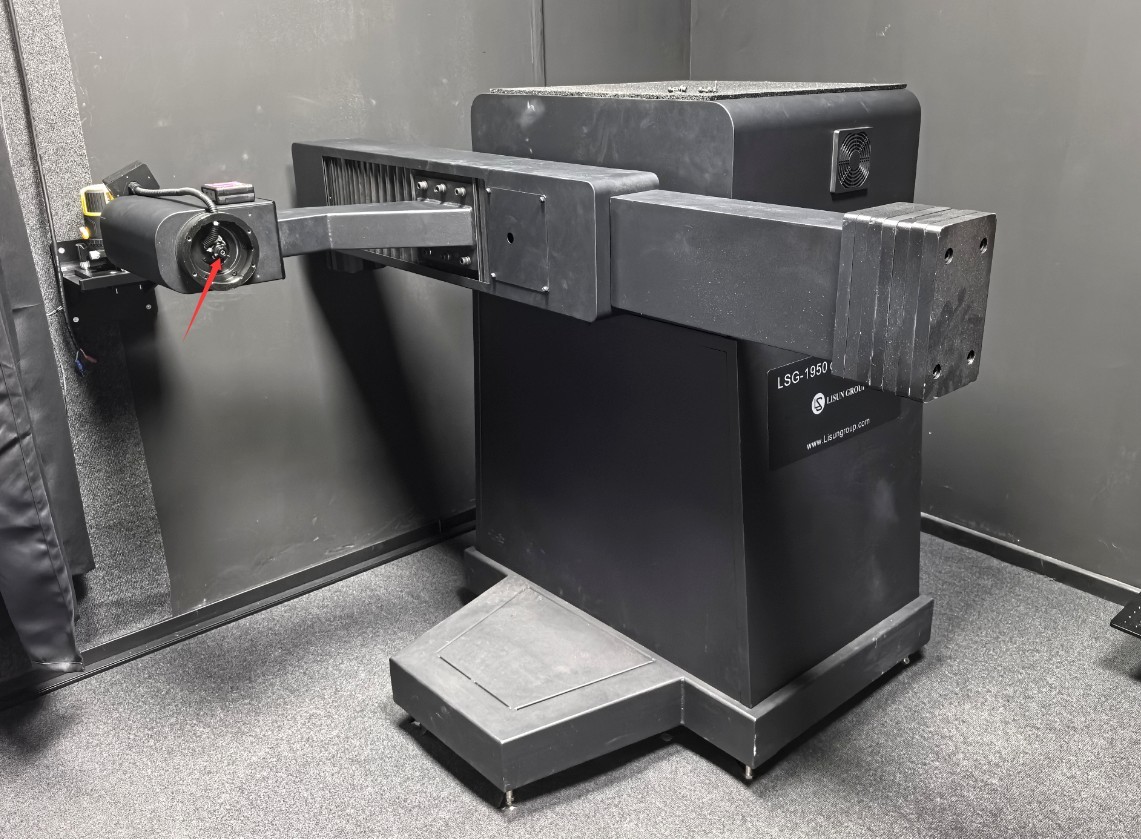
Figura 22
5.1.2 Debugging on the Host Side
Fine-tune the position of the main unit, then adjust its pitch (which can be done by adjusting the height of the unit’s feet). The single-line laser must pass through the exact center of all the light barriers in the darkroom.
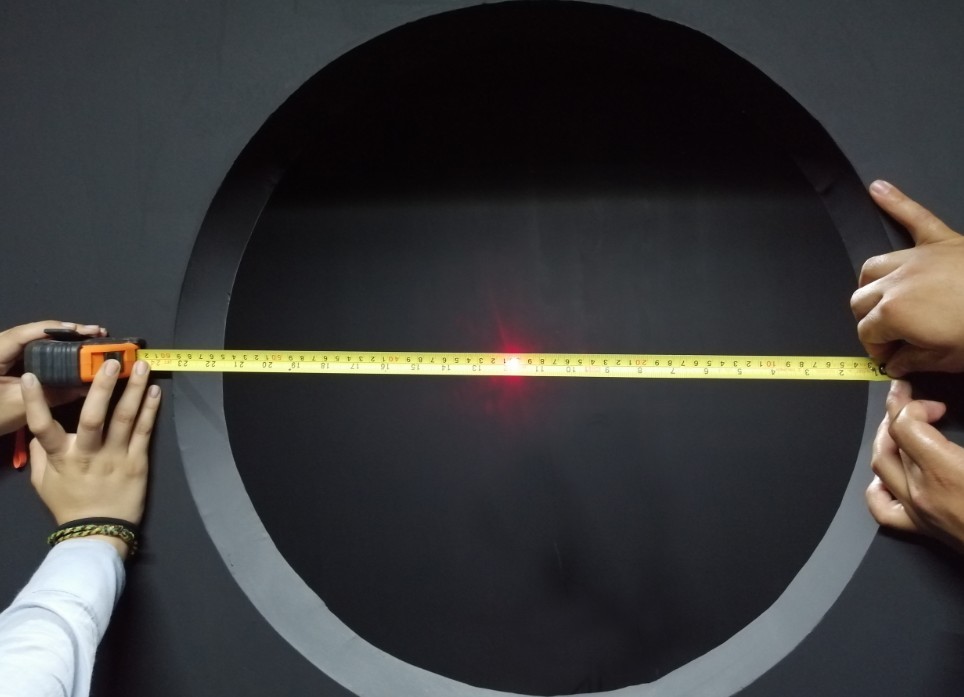
Figura 23
Once adjusted, all feet on the main unit should be firmly on the ground and locked in place. Once the orientation of the main unit of the Goniophotomoeter has been adjusted, do not move it again, as doing so will cause the test results to be inaccurate.
5.2 Calibrarea sondei fotometrice
Rotate the light probe’s lens hood counterclockwise and remove it.
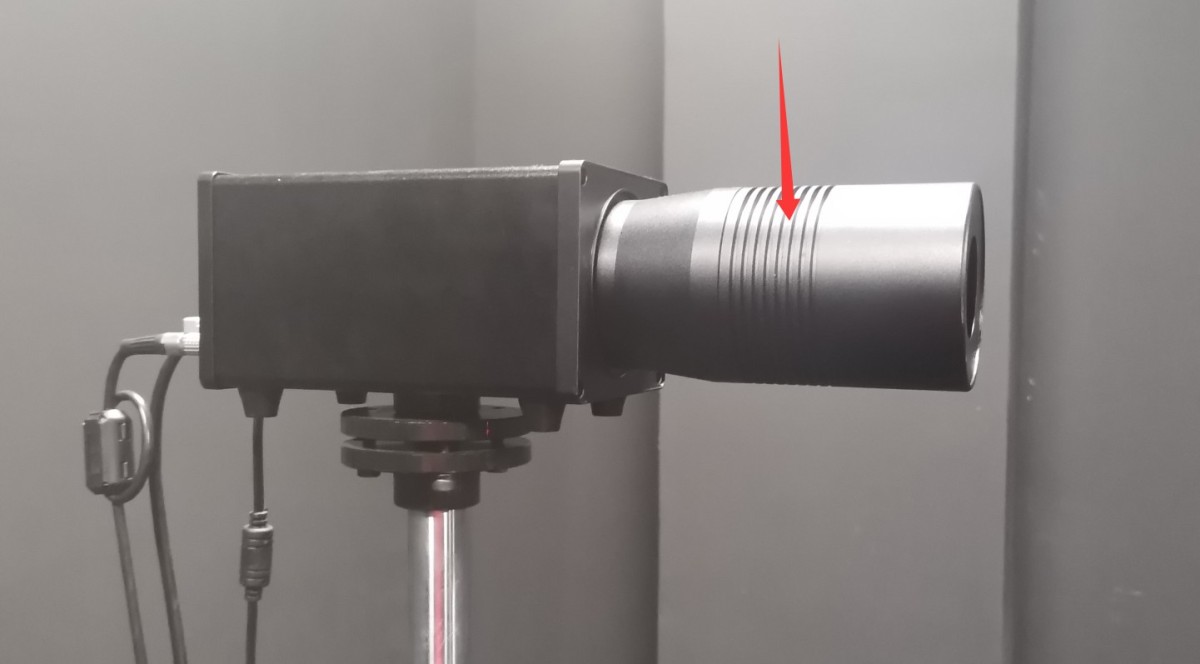
Figura 24
Cutia standard a lămpii conține o oglindă mică.
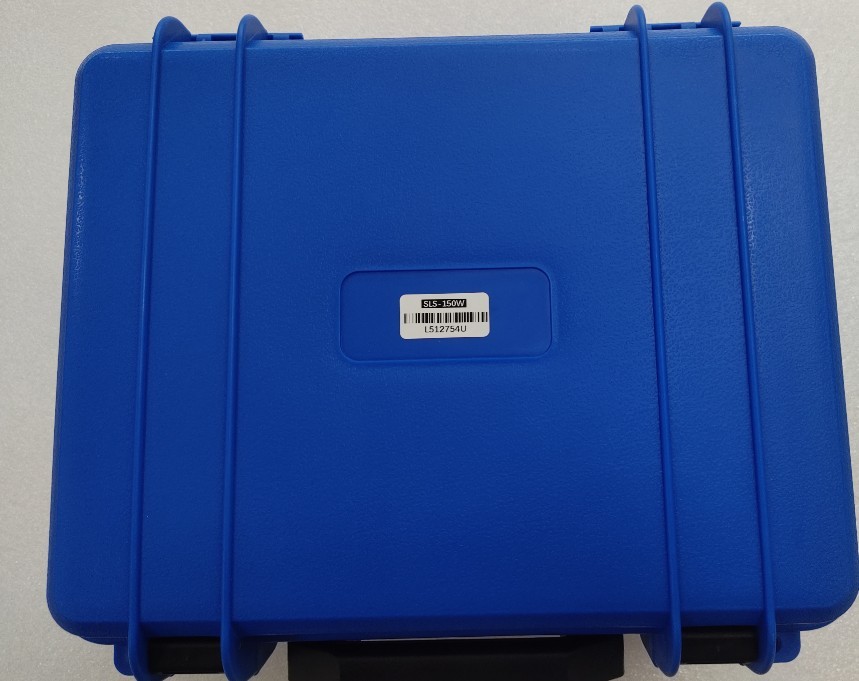
Figura 25
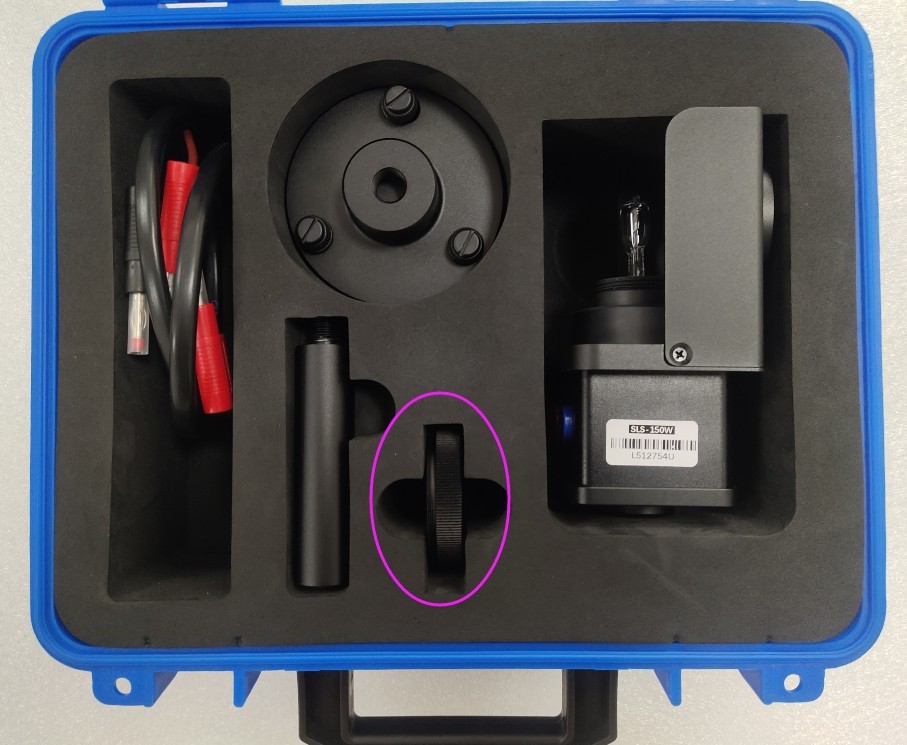
Figura 26
Scoateți reflectorul mic și atașați-l la sondă.
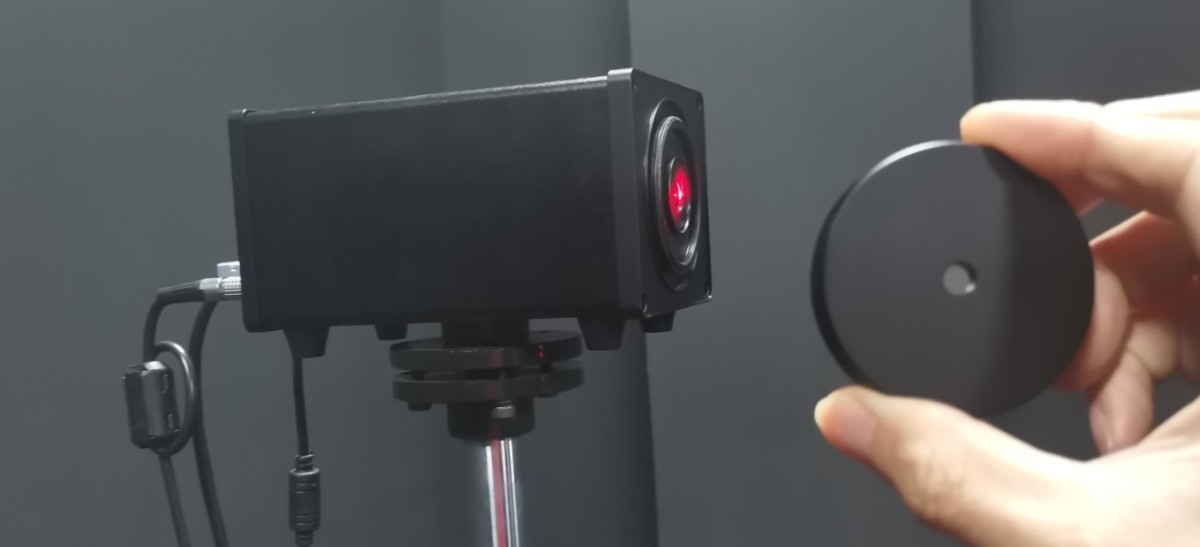
Figura 27
At this point, the fixed axis of the near-field photometer is still at the -90-degree position. Slightly move the probe base and adjust the screws at points ① and ② to adjust the probe’s height and orientation. Position the probe so that the straight laser beam coming from the main axis hits the exact center of the mirror, and ensure that the reflected beam returns along the same path.
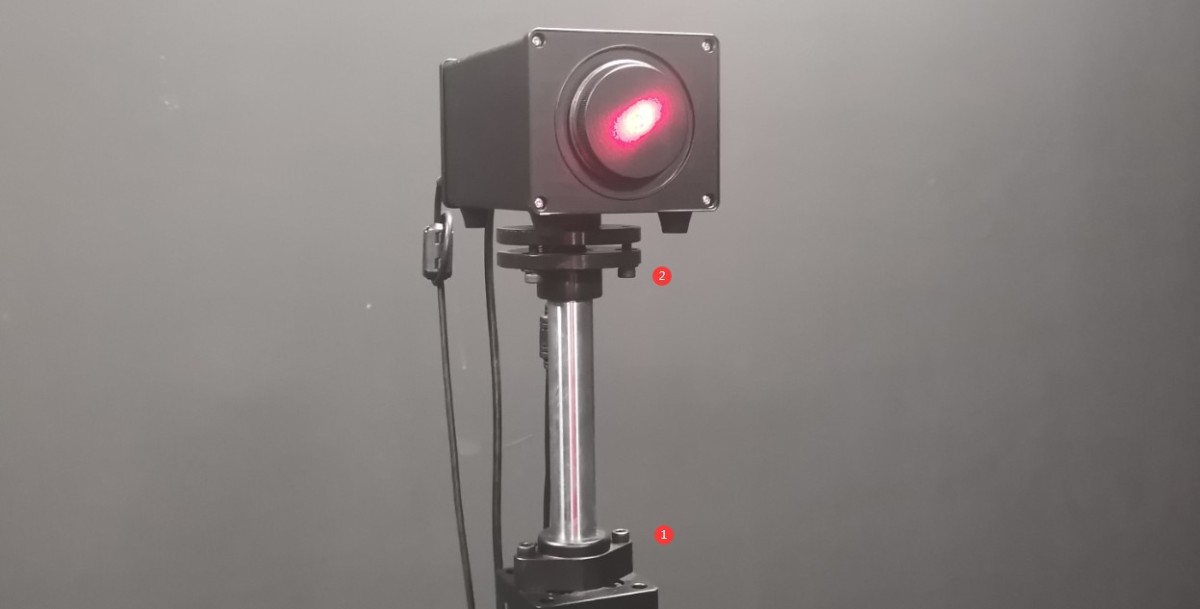
Figura 28
Apoi fixați baza suportului sondei pe podea cu șuruburi.
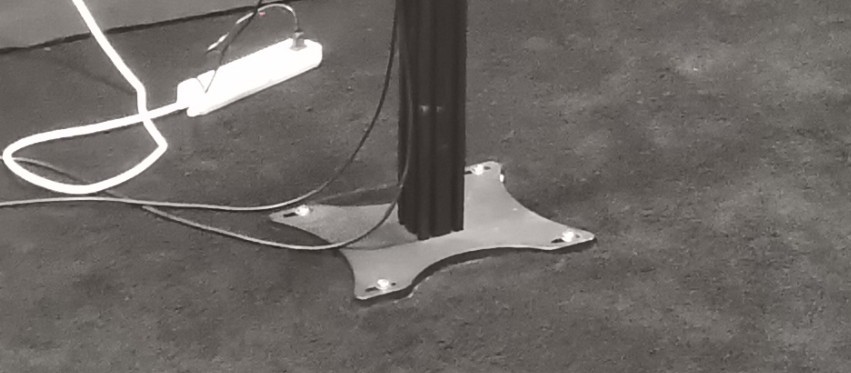
Figura 29
Once secured, you may need to make minor adjustments to the probe’s height and orientation so that the straight laser beam continues to hit the exact center of the reflector and the reflected beam returns along the same path. After calibration is complete, ensure that all screws are tightened. Then remove the reflector and reinstall the light probe’s lens cover.
Note: Once the probe is positioned and oriented correctly, do not adjust it, as doing so may cause the test data to be inaccurate.
You can secure the photometer probe’s power adapter to the probe bracket as shown in the figure below to protect the probe’s power jack.
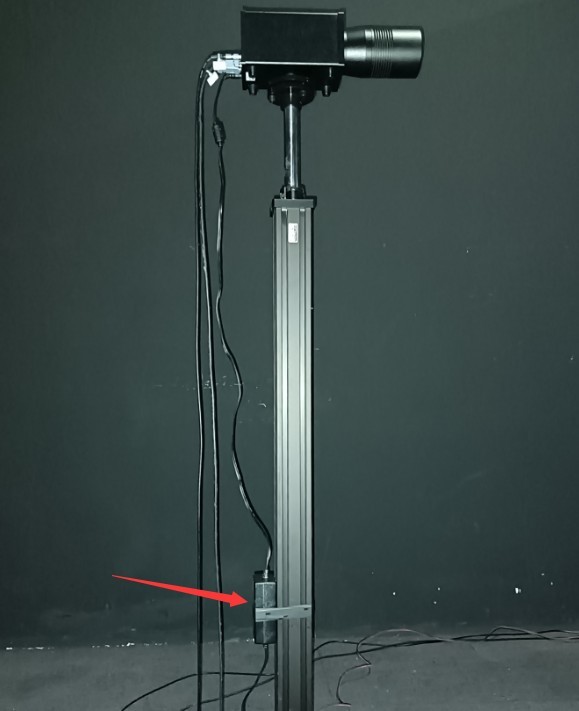
Figura 30
5.3 Returning Equipment to Its Original Location
Turn off the laser on the follow-up shaft.
Back to the software-based control interface.
| Număr | notițe |
| ① | Introduceți 0 |
| ② | Click CW to rotate the fixed part clockwise back to the 0-degree position. |
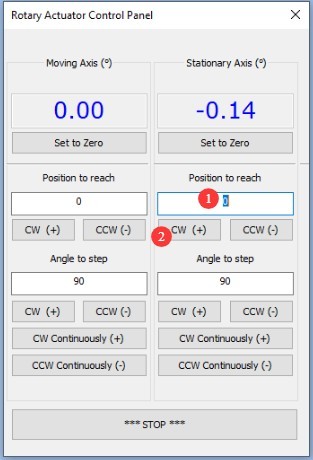
Figura 31
Then reinstall the stage onto the follow-up shaft.
5.4 Curățarea
You may shut down all equipment. When doing so, first turn off the power switch on each device, and then turn off the main power switch for the cabinet. Next, clean the darkroom and control room thoroughly. To prevent dust from entering the equipment, cover it with a dust-proof cloth before cleaning. After cleaning, turn all equipment back on and continue with the calibration and testing procedures.
Notă: Păstrați camera obscură cât mai lipsită de praf în timpul utilizării.
6. Calibration-Related Matters
6.1 Overview of the Fixed-Axis Function
| Număr | notițe |
| ① | Cross-shaped Laser Switch |
| ② | Crosshair Laser Exit Point |
| ③ | Lift Motor Switch |
| ④ | The speed control knob for the lift motor generally does not need to be adjusted. |
| ⑤ | A three-position switch controls the raising, lowering, and stopping of the follow-up shaft |
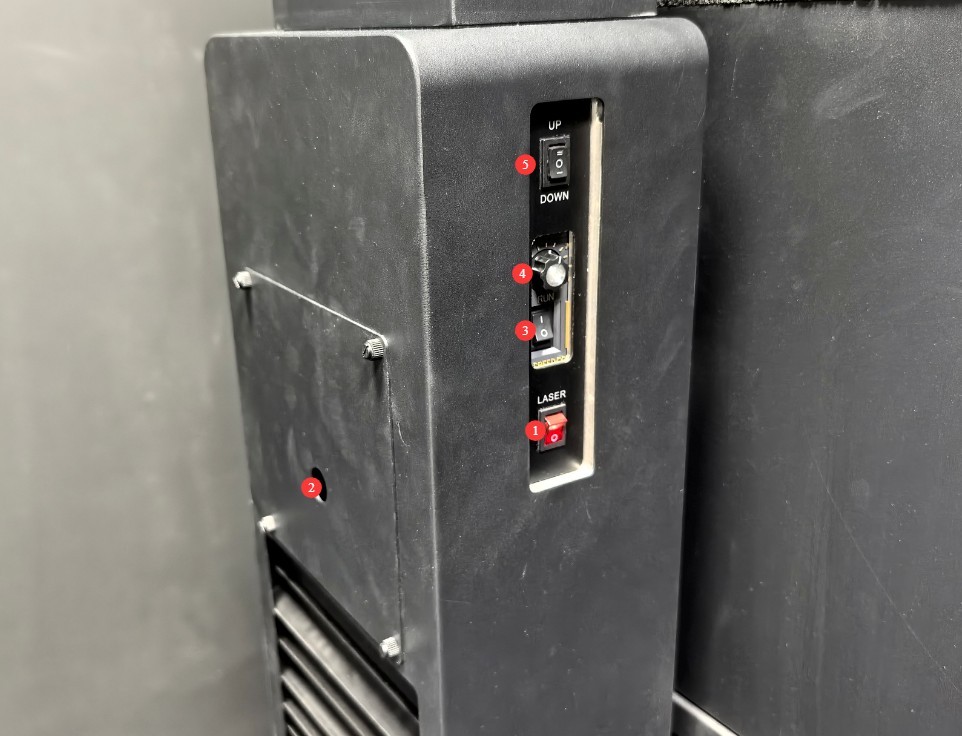
Figura 32
6.2 Instalarea și punerea în funcțiune a lămpilor standard
6.2.1 Instalarea lămpilor standard
Deschideți cutia lămpii standard.
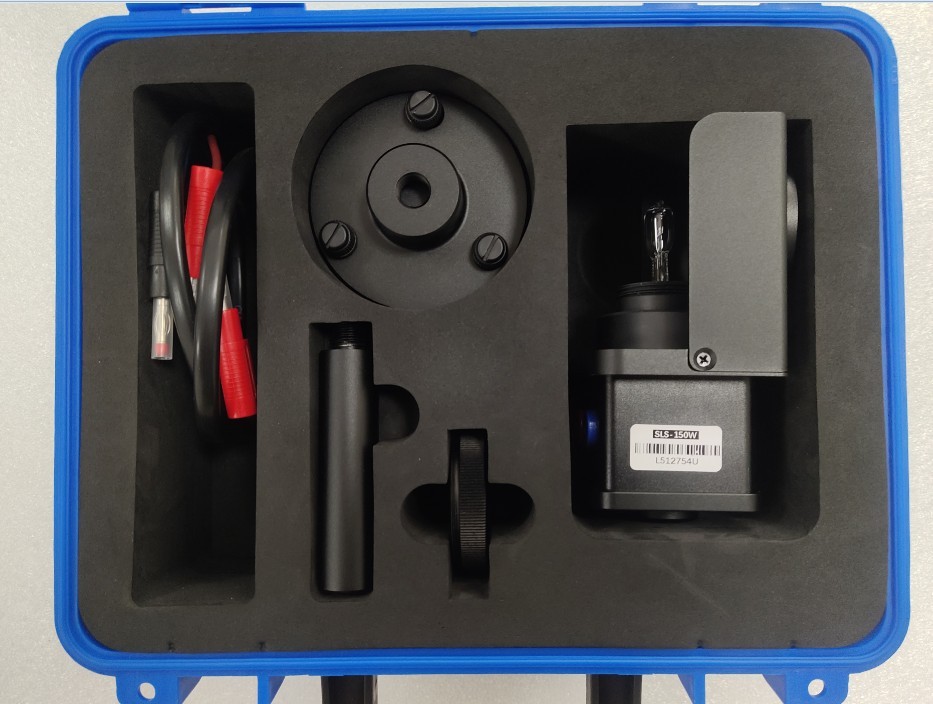
Figura 33
Then assemble the standard lamp, bracket, and small reflector as shown in the figure below.
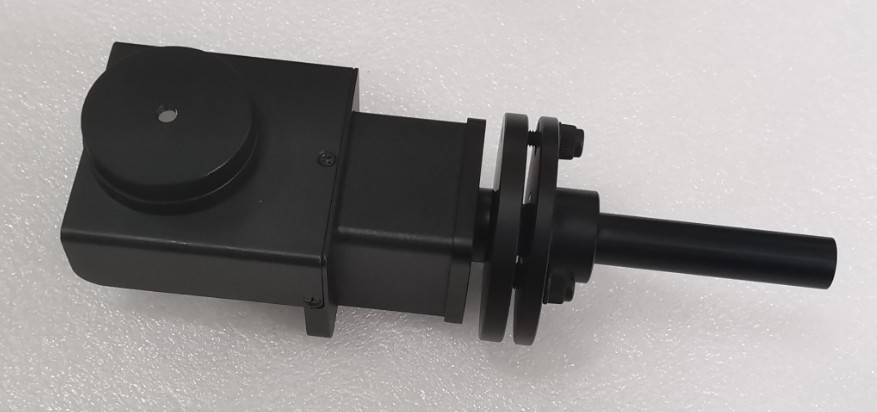
Figura 34
Find the following accessories to help install a standard lamp exactly in the center of the stage.
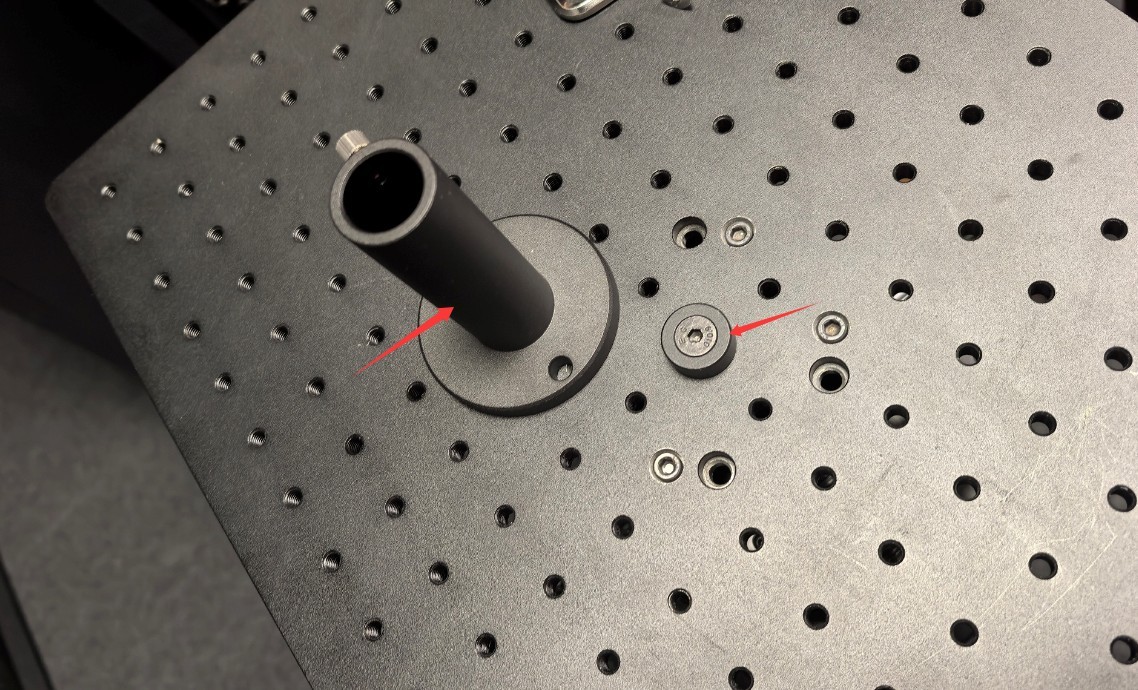
Figura 35
| Număr | notițe |
| ① | Turn on the crosshair laser and adjust the height of the follow-up shaft so that the crosshair laser is projected onto the exact center of the small mirror. |
| ② | Connect the standard lamp power cord to terminals 1 and 2. |
| ③ | The three screws on the standard lamp bracket here can be used to adjust the tilt of the standard lamp. |
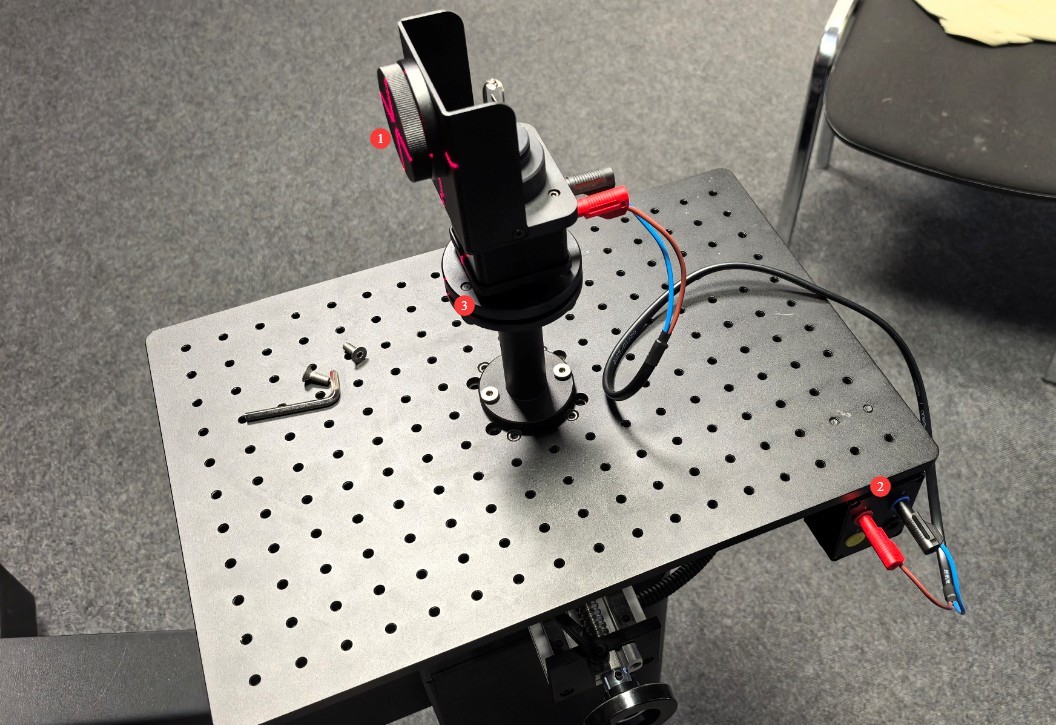
Figura 36
6.2.2 Calibration of the Standard Lamp Direction
Fine-tune until the following conditions are met: The cross-shaped laser beam is directed at the center of the small mirror, and the horizontal and vertical laser beams reflected from the mirror perfectly align with the original cross-shaped laser beam.
Based on our experience, follow these steps for calibration: First, adjust the standard lamp to the appropriate height. The vertical laser reflection can be calibrated by rotating the standard lamp bracket, while the horizontal laser reflection can be calibrated by adjusting the standard lamp’s pitch. Once calibrated, the center height of the standard lamp may change, requiring you to readjust its height.
Once the standard lamp is properly aligned, carefully remove the small reflector, taking care not to alter the alignment of the standard lamp during removal. Then turn off the crosshair laser.
6.3 Procedura de calibrare
All standard lamps are constant-current DC light sources. Set the AC/DC switch on the 19-inch Standard Instrument Cabinet to the DC position.
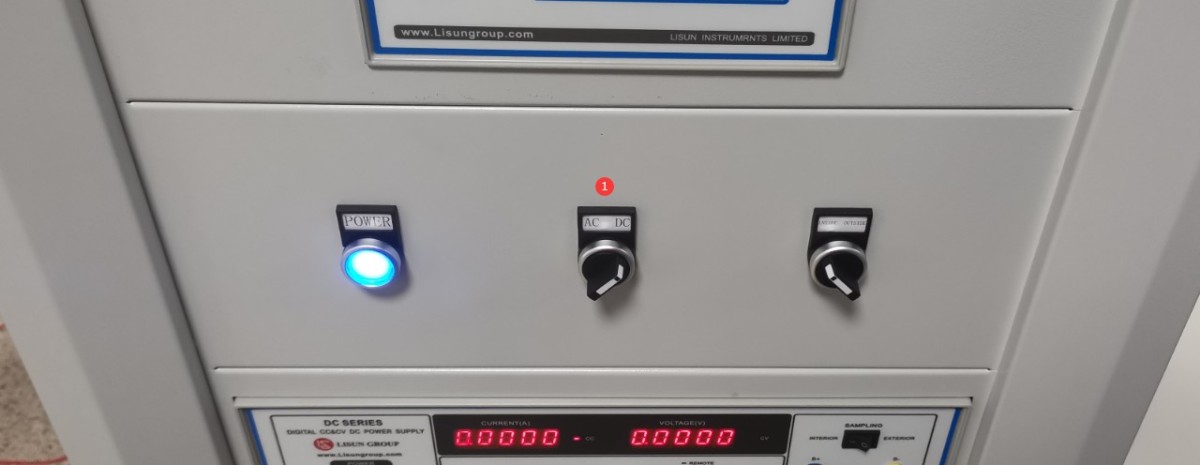
Figura 37
Deschideți controlerul software de unghi.
| Număr | notițe |
| ① | Introduceți -90 |
| ② | Click CCW to rotate the driven shaft counterclockwise to the -90-degree position. |
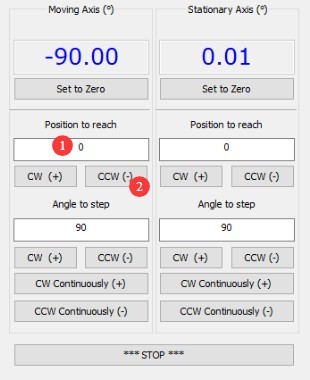
Figura 38
At this point, the circular opening in the standard lamp holder is directly facing the photometric probe.
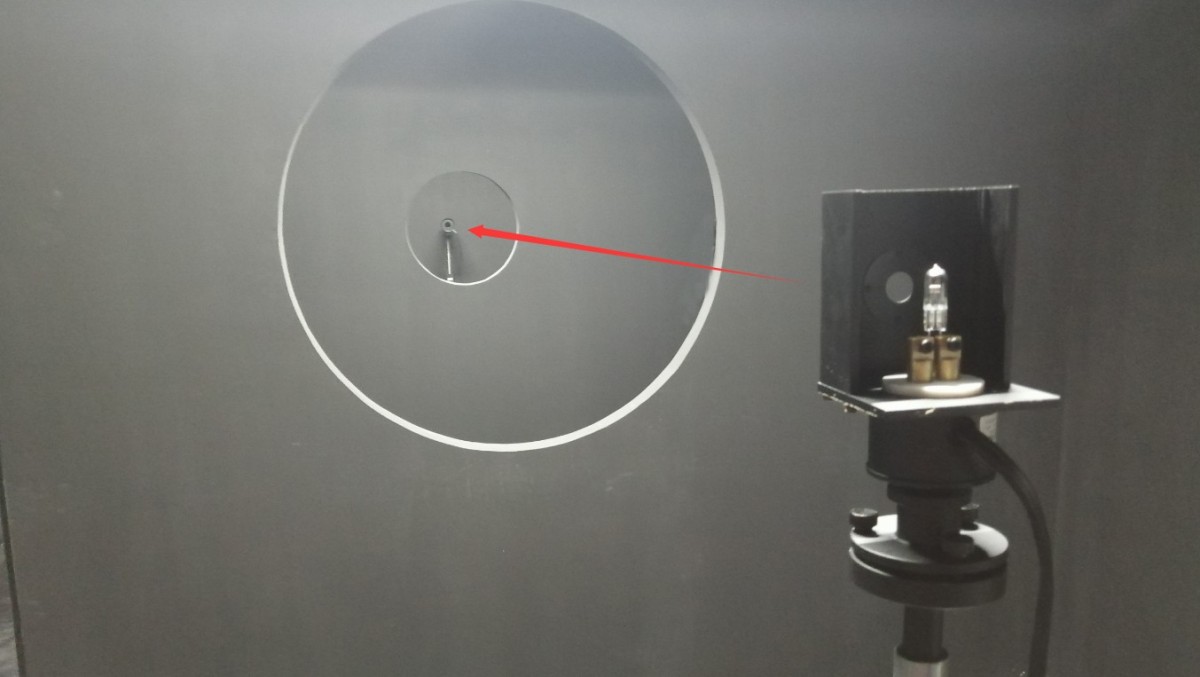
Figura 39
DC Power Control Window.
| Număr | notițe |
| ① | Refer to the standard lamp certificate and enter the reference voltage and rated current. |
| ② | The standard lamp is a constant-current source; select the CC (constant-current) mode. |
| ③ | Click to turn the standard light on or off |
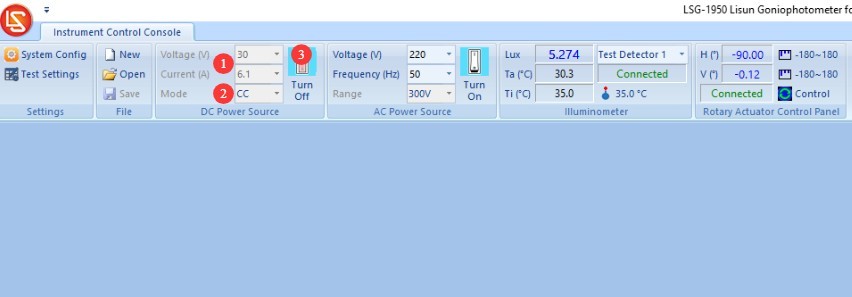
Figura 40
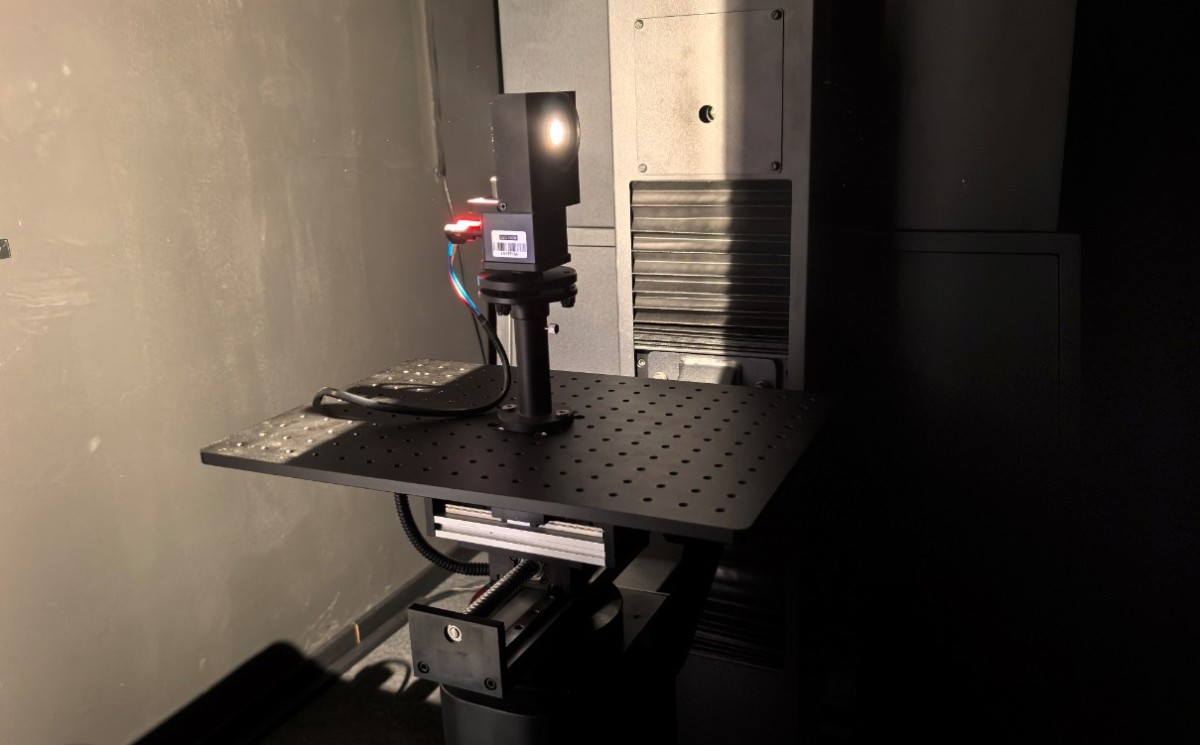
Figura 41
Close the darkroom door and make sure all light sources in the darkroom are turned off except for the standard lamp. Go to the system settings screen.
| Număr | notițe |
| ① | Refer to the standard lamp certificate and enter its rated luminous intensity value. |
| ② | A standard lamp needs to be turned on for about 15 minutes to reach a stable state. Once the standard lamp has stabilized, click “Start” to begin calibration. |
| ③ | The software automatically calculates the test distance. |
| ④ | Faceți clic pe aplicație |
| ⑤ | Faceți clic pe „OK” pentru a salva și a ieși. |
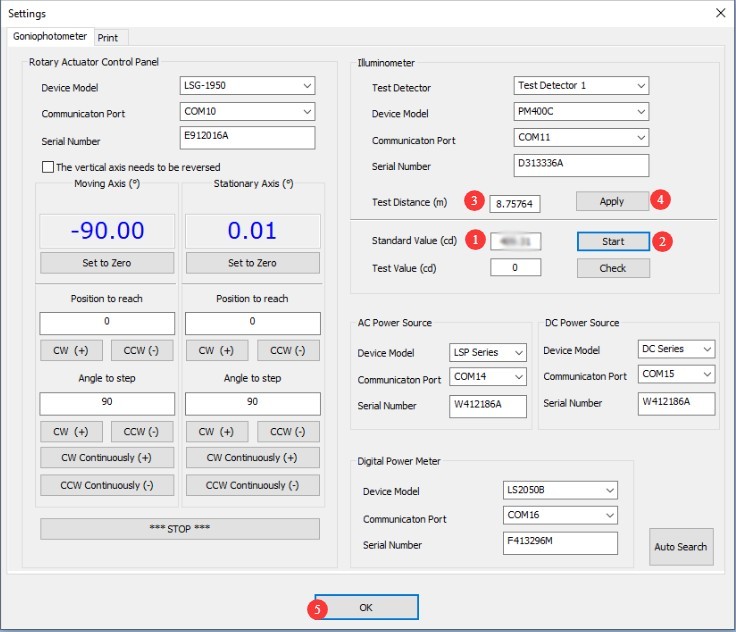
Figura 42
Note: The test distance is the distance from the center of the Goniophotomoeter to the surface of the photometric probe. The distance calculated by the software should be close to the actual distance; an error of 1% or less is considered normal. If the error is too large, please refer to Chapters 5 and 6 to verify that all steps have been performed correctly.
After calibration is complete, you can turn off the standard lamp using the software. Since the standard lamp becomes quite hot during use, wait for it to cool down before returning it to its packaging for safe storage. Remove the calibration rod and store it properly.
6.4 Calibrare și întreținere
| Nicio modificare în camera obscură | Dacă nu au existat modificări la computer, recalibrarea nu este necesară. |
| No changes were made to the computer; simply unplug and replug the communication cable or reinstall the Goniophotomoeter software. No recalibration is required. | |
| If you switch to a new computer or reinstall the operating system, there is no need to recalibrate; simply enter the previous test distance and save it. | |
| Schimbări în camera obscură | Structura camerei obscure rămâne neschimbată; cu toate acestea, după o utilizare prelungită, vopseaua interioară se poate decolora sau exfolia. În funcție de cât de bine întrețineți camera obscură și de nivelul de precizie necesar pentru rezultatele testelor, puteți revopsi periodic camera obscură. După revopsire, camera obscură trebuie recalibrată. |
| A avut loc o modificare a configurației camerei obscure, așa că este necesară recalibrarea. |
7. Install and turn on the sample light fixture
7.1 Installation of Sample Luminaires
Rotate the follow-up axis back to the -90-degree position. Turn on the crosshair laser on the fixed axis. Secure the sample to the stage, and adjust the height of the follow-up axis so that the center of the sample’s light-emitting surface aligns with the center of the crosshair laser.
7.2 Turning on the Sample Luminaire
Connect the power leads of the luminaire under test to the sampling leads. Connect the power leads to terminals 1 and 2 in the test stand junction box. Terminals 3 and 4 are the sampling leads; use jumper wires to short-circuit terminals 1 and 3, and terminals 2 and 4.
Adjust the cabinet transfer switch based on the parameters of the luminaire being tested.
| Număr | notițe |
| ① | Dacă corpul de iluminat eșantion este alimentat de curent alternativ, comutați pe direcția curent alternativ; dacă este alimentat de curent continuu, comutați pe direcția curent continuu. |
| ② | Internal/External Sampling Switch for Electrical Parameters. External sampling uses a four-wire configuration, which provides more accurate voltage readings. Unless otherwise required, please set this switch to “External Sampling”; no further adjustments are necessary. |
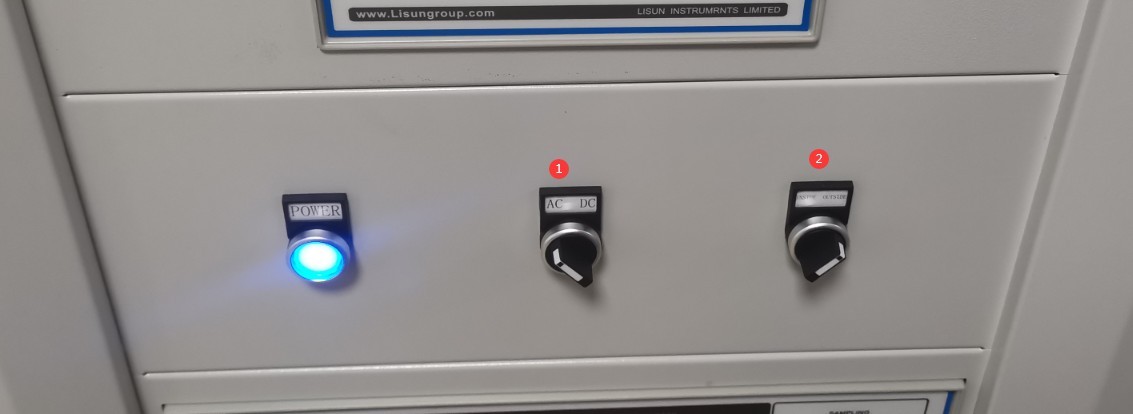
Figura 43
Dacă corpul de iluminat eșantion este alimentat de curent alternativ.
| Număr | notițe |
| ① | Based on the parameters of the sample luminaire, enter the correct voltage and frequency. |
| ② | Click to turn the sample light on or off |
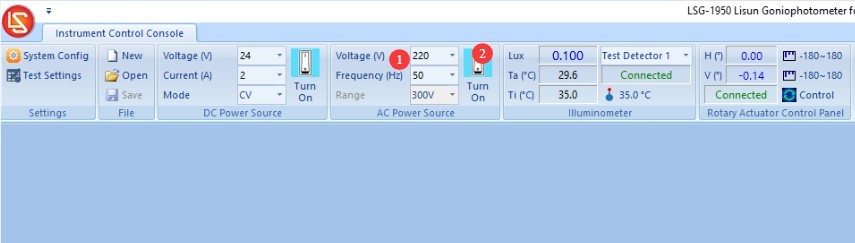
Figura 44
Dacă corpul de iluminat eșantion este alimentat cu curent continuu.
| Număr | notițe |
| ① | Based on the parameters of the sample luminaire, enter the correct voltage and current. |
| ② | Select the output mode: CC stands for constant current, and CV stands for constant voltage. If you select constant current, enter the sample’s rated current value; for voltage, simply enter the DC power supply’s maximum output voltage. If you select constant voltage, enter the sample’s rated voltage; for the current, simply enter the DC power supply’s maximum output current. Notă: Dacă modelul sursei de alimentare CC este DC3010tensiunea sa maximă de ieșire este de 30 V, iar curentul său maxim de ieșire este de 10 A. |
| ③ | Click to turn the sample light on or off |
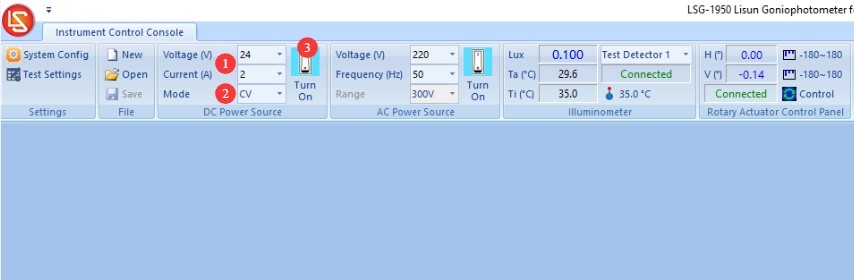
Figura 45
Close the darkroom door and make sure that all light sources in the darkroom, except for the sample lighting, are turned off.
8. Testare operațională
8.1 Testing Using Existing Software Programs
| Număr | notițe |
| ① | Click “New Test” |
| ② | Select the program you need |
| ③ | Click OK to enter the test interface |
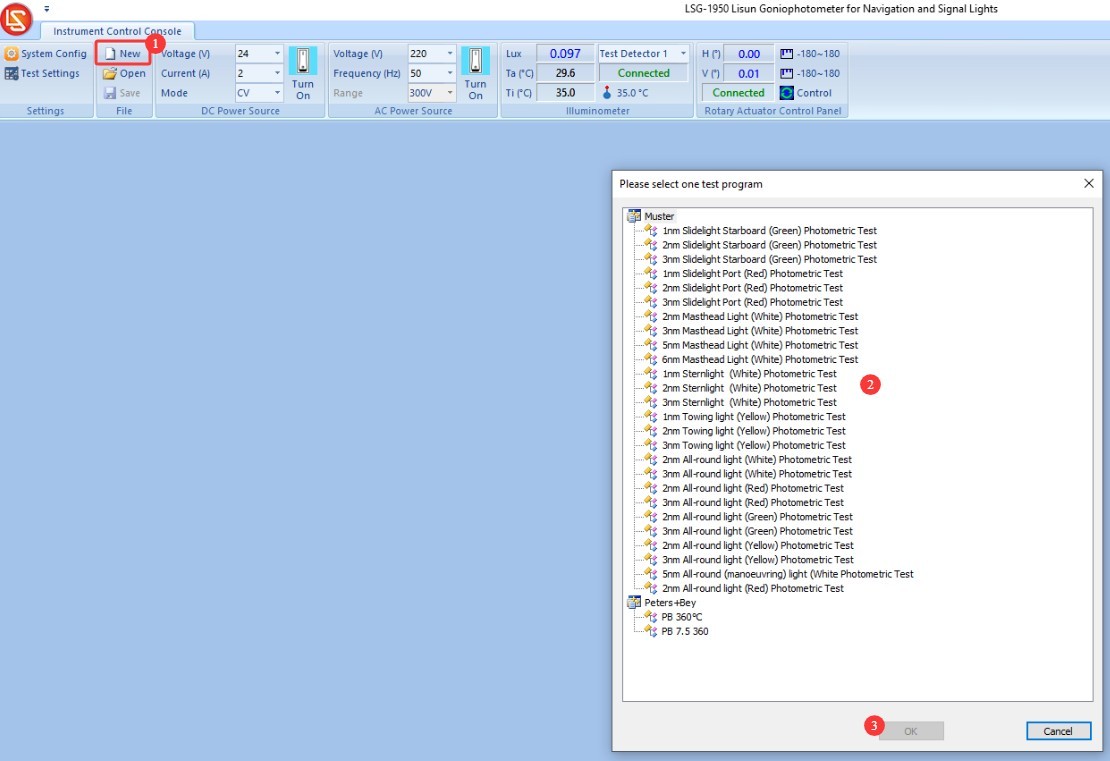
Figura 46
Click the “Test” button in the left sidebar to automatically run the test suite for the current program. Simply wait for the test to complete automatically.
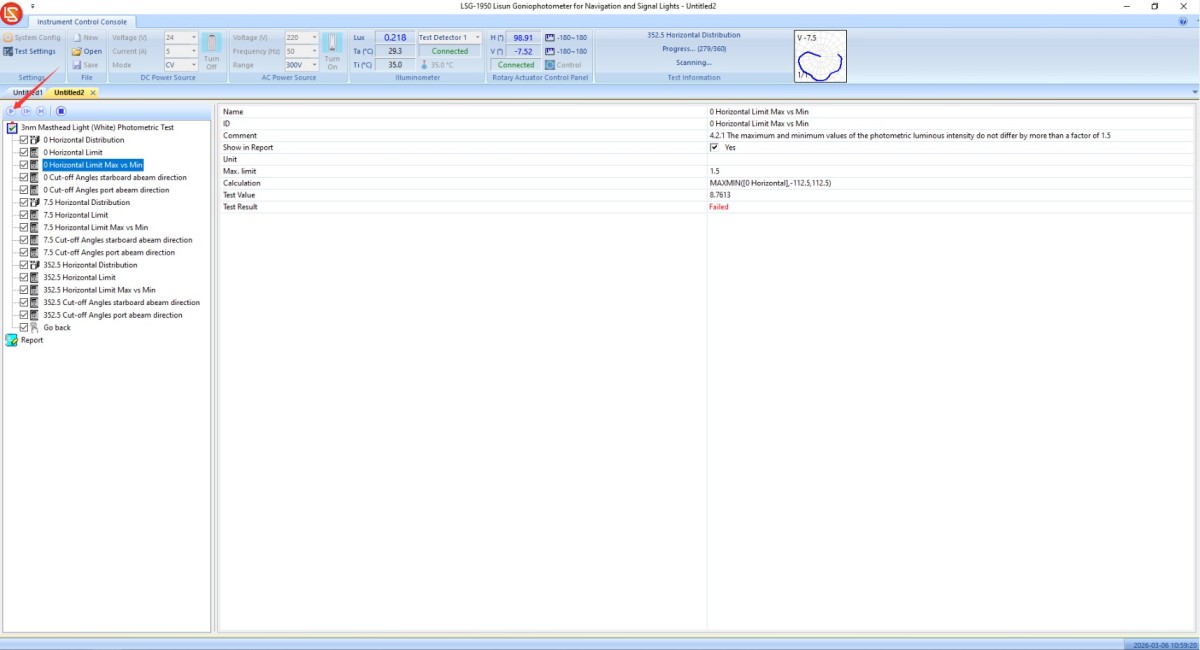
Figura 47
8.2 Testing the Newly Created Program
8.2.1 Creating a New Program
| Număr | notițe |
| ① | Click to configure the test settings |
| ② | Based on the existing test standards, you can click to add a new test standard. Test standards are the items circled in red; you can customize the standard name. |
| ③ | After selecting a test standard, you can click to add a new test program under that standard. This refers to the item circled in green; you can customize the name of the test program. |
| ④ | If you want to modify one of the previous test programs, select the program you want to edit and click “Copy.” |
| ⑤ | Select the corresponding standard, then click “Paste.” The previously selected test program will be copied to the current standard. |
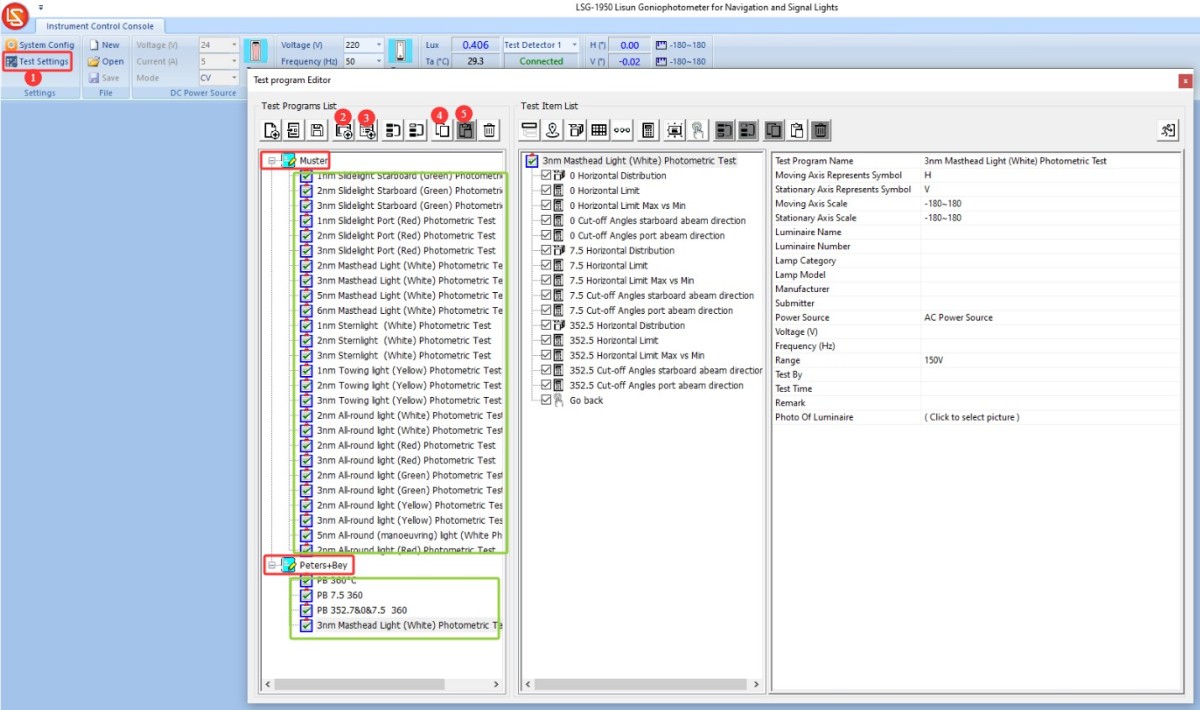
Figura 48
Note: For ease of editing, you may copy an existing program and make adjustments or deletions based on it. If you wish to create a new test program from scratch, please ensure you have fully mastered Section 8.2 of this manual before carefully studying the LSG-1950 Programming Tutorial.
8.2.2 Examples of Editing Programs
| Număr | notițe |
| ① | Select the test program you want to edit |
| ② | Select the first row |
| ③ | You can change the name of the test program |
| ④ | Define the angle range, which can be set from -180 to 180 or from 0 to 360. |
| ⑤ | To control the lighting on/off via a program, you must select the appropriate power supply and configure the corresponding electrical parameters. If you follow the instructions in Section 7.2 to turn the lights on or off, you do not need to use program-based control, and you do not need to configure the power supply-related parameters. |
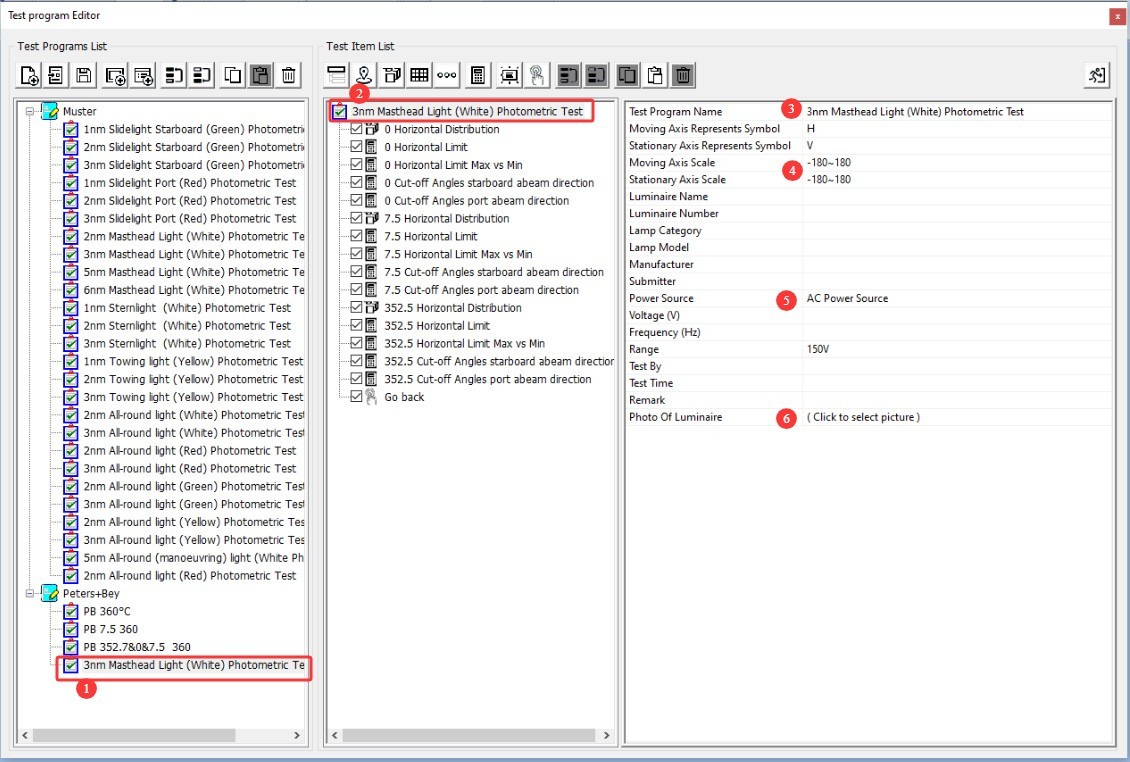
Figura 49
Program Editor Navigation Bar Guide.
| Număr | notițe |
| ① | Add a test point |
| ② | Add a test face |
| ③ | Add a Test Grid |
| ④ | Add Multiple Test Points |
| ⑤ | Add Calculation |
| ⑥ | Add a Message |
| ⑦ | Adăugați comanda |
| ⑧ | Move Test Item Up |
| ⑨ | Move the test item down |
| ⑩ | Copy Test Item |
| ⑪ | Paste Test Items |
| 10 | Delete Test Item |
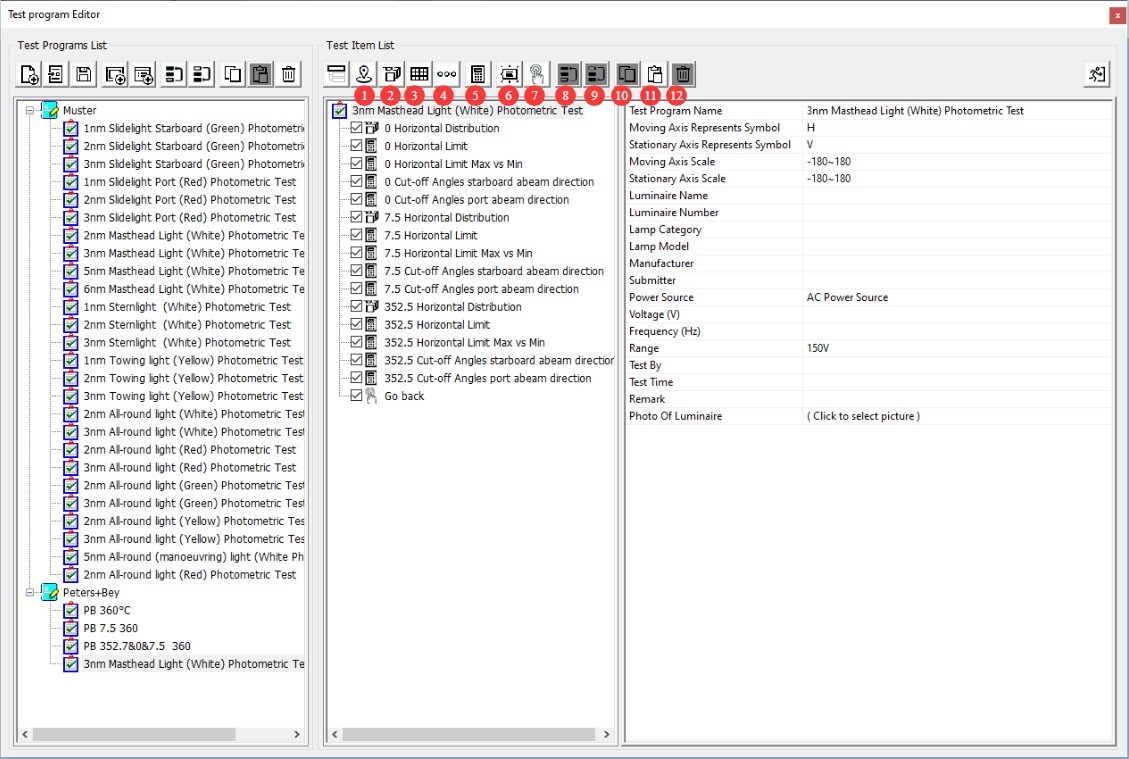
Figura 50
| Număr | notițe |
| ① | The first test case in the program is the test case |
| ② | You can freely edit the name of this test surface. |
| ③ | You can freely edit the ID of this test surface. (Note: If subsequent calculations are to be based on these test results, you must use the same ID when adding the calculations.) |
| ④ | Graph Selection: Polar Coordinates or Cartesian Coordinates |
| ⑤ | Marker Lines: Add marker lines at several key angles on the light intensity curve. Example: -115.5R indicates adding a red marker line at -115.5 degrees; 112.5G indicates adding a green marker line at 112.5 degrees. Separate entries with a semicolon. |
| ⑥ | Scan axis selection: Choose between a fixed axis or a follow-up axis; the follow-up axis is generally selected. |
| ⑦ | Scan position: 0.0 means that when the fixed axis is at the 0.0-degree position, the follow-up axis performs the scan. |
| ⑧ | The scanning range is from -180 to 180, meaning the follow-up shaft scans from the -180-degree position to the 180-degree position. Users can configure this setting according to their needs. |
| ⑨ | Set the upper and lower limits in cd. Leave blank if no values are needed. |
| Note: For other settings on this page, please refer to the image. | |
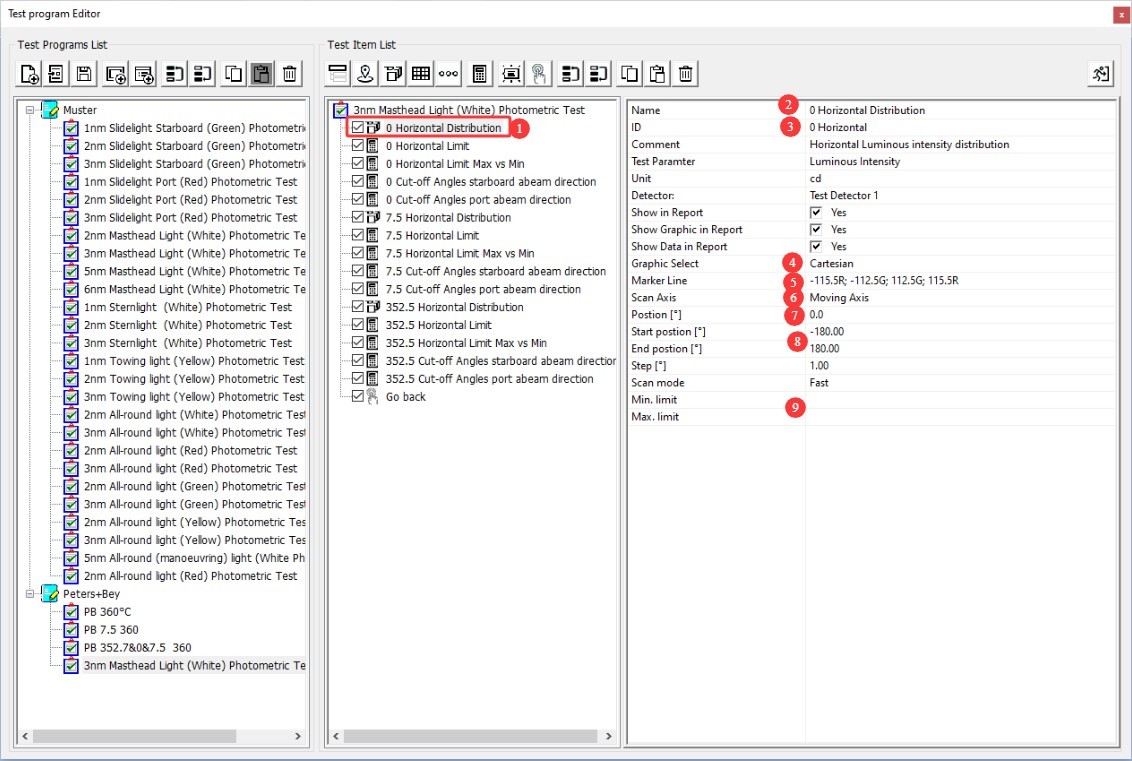
Figura 51
Several calculations were added based on this test case.
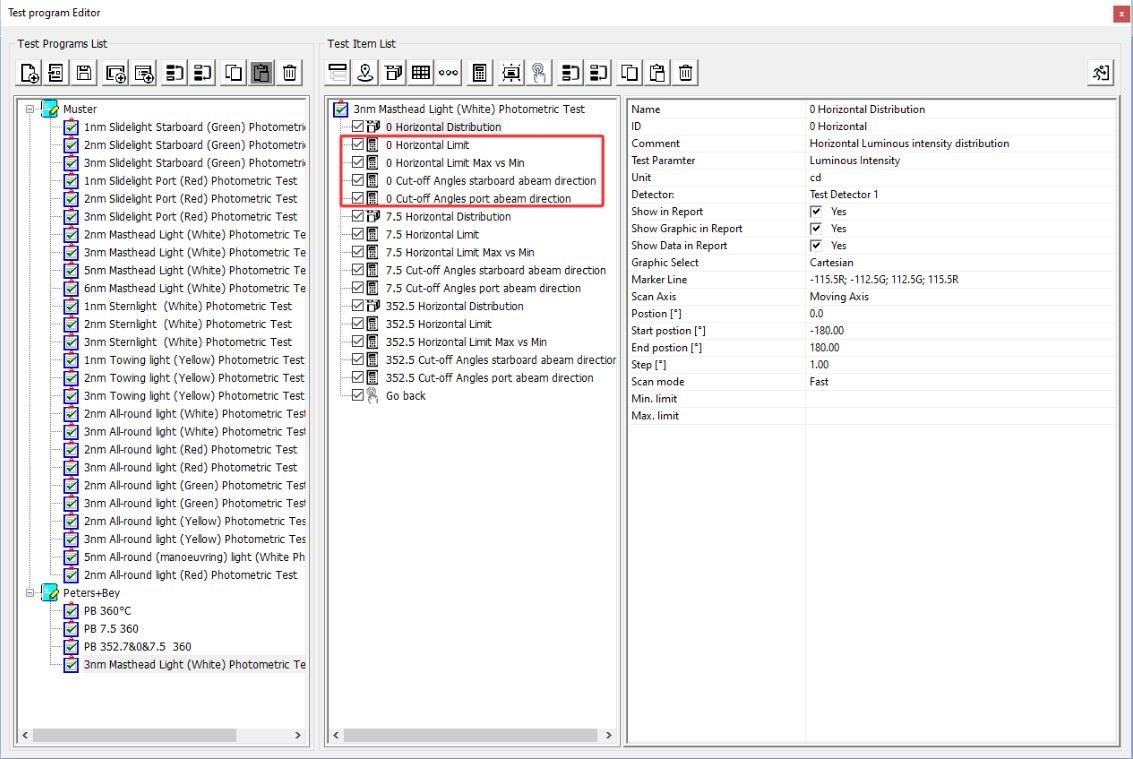
Figura 52
| Număr | notițe |
| ① | First calculation: Calculate the limit |
| ② | You can freely edit the name of this calculation. |
| ③ | You can freely edit the ID of this calculation. (Note: If subsequent calculations need to be based on the results of this calculation, you must use the same ID when adding those calculations.) |
| ④ | Enter the limit values. The minimum value is 12; that is, the test passes if the minimum value is at least 12 cd, and fails if it is less than 12 cd. No maximum value is set, meaning the maximum value is not calculated. |
| ⑤ | Calculation formula. In this formula, “MIN” refers to calculating the minimum value; “0 Horizontal” is the ID of the test plane for the first test item, meaning the calculation is based on that test plane; “-112.5112.5” means the calculation is performed within the range of -112.5 degrees to 112.5 degrees of the results for that test plane. |
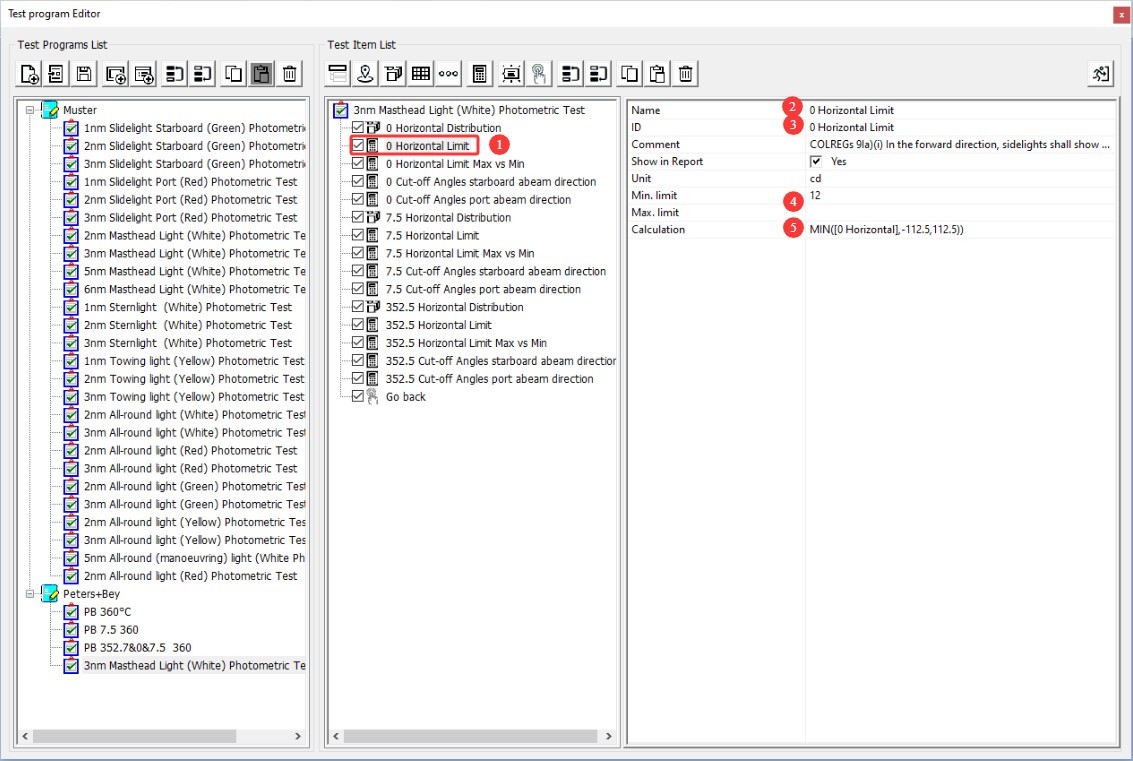
Figura 53
| Număr | notițe |
| ① | The second calculation: Calculate the ratio of the maximum value to the minimum value. |
| ② | You can freely edit the name of this calculation. |
| ③ | You can freely edit the ID of this calculation. (Note: If subsequent calculations need to be based on the results of this calculation, you must use the same ID when adding those calculations.) |
| ④ | Enter the limit values. The maximum value is 1.5; that is, the test passes if the ratio of the maximum light intensity to the minimum light intensity is no greater than 1.5, and fails if it is greater than 1.5. No minimum value is set, meaning the minimum value is not calculated. |
| ⑤ | Calculation formula. In this formula, MAXMIN refers to calculating the ratio of the maximum value to the minimum value; 0 Horizontal is the ID of the test plane for the first test item, meaning the calculation is based on that test plane; -112.5112.5 means the calculation is performed within the range of -112.5 degrees to 112.5 degrees of the results for that test plane. |
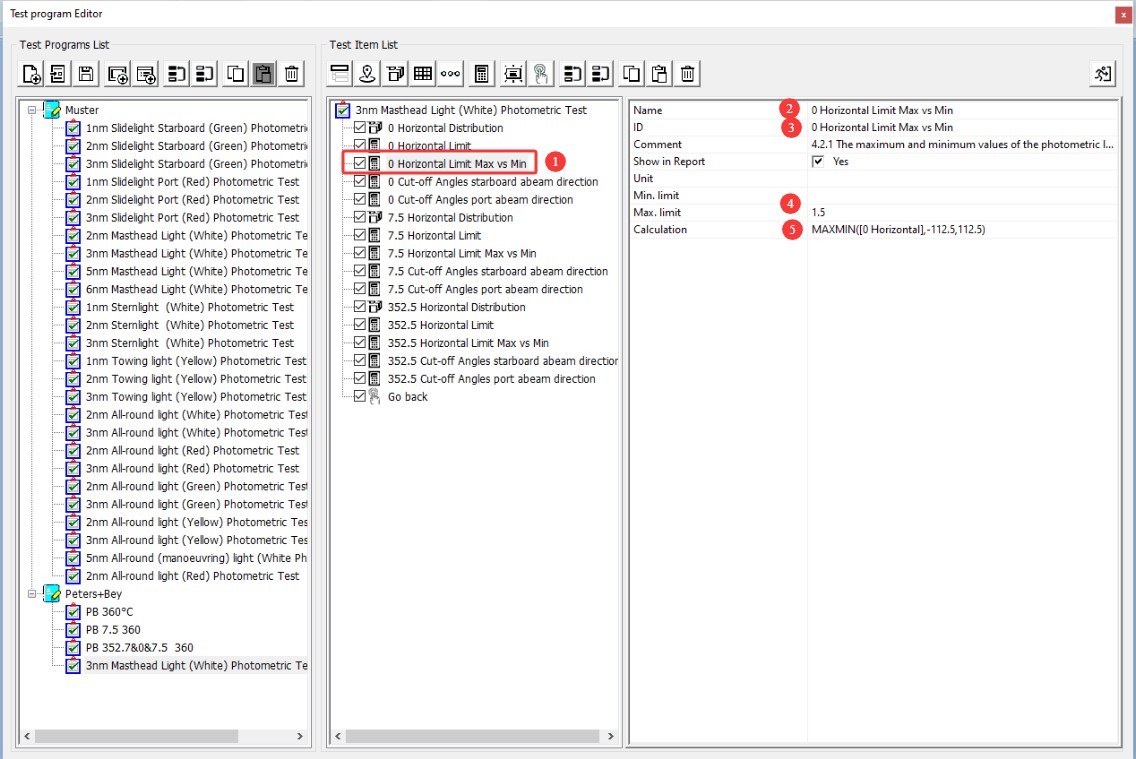
Figura 54
| Număr | notițe |
| ① | The third calculation determines the effective beam angle of the starboard crossbeam (forward angle). |
| ② | You can freely edit the name of this calculation. |
| ③ | You can freely edit the ID of this calculation. (Note: If subsequent calculations need to be based on the results of this calculation, you must use the same ID when adding those subsequent calculations.) |
| ④ | The unit is ° |
| ⑤ | Enter the limit values. The minimum value is 112.5 and the maximum is 115.5; that is, a forward-facing valid beam angle within this range is considered a pass, while one outside this range is considered a fail. |
| ⑥ | Calculation formula. In this formula, “CUTOFF” refers to the calculation of the effective beam angle; “0 Horizontal” is the ID of the test surface for the first test item, meaning the calculation is based on that test surface; “1” indicates that the effective beam angle is determined by measuring forward angles starting from the center (the 0-degree position). |
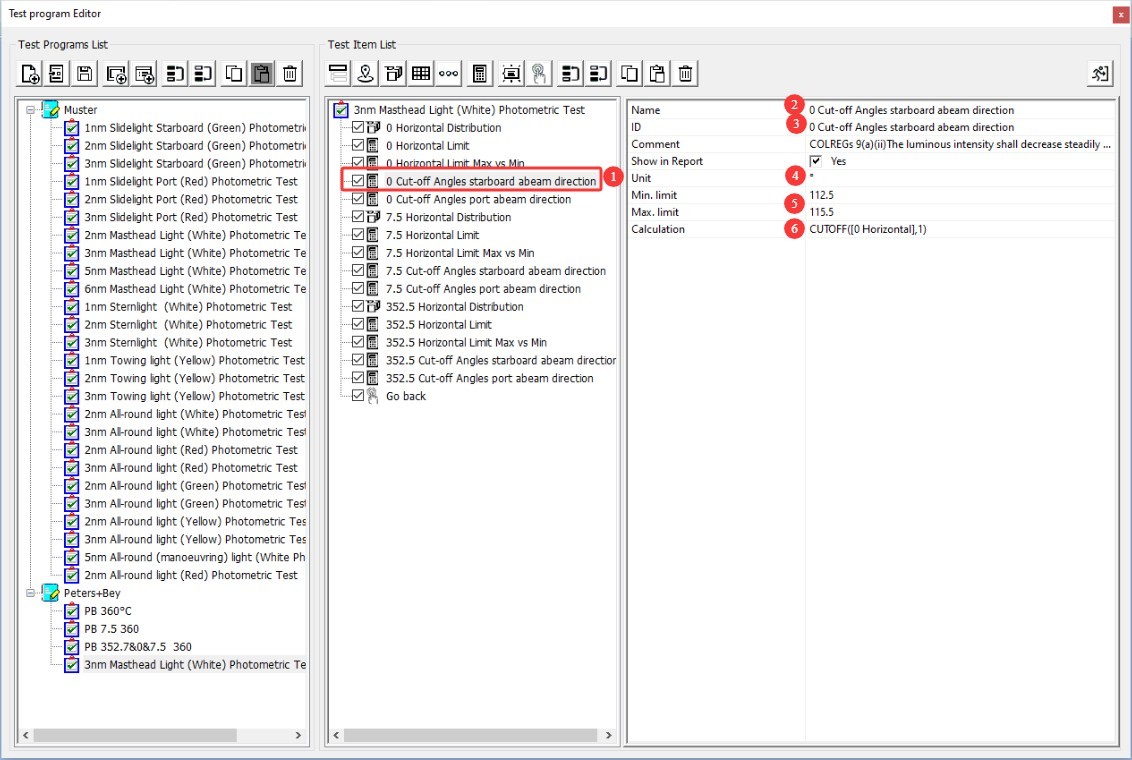
Figura 55
| Număr | notițe |
| ① | The fourth calculation: Calculate the effective beam angle of the port-side crossbeam (negative angle) |
| ② | You can freely edit the name of this calculation |
| ③ | You can freely edit the ID of this calculation. (Note: If subsequent calculations need to be based on the results of this calculation, you must use the same ID when adding those subsequent calculations.) |
| ④ | The unit is ° |
| ⑤ | Enter the limit values. The minimum value is -115.5, and the maximum is -112.5. This means that a forward valid beam angle within this range is considered “pass,” while one outside this range is considered “fail.” |
| ⑥ | Calculation formula. In this formula, “CUTOFF” refers to the calculation of the effective beam angle; “0 Horizontal” is the ID of the test surface for the first test item, meaning the calculation is based on that test surface; “0” indicates that the effective beam angle is determined by measuring from the center (the 0-degree position) toward negative angles. |
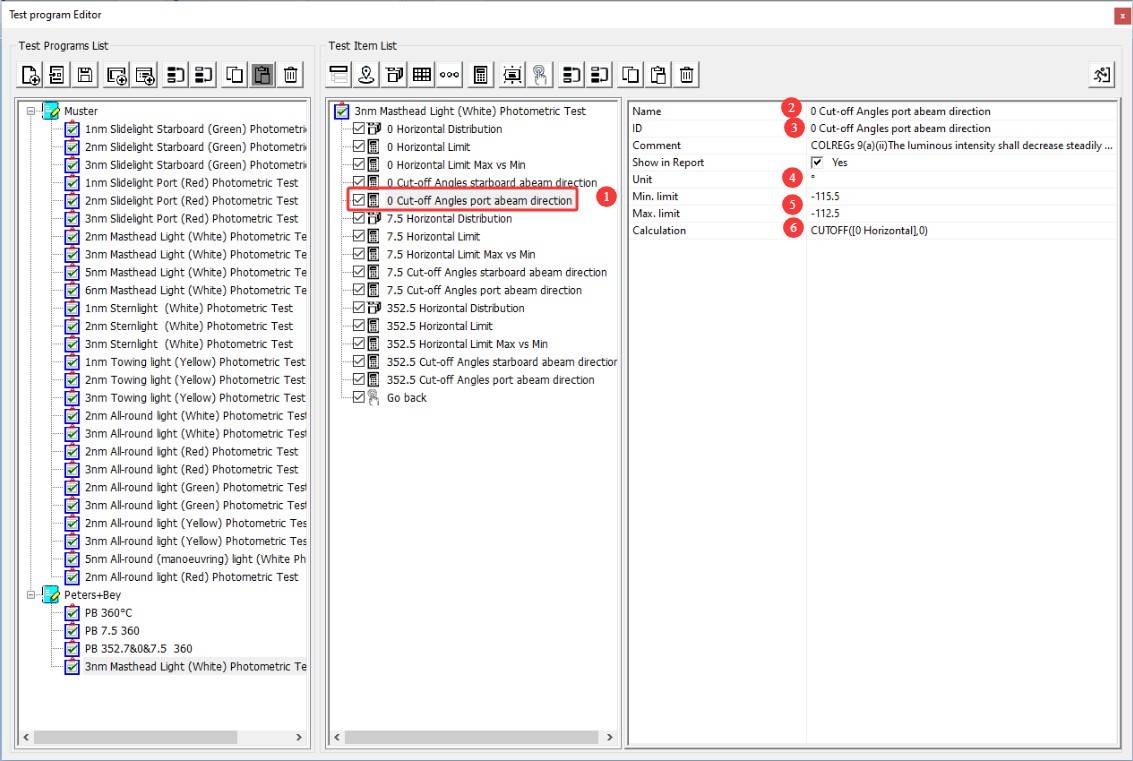
Figura 56
The following two sets of scans and calculations were performed at fixed-axis positions of 7.5 degrees and 352.5 degrees (-7.5), respectively.
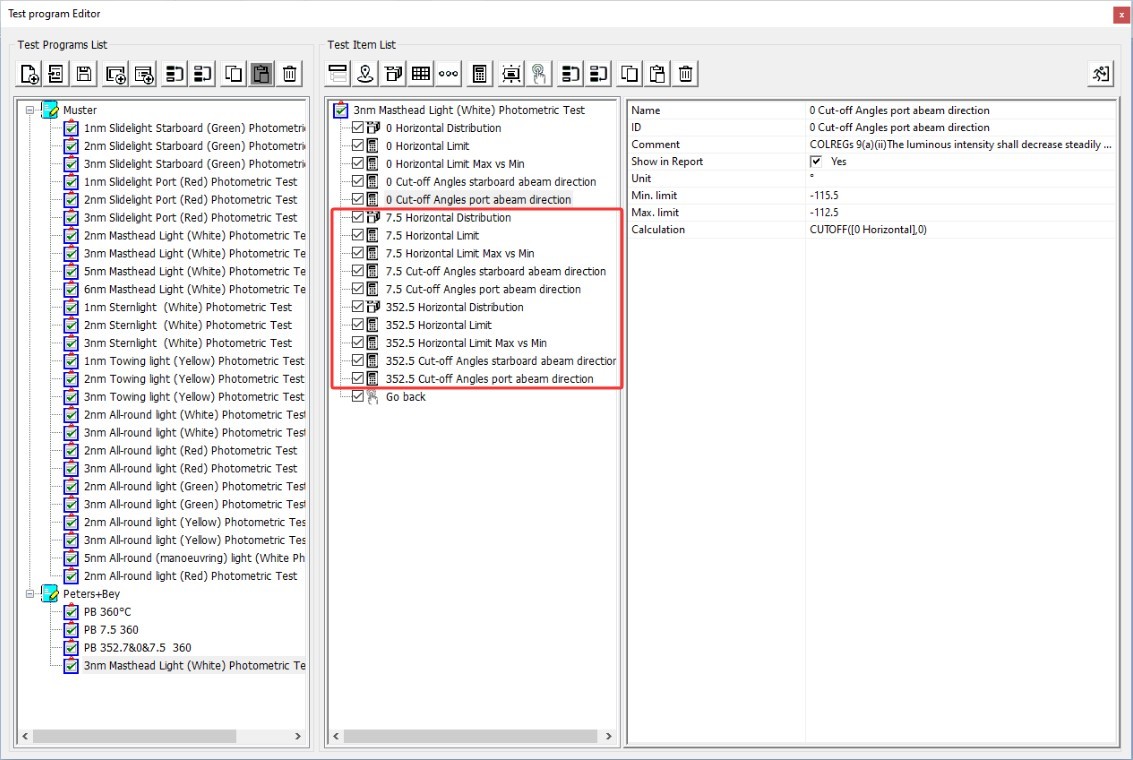
Figura 57
For all parameter settings, please refer to the first test surface described above and its associated calculations. Please note the following differences.
| Număr | notițe |
| ① | Suprafața de testare |
| ② | Use an ID different from that of the first test surface to avoid confusion in the calculations |
| ③ | Scan position: set to 7.5 degrees |
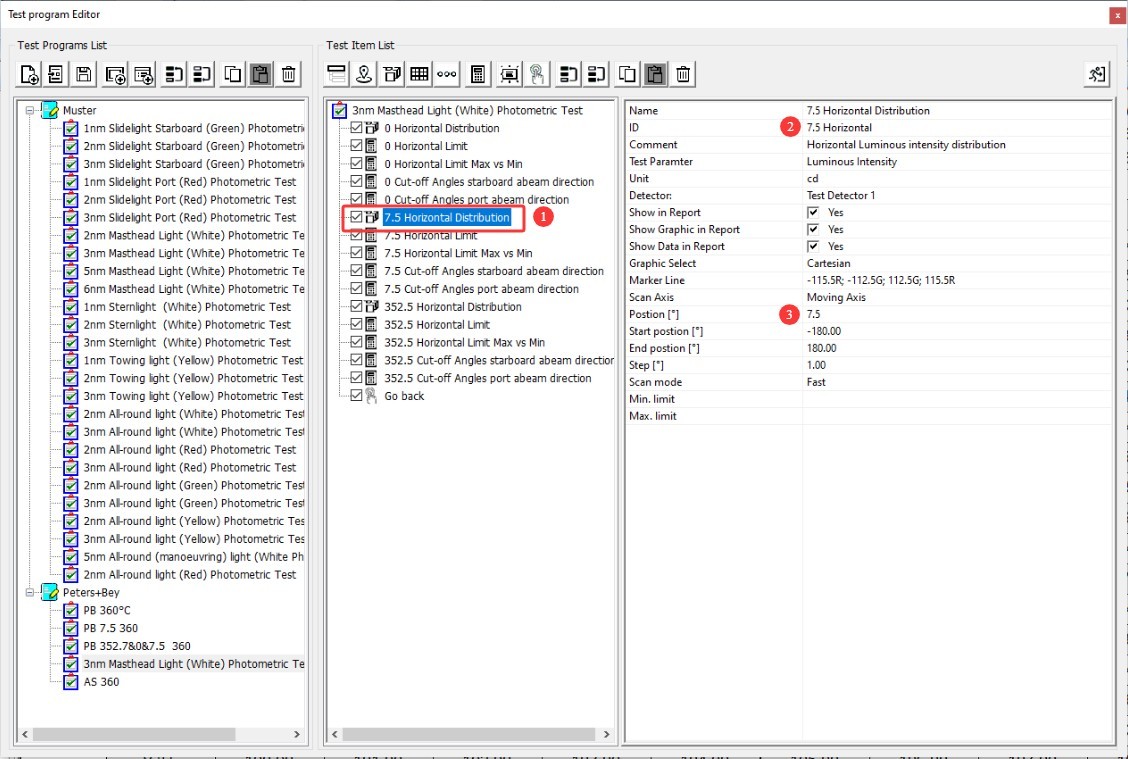
Figura 58
| Număr | notițe |
| ① | Calcul |
| ② | Calculation formula: The reference ID must be 7.5 Horizontal—that is, the ID of the second test surface—meaning the calculation is based on that test surface. |
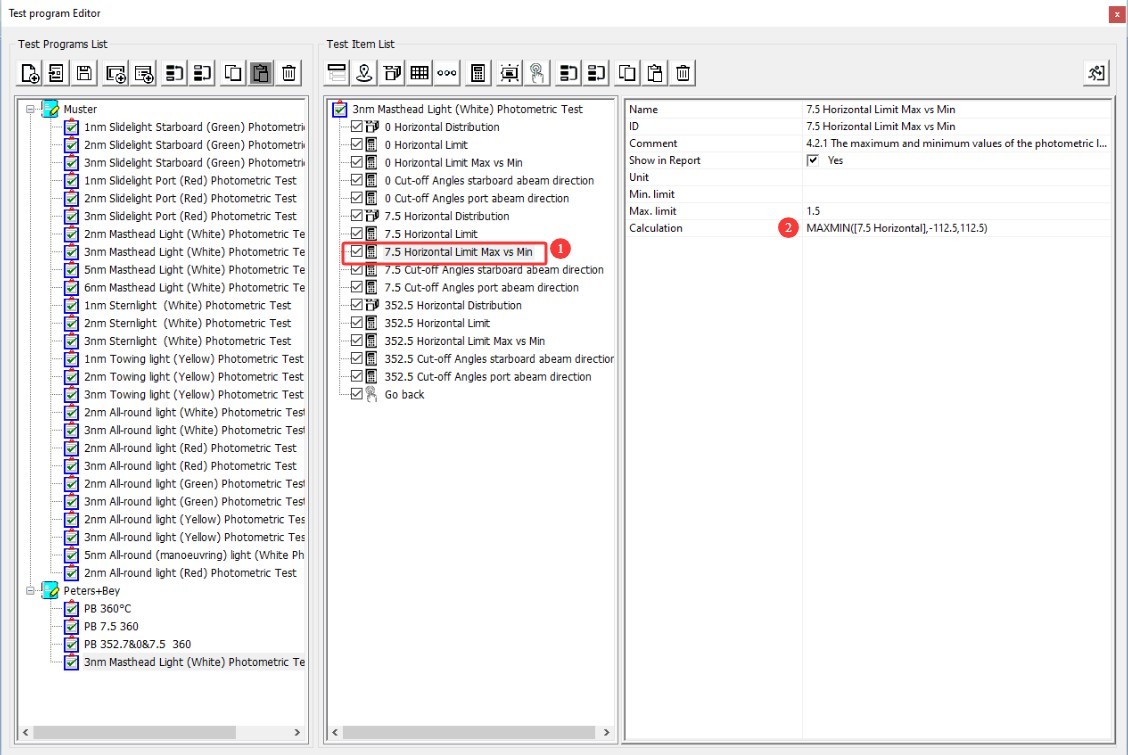
Figura 59
| Număr | notițe |
| ① | Suprafața de testare |
| ② | Use an ID different from those of the first two test surfaces to avoid confusion in the calculations. |
| ③ | Scan position: Set to 352.5 degrees. Note: Negative values cannot be set here. Although 352.5 degrees and -7.5 degrees correspond to the same position, please set it to a positive value, i.e., 352.5. |
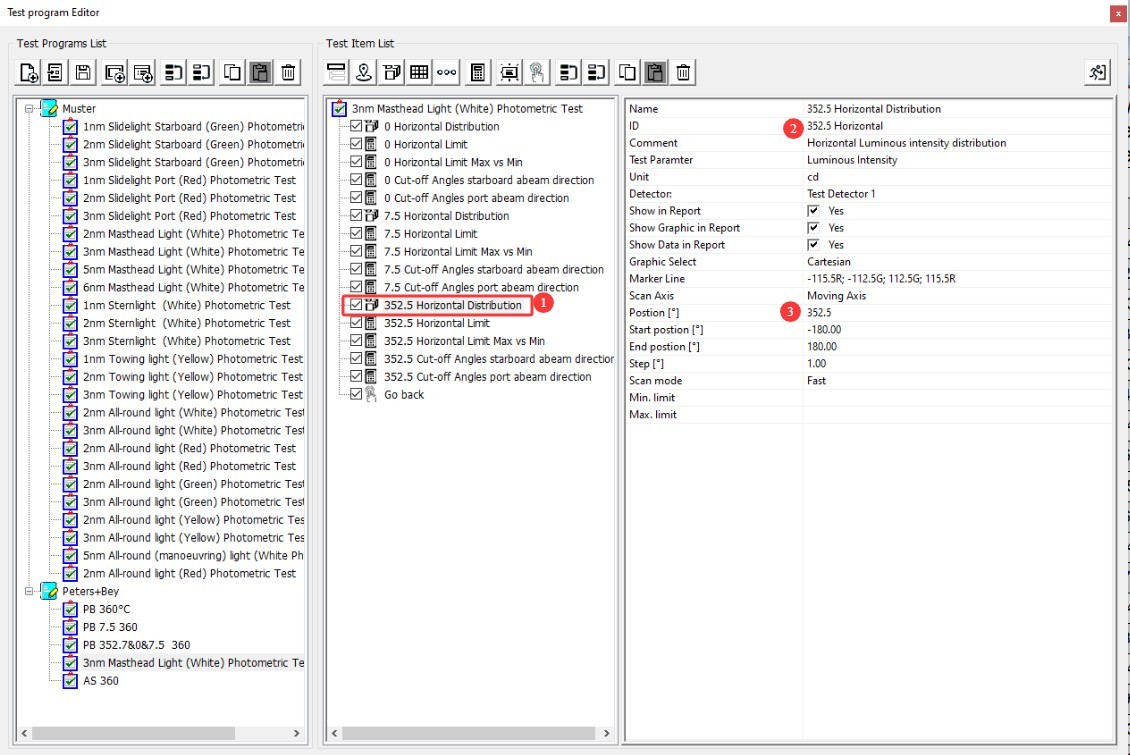
Figura 60
| Număr | notițe |
| ① | Finally, add a command |
| ② | You can customize the name of this command |
| ③ | Select this command to execute the operation. This command performs the following action: rotates the Goniophotomoeter to a specified position. |
| ④ | Enter the angle at this position; (0, 0) corresponds to returning the Goniophotomoeter to its initial position (with both the fixed axis and the follow-up axis at 0 degrees). |
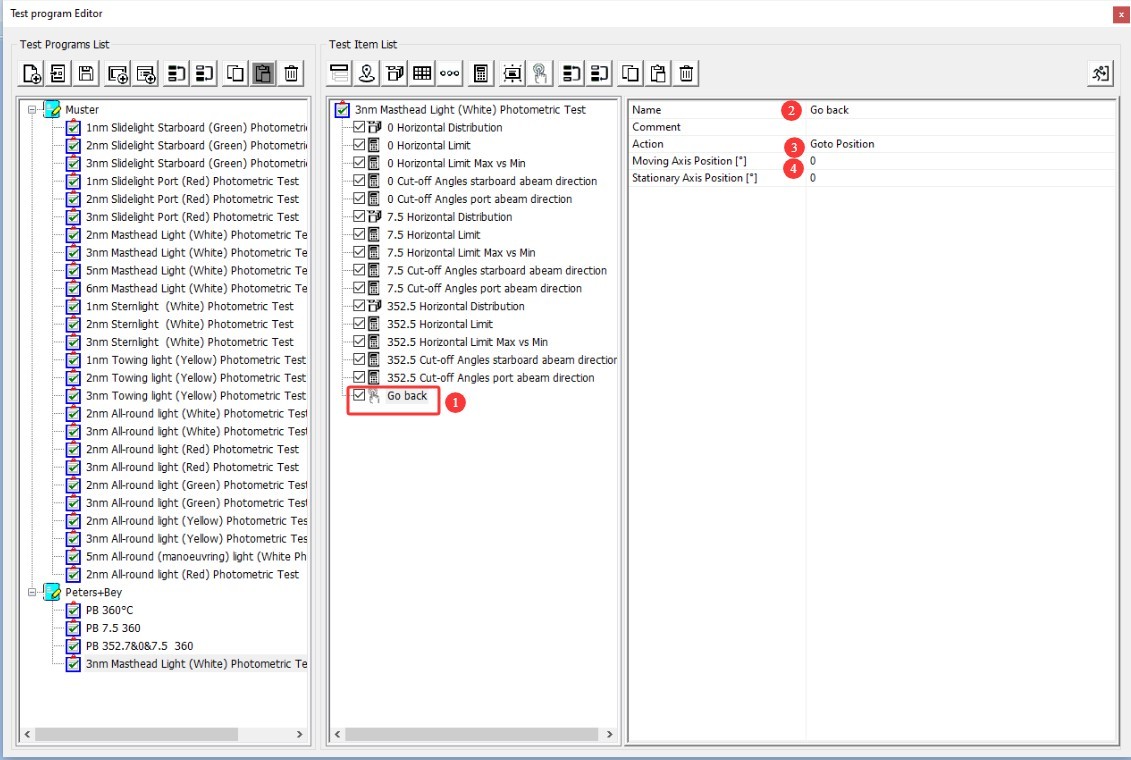
Figura 61
8.2.3 Run a Test Using the Program You Just Edited
Refer to Section 8.1, then select the program you just edited to run the test.
Note: The software executes all steps of this program in sequence. When editing the program, please ensure that the order of all steps is correct.
9. Test finalizat
| Număr | notițe |
| ① | Click to turn off the sample light fixture |
| ② | Click any item to view its test results. |
| ③ | After the test is complete, the test report will appear as the last item in the left sidebar. Click it to view the full test report. |
| ④ | Test Results and Test Reports Section |
| ⑤ | Test reports can be printed as PDF files or on A4 paper. |
| ⑥ | Test reports can be saved as .gmsax files, which can only be opened using the LSG-1950 Software. |
| ⑦ | You can open historical gmsax files to view or process test reports. |
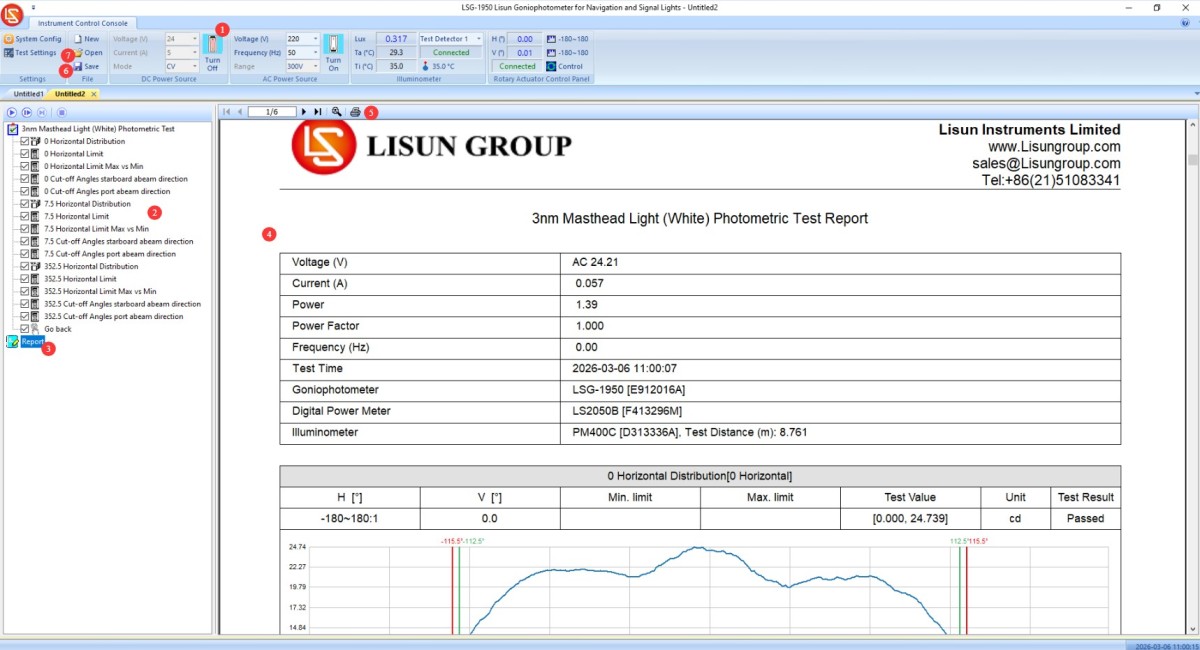
Figura 62
10. Întreținerea și îngrijirea zilnică a echipamentelor
10.1 Întreținerea de rutină
Start-up procedure: First, turn on the main power switch for the cabinet; then, turn on the power switches for each piece of equipment inside the cabinet and in the equipment room in sequence; finally, launch the software. Shutdown procedure: First, close the software; then, turn off the power switches for the equipment inside the cabinet and in the equipment room one by one; finally, turn off the main power switch for the cabinet.
Păstrați camera obscură curată și fără praf pentru a preveni pătrunderea prafului în echipament. Dacă există praf pe suprafața echipamentului, ștergeți-l cu o cârpă uscată și moale.
Evitați expunerea camerei obscure la umiditate ridicată pentru perioade lungi de timp; păstrați la îndemână un dezumidificator dacă este necesar.
10.2 Întreținere regulată
10.2.1 Cleaning the Photometric Probe
If the darkroom cannot be kept dust-free, clean the light-sensitive surface of the photometer probe regularly (for example, once a month) based on actual conditions to prevent dust from accumulating and affecting test accuracy.
When cleaning the light-sensitive surface of a photometric probe, use a specialized lint-free cloth dampened with a small amount of non-corrosive cleaning solution designed for optical instruments to gently wipe the surface. Avoid dry wiping, which can scratch the light-sensitive surface. Allow the probe to air dry naturally after cleaning.
10.2.2 Lampă standard
Lampa standard este valabilă un an. Dacă totuși trebuie să calibrați camera obscură după un an, vă recomandăm să achiziționați o nouă lămpă standard.
Software 10.2.3
We will update the software from time to time to add features and fix bugs. If you encounter any issues while using the software, please feel free to contact us at any time to obtain the latest version.
10.3 Dezafectare și întreținere pe termen lung
10.3.1 Curățarea și protecția echipamentelor
Thoroughly clean all equipment surfaces, and cover the main unit, probes, and cabinet with dust-proof cloths; disconnect all power sources.
10.3.2 Protecția mediului
Asigurați-vă că camera obscură este uscată și bine ventilată pentru a preveni umezirea echipamentului. Dacă umiditatea ambientală este ridicată, țineți la îndemână un dezumidificator.
10.3.3 Pornire lunară
Efectuați un test de pornire o dată pe lună pentru a vă asigura că toate componentele hardware ale sistemului funcționează corect.
11. Depanarea și rezolvarea problemelor comune
11.1 Erori de comunicare
Cauza problemei: Verificați dacă este conectat corect cablul de comunicare și dacă nu este introdus în portul greșit; verificați dacă driverele sunt instalate corect; încercați un alt port USB sau un alt cablu de comunicare pentru a exclude problemele hardware.
Solution: Reinstall the driver, connect the communication cable according to the device identifier, and restart the device and software.
11.2 Erori de testare
Cauza defecțiunii: Verificați dacă sursa de lumină este stabilă și dacă timpul de încălzire este suficient; verificați dacă calibrarea echipamentului este validă, dacă distanța de testare este corectă și dacă lumina standard funcționează corect; verificați dacă există interferențe luminoase externe în camera obscură și dacă traiectoria luminii este obstrucționată.
Soluție: Prelungiți timpul de încălzire, recalibrați instrumentul, opriți alte surse de lumină din camera obscură și îndepărtați orice obstrucții de pe calea optică.
11.3 The Goniophotomoeter does not rotate
Cause of Malfunction: Check whether the main unit is powered on and whether the wiring is correct; check whether the angle controller inside the cabinet is operating normally; confirm whether any foreign objects are jammed in the rotating shaft.
Solution: Check the power supply and wiring, and remove any foreign objects; restart the system and software, then try again.
11.4 Prăbușiri de software
Cause of the problem: Check whether you are logged in to the computer’s operating system with an administrator account; verify that the software has been installed completely.
Solution: Log in to the computer using an administrator account; reinstall the software and drivers.
11.5 Pană de curent
11.5.1 Anomalii ale ieșirii de curent continuu
Cauzele defecțiunii: Comutatorul AC/DC de pe dulap nu era setat pe DC; tensiunea sau curentul probei a depășit limitele alimentării cu curent continuu; un scurtcircuit în probă;
Depanare: Verificați dacă tensiunea și curentul mostrei se încadrează în intervalul de ieșire al sursei de alimentare de curent continuu. De exemplu, DC3010 Modelul are o tensiune maximă de ieșire de 30 V și un curent maxim de ieșire de 10 A. Verificați dacă eșantionul este scurtcircuitat; dacă da, reparați eșantionul înainte de a-l testa din nou.
11.5.2 Fără ieșire CA
Cause of the fault: The AC/DC switch in the cabinet was not set to the AC side; the overload protection was triggered;
Troubleshooting Steps: Check the AC power output wiring and sample connections to ensure there are no loose connections or short circuits. If the overload protection is triggered, turn off the power, let the unit cool for 5 minutes, and then restart it. Ensure that the sample power remains within the AC power output range; for example, the LSP-500VARC are o putere maximă de ieșire de 500 W.