
 Engleză
 中文简体
中文简体 Русский
 Español
 Português
 Türkçe
 العربية
 Deutsch
 Polski
 Italiano
 Français
 한국어
한국어 ไทย
ไทย Tiếng Việt
 日本語
日本語





























Sursă de alimentare CA cu undă sinusoidală pură
Manual de utilizare
Aplicabil LISUN modele: LSP-1KVARC,LSP-1KVARC-Pst,LSP-500VARC,LSP-500VARC-Pst
1. Noțiuni de bază despre echipament
1.1 Specificații tehnice cheie
| Specificații/Numere de model | LSP-500VARC | LSP-500VARC-Pst | LSP-1KVARC | LSP-1KVARC-Pst |
| Tensiune de ieșire | Single-phase: 2 V–150 V / 2 V–300 V | |||
| Curent maxim de ieșire | 4.2A (2V–150V), 2.1A (2–300V) | |||
| Frecvența de ieșire | 45.00–65.00 Hz | |||
| distorsiune armonica totala | ≤0.3% (no-load or at full resistive load) | |||
| Equivalent Internal Resistance | ≤0.1 Ω (zero-resistance design) | |||
| Precizia curentă | ±(0.02% of reading + 0.01% of range + 1 digit) < 5 A; ±(0.03% of reading + 0.02% of range + 1 digit) ≥ 5 A | |||
| Rezoluție de tensiune | 0.1 V | |||
| Rezoluția curentă | A 0.001 | |||
| Parametrii afișajului | Voltage, Current, Power, Power Factor, Frequency | |||
| Sursa de alimentare de intrare | Single-phase AC 110 V/220 V, 50/60 Hz | |||
1.2 Verificarea configurației echipamentului
1.2.1 Despachetarea
Când despachetați dispozitivul, manipulați-l cu grijă pentru a evita zgârierea carcasei exterioare cu unelte ascuțite. După despachetare, inspectați mai întâi exteriorul dispozitivului pentru a vă asigura că nu există deformări sau lovituri vizibile și că butoanele nu sunt deteriorate sau slăbite. Dacă observați anomalii la dispozitiv sau la accesoriile sale, nu îl porniți. Vă rugăm să ne contactați imediat.
1.2.2 Unitatea principală și accesoriile
| Număr | notițe |
| ① | LSP Series Power Supplies |
| ② | Cablu de alimentare |
| ③ | RS232/RS485 Communication Cables |
| ④ | Siguranțe de rezervă |
1.2.3 Descărcarea documentelor electronice
Linkurile de descărcare pentru manualul de utilizare digital, software, cardul de garanție și alte materiale au fost trimise prin e-mail. Vă rugăm să le descărcați cât mai curând posibil. Dacă ați pierdut e-mailul, vă rugăm să ne contactați pentru a solicita din nou linkurile de descărcare.
Notă: ambele LISUN spectroradiometer and goniophotomoeter software can control the LSP series power supplies; this manual covers only the operation of the power supply-specific software.
2. Măsuri de siguranță
2.1 Standarde de siguranță electrică
Input power supply single-phase AC 110 V/220 V ±10 V, 50/60 Hz. It must comply with safety standards and be equipped with a proper protective grounding system, with a protective grounding resistance of ≤4 Ω, to prevent electric shock.
Note: The rear panel of the LSP series power supplies features an input voltage selector switch. See Section 3.2. Please take note!
2.2 Standarde de siguranță a mediului
For indoor use only; avoid direct sunlight. Place on a sturdy, stable surface to prevent excessive vibration. Ensure the environment is free of dust, corrosive gases, and flammable or explosive materials. Keep away from strong magnetic and electric fields. Ensure adequate ventilation; leave at least 10 cm of clearance around the device for heat dissipation, and do not block the cooling fan vents. Operating Environment: Temperature 5°C to 35°C, relative humidity ≤65% RH.
2.3 Instrucțiuni de siguranță operațională
Do not operate the equipment or plug in/unplug the power cord with wet hands; the output must be turned off before connecting or disconnecting wires; allow the unit to warm up for at least 10 minutes after powering on before enabling the output; Do not touch the output terminals, internal components, the load, or load wiring while the equipment is operating; allow at least 3 minutes between powering on and off to prevent damage from power surges; do not shut down the equipment directly while it is in output mode; first disconnect the output before shutting down; if you notice an unusual odor, smoke, abnormal noise, or overheating, immediately disconnect the power and do not continue operation.
3. Prezentare generală a echipamentului și cablare
3.1 Introducere în panoul frontal
| Număr | notițe |
| ① | Întrerupător |
| ② | The left half of the display is the display area, showing the following from top to bottom: voltage, current, power, and power factor. |
| ③ | The right half of the display is the settings area, which, from top to bottom, consists of: voltage, frequency, voltage range, starting phase, and baud rate. |
| ④ | The power output status is displayed in the lower-right corner of the screen; if a power alarm occurs, the alarm code is displayed. |
| ⑤ | The function buttons, from left to right, are: Settings, Voltage Setting, Frequency Setting, and Lock Screen. |
| ⑥ | Slider: Use it to adjust the number value; move it clockwise to increase and counterclockwise to decrease. |
| ⑦ | Use the left and right arrow keys to adjust the number’s value or the number of digits during setup. |
| ⑧ | Number keys: 0 through 9 and the decimal point |
| ⑨ | Buton Ștergere |
| ⑩ | Butonul Confirmați |
| ⑪ | Tasta de ieșire |
| 10 | Priză de ieșire — vă rugăm să conectați sarcina de curent alternativ |
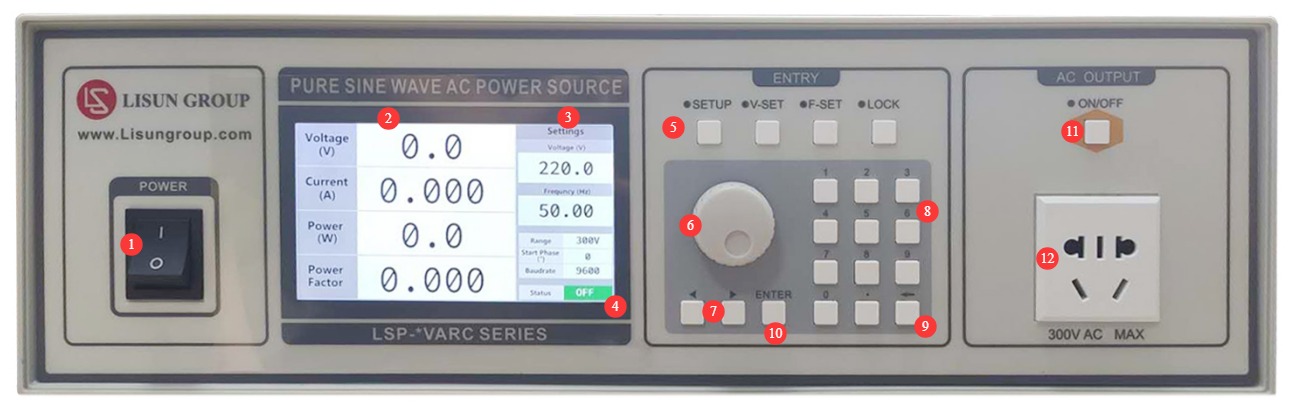
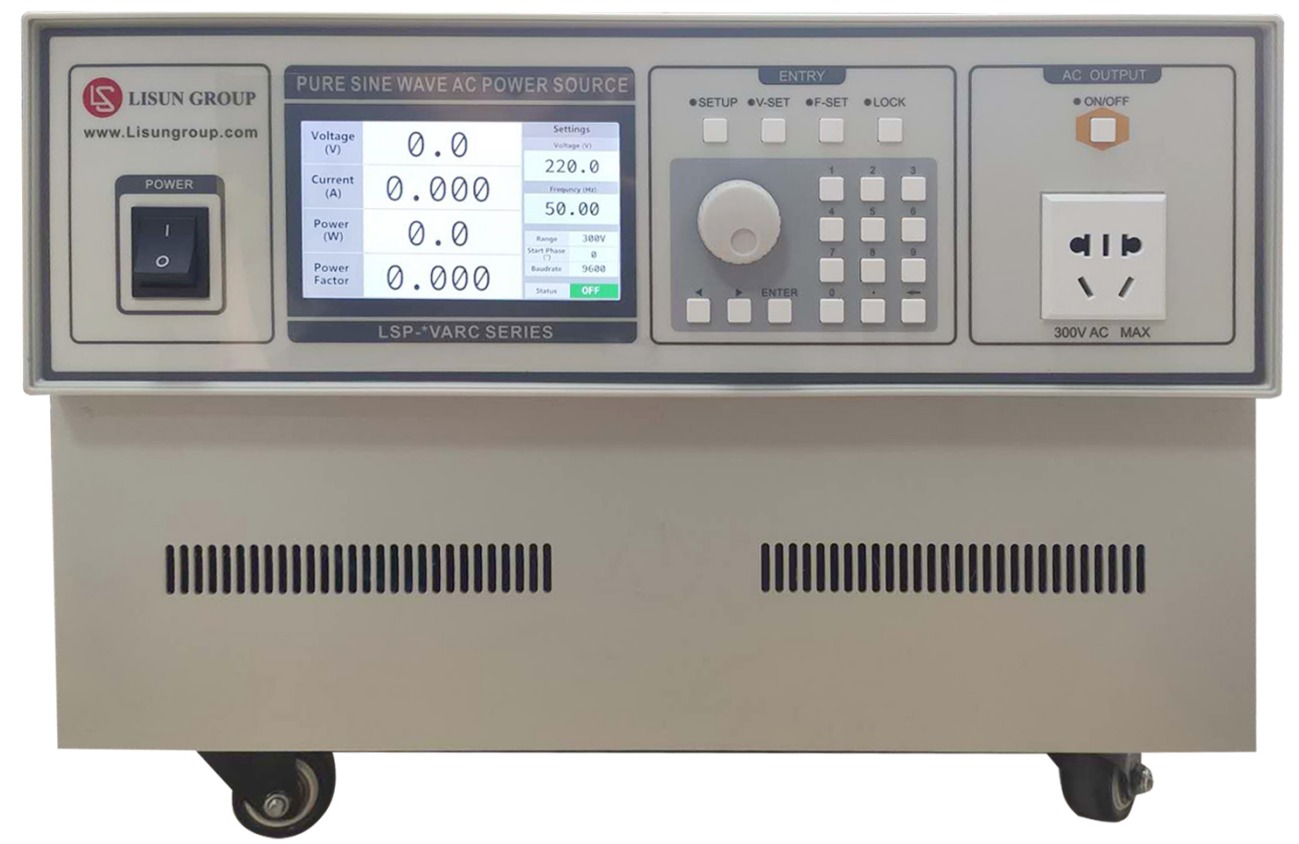
Nota: LSP-500VARC series consists of compact power supplies; the front panel appearance is shown in the figure above. The LSP-1KVARC series consists of large power supplies; the front panel appearance is shown in the figure below. The front panel controls for both series are identical.
3.2 Introducere în panoul din spate
| Număr | notițe |
| ① | Input voltage switching: The unit is set to 220V by default at the factory. Note: If the switch is set to 110V and the input is 220V, the power supply will burn out; if the switch is set to 220V and the input is 110V, the power supply will fail to start . Notă: LSP-500VARC has one switch on the back; the LSP-1KVARC has two switches on the back, which must be set to the same position simultaneously. |
| ② | Power cord jack, for connecting the device to an appropriate power source |
| ③ | Protective grounding terminal: Internally short-circuited to the power cord’s grounding terminal. If the power cord already provides adequate protective grounding, this terminal does not need to be connected. |
| ④ | Siguranță |
| ⑤ | Trigger signal interface; required when used with the LISUN LSRF-3 dispozitiv |
| ⑥ | RS232/RS485 communication port: If you need to use computer software to configure and control the power output, connect it to the computer’s communication port, or use a USB cable to connect it to the computer’s USB port. |
| ⑦ | Output jack—this functions the same as the front-panel output jack; simply connect to either one. |
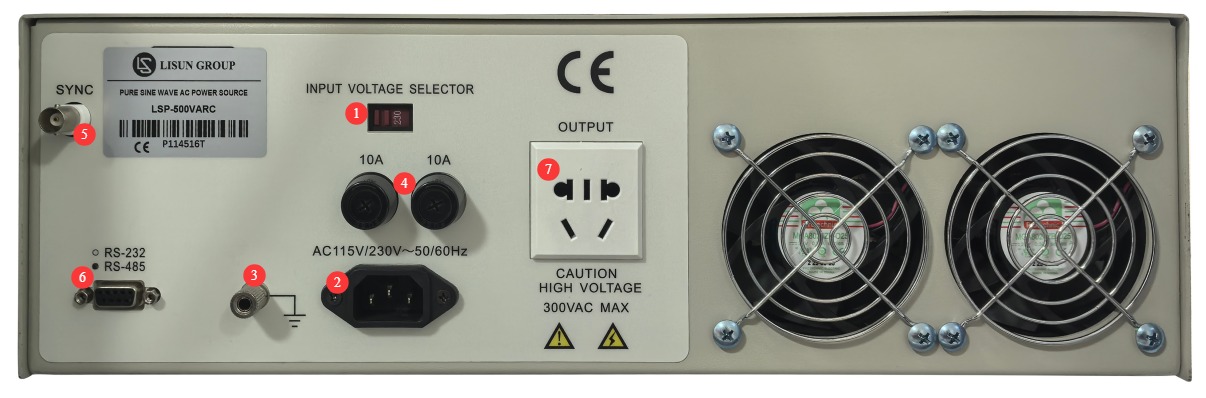
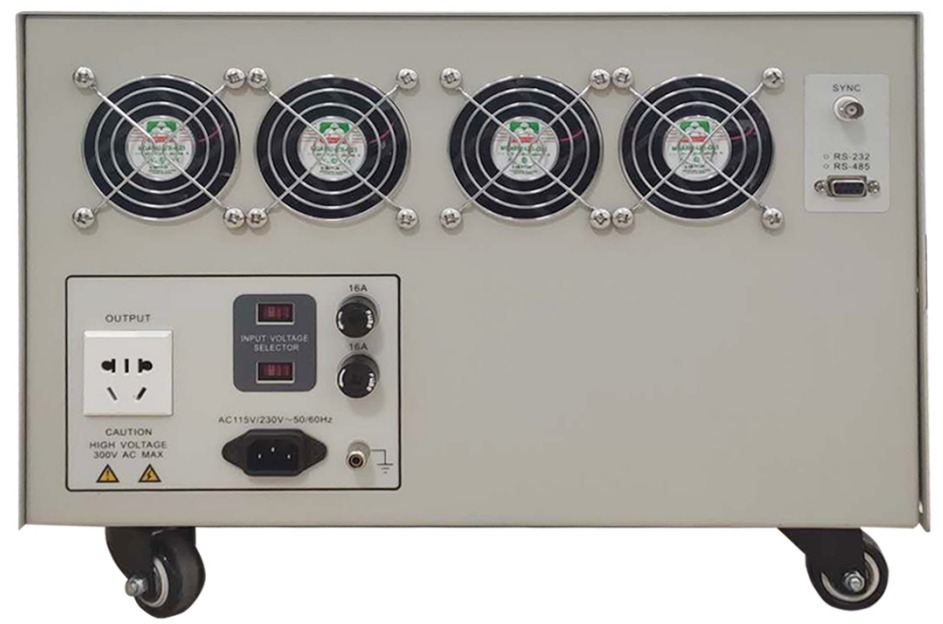
Nota: LSP-500VARC series consists of compact power supplies; the rear panel appearance is shown in the image above. The LSP-1KVARC series consists of large power supplies; the rear panel appearance is shown in the image below. The front-panel operation is identical for both series.
4. Funcționarea echipamentelor
4.1 Pregătiri
Changing the Display Language: Press and hold the number keys 1, 5, and 9 simultaneously to switch the display language between Chinese and English.
Procedura 4.2
| Instrucțiuni | notițe |
| ① | Press the “Set” button to first set the voltage range—150 V or 300 V. You can use the knob or the left and right buttons to adjust the setting. Once set, press the “Confirm” button. |
| ② | The system automatically enters the initial phase setting, which defaults to 0°. If you have specific requirements, you can set the value between 0° and 359° using the left and right buttons and the rotary knob. Once you have made your selection, press the Confirm button. |
| ③ | The device automatically enters the baud rate settings menu. The factory default is 9600. When you need to control the device using software, set the baud rate to 9600. Use the left and right buttons and the knob to make the selection, then press the Confirm button. |
| ④ | Press the voltage setting button to set the output voltage. You can use the numeric keys to set the value directly. Once set, press the confirm button. |
| ⑤ | Press the frequency setting button to set the output frequency. You can use the number keys to set it directly. Once set, press the confirm button. |
| ⑥ | After verifying that the wiring and settings are correct, press the output button to start output. While in output mode, you can use the knob to fine-tune the output voltage; press the output button again to stop the output. |
5. Operare software
5.1 Pregătiri
5.1.1 Pregătirea hardware
Refer to Section 4.2 to verify that the device’s baud rate is 9600.
5.1.2 Pregătirea software-ului
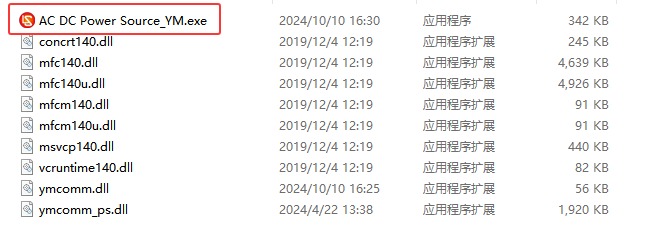
Copy the software folder to your computer. No installation is required; simply double-click the following file to open the software interface.
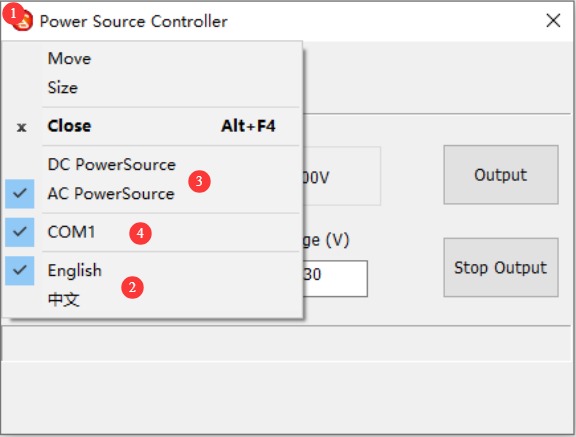
| Număr | notițe |
| ① | Faceți clic pe roșu LISUN logo in the upper-left corner of the software interface |
| ② | Select the display language for the software interface: Chinese or English |
| ③ | Selectați alimentarea cu curent alternativ |
| ④ | To select the correct communication port, go to “Device Manager” on your computer to verify which communication port is being used. |
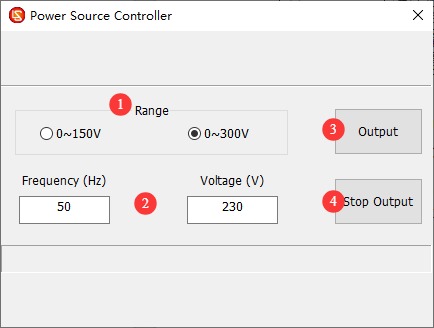
5.2 Controlling AC Power Output Using Software
| Număr | notițe |
| ① | Set the voltage range |
| ② | Set the Output Frequency and Voltage |
| ③ | Click to start output |
| ④ | Click to turn off the output |
6. Întreținerea și îngrijirea zilnică a echipamentelor
6.1 Întreținerea de rutină
6.1.1 Curățare zilnică
Asigurați-vă că opriți alimentarea și deconectați cablul de alimentare înainte de curățare. Recomandăm ștergerea dispozitivului cu o lavetă moale, antistatică, din bumbac și un detergent blând; nu pulverizați lichide direct pe dispozitiv. Nu utilizați solvenți chimici precum benzen, toluen sau acetonă.
6.1.2 Inspecții de rutină
Înainte de fiecare utilizare, verificați dacă cablul de alimentare și conexiunile terminalelor sunt fixate și nu prezintă urme de arsură; asigurați-vă că orificiile de ventilație ale ventilatorului nu sunt blocate; și după pornirea unității, verificați dacă luminile indicatoare și afișajul funcționează corect.
6.2 Specificații de stocare
6.2.1 Cerințe privind mediul de stocare
Temperatură: 5°C până la 35°C; umiditate relativă: ≤65% RH; mediu uscat, fără praf și fără gaze corozive.
6.2.2 Operațiuni de depozitare pe termen lung
Opriți alimentarea și deconectați toate cablurile; curățați echipamentul și înfășurați-l în folie antipraf; porniți alimentarea timp de 10 de minute în fiecare lună pentru a preveni deteriorarea componentelor din cauza umezelii.
7. Depanarea și rezolvarea problemelor comune
| Simptome de eroare | Cauze posibile | Procedură |
| Nu se poate porni | Input voltage selector switch malfunction, blown fuse | Check the input voltage selector switch; turn off the power, eliminate any output short circuits or overloads, replace the fuse with one of the same rating, and do not increase the current rating. |
| Ventilatorul nu se învârte | Acumulare de praf, defecțiune a motorului | Opriți alimentarea și curățați praful de pe ventilator; dacă problema persistă, vă rugăm să ne contactați pentru reparații sau pentru înlocuirea ventilatorului. |
| Error code 02 in the lower-right corner of the display | In the event of an output short circuit, current overload, or power overload, the power supply will automatically cut off the output to protect itself. | Please turn off the LSP power supply, check the wiring, and resolve any output short circuits before turning it back on; if the load current or power exceeds the power supply’s upper limit, you will need to purchase a larger AC power supply. |
| Error code 01 in the lower-right corner of the display | S-a ars o siguranță | Please turn off the LSP power supply and unplug the power cord. Check all fuses on the rear panel of the power supply and replace them with fuses of the same rating. Do not use fuses with a higher current rating. |
8. Lista de impachetat
| Nu. | Nume | Cantitate |
| ① | LSP Series Power Supply Units | unitate de 1 |
| ② | Cablu de alimentare | buc 1 |
| ③ | RS232/RS485 Communication Cables | |
| ④ | Siguranțe de rezervă | 2 |