
 Engleză
 中文简体
中文简体 Русский
 Español
 Português
 Türkçe
 العربية
 Deutsch
 Polski
 Italiano
 Français
 한국어
한국어 ไทย
ไทย Tiếng Việt
 日本語
日本語





























Tester de aprindere cu fir fierbinte
Manual de utilizare
Aplicabil LISUN modele: RSY-LT
1. Despachetarea și familiarizarea de bază cu echipamentul
1.1 Specificații tehnice cheie
| Elemente de specificație | Specificații detaliate |
| Heating Element Parameters | Heating coil: Ni80/Cr20, φ0.5 mm, length 250 ± 5 mm, thermal resistance 5.28 Ω/m, heating power 0.26 W/mm ± 4% |
| Heated Wire Pretreatment | Pre-annealing of the heating wire coil: Time: 8–12 seconds (preset); Power: 0.26 W/mm ±4% |
| De reglare a presiunii | Coil Winding: Tension 5.4±0.05 N, pitch 6.35±0.5 mm, 5 turns wound within 31.5±0.5 mm |
| Parametrii de sincronizare | Coil test time: 120 s (preset range: 1 s–999.9 s) |
| Specificații ale specimenului | Dimensions: Length 125±5 mm, width 13±0.5 mm, thickness 0.75±0.1 mm/1.5±0.1 mm/3±0.2 mm; during testing, the heating wire must be wound around the specimen 5 times. |
| Specimen Holder Parameters | The distance from the surface of the specimen holder to the connector plate is 70 mm; the height is 60 mm; designed to accommodate a fixed hot-wire coil. |
| Combustion Chamber Specifications | Volume ≥ 0.5 m³ (other sizes available upon request) |
| Material corp | High-temperature spray-coated steel structures are heat-resistant and corrosion-resistant, making them suitable for long-term high-temperature testing environments. |
| Afișare funcționare | Proprietary extra-large LCD touchscreen + clear indicator lights + remote control operation |
1.2 Despachetarea și verificarea conținutului
1.2.1 Despachetare și inspecție vizuală
When unpacking the equipment, handle it gently to avoid scratching the exterior casing with sharp tools. After unpacking, first inspect the exterior of the main unit to ensure there is no obvious deformation or dents, and that the buttons are not damaged or loose. Open the test chamber door and check whether any internal components have come loose, become deformed, or been damaged during shipping. If you notice any abnormalities with the equipment or accessories, do not power it on. Please contact us immediately.
1.2.2 Unitatea principală și accesoriile
Hosting Categories:
| Număr | notițe |
| ① | Tester de aprindere cu fir fierbinte |
| ② | Specialized Winding Tools |
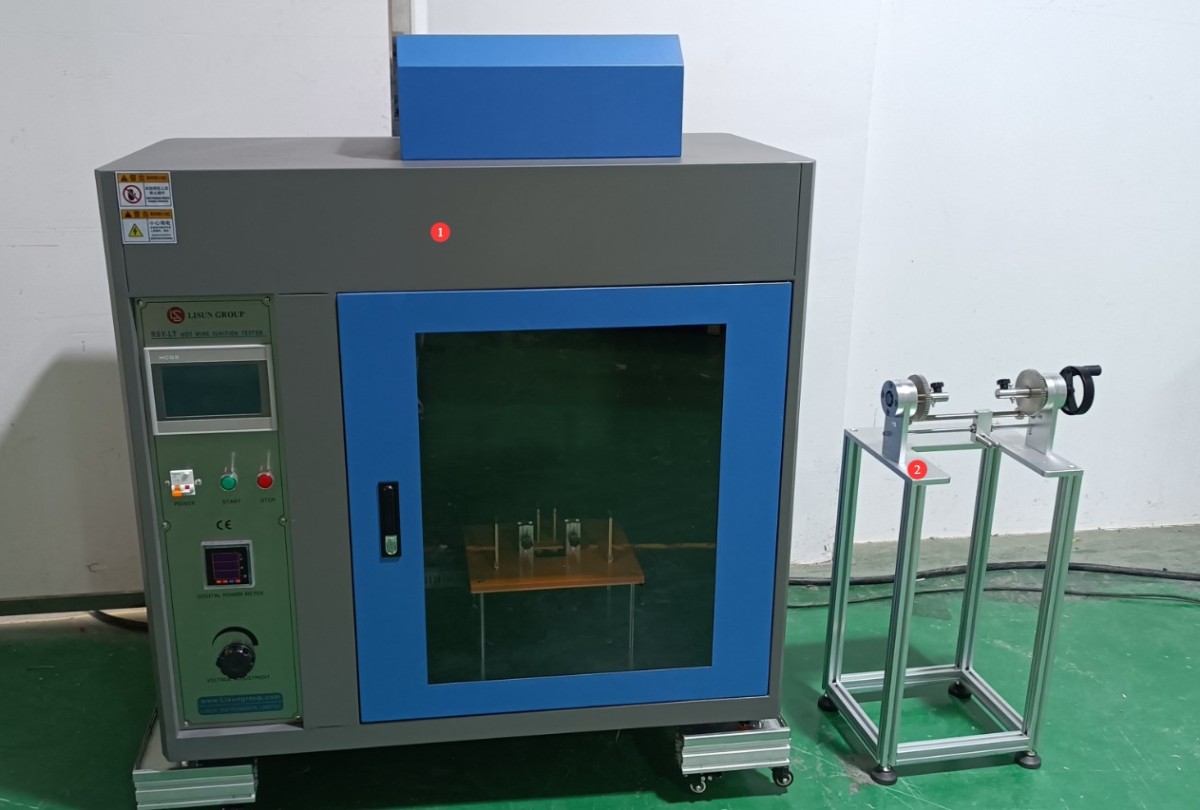
Figura 1
Accesoriile standard sunt următoarele:
| Număr | notițe |
| ① | Țeavă de eșapament |
| ② | Nickel-chromium resistance wire/heating wire, total length 25 m |
| ③ | Greutate de 5.4 N |
| ④ | Cablu de alimentare |
| ⑤ | Stainless Steel Clamps (for securing exhaust pipes) |
| ⑥ | Siguranțe de rezervă |
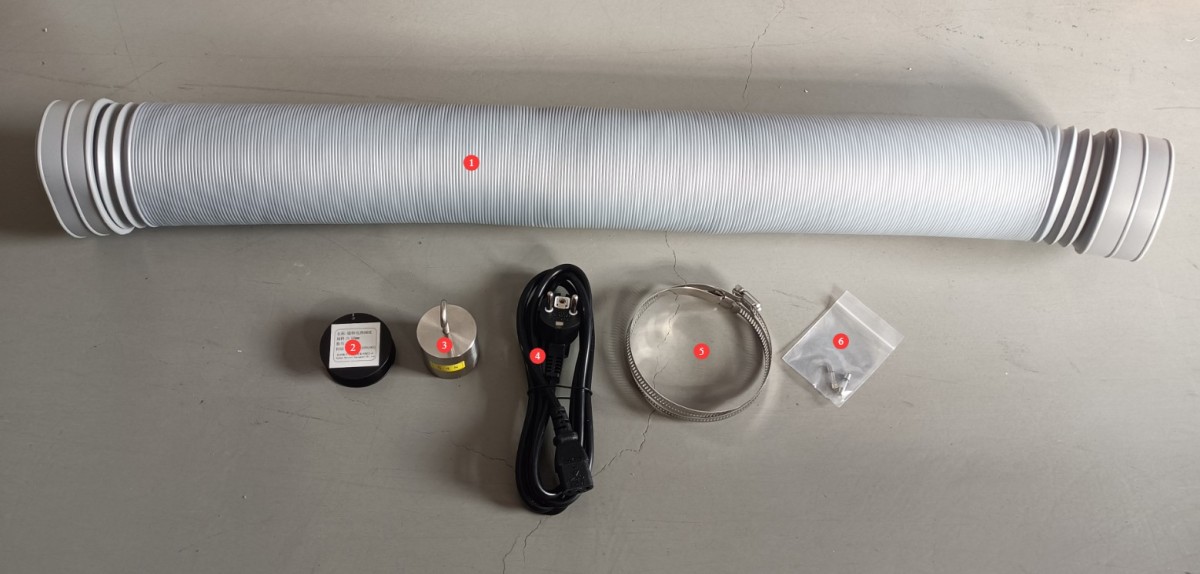
Figura 2
Links to download the electronic user manual, warranty card, and other documents have been sent via email. Please download them as soon as possible. If you missed the email, you may contact us to request the download links again.
2. Măsuri de siguranță
2.1 Siguranța electrică
2.1.1 Conexiune la alimentare
220V single-phase power; power outlets must comply with safety standards, have proper grounding, and have a rated current that matches the equipment’s power rating (it is recommended to install a dedicated circuit breaker).
We recommend using a regulated power supply, as voltage fluctuations can also cause fluctuations in the heating power of the heating element.
2.1.2 Specificații de împământare
The equipment must be reliably grounded, with a grounding resistance of ≤4 Ω. Do not use gas pipes, non-metallic water pipes, or neutral wires as substitutes for the grounding wire. After grounding is complete, use a Grounding Resistance Tester to measure the grounding resistance. Do not turn on the power until it is confirmed to meet the requirements, to prevent electric shock, equipment malfunctions, or measurement errors caused by poor grounding.
2.1.3 Contraindicații pentru procedură
Înainte de a cabla, inspecta sau întreține echipamentul, trebuie să deconectați alimentarea principală a echipamentului și să confirmați că nu există tensiune reziduală înainte de a continua;
Nu acționați comutatorul de alimentare, ecranul tactil sau butoanele instrumentului cu mâinile ude pentru a evita riscul de electrocutare;
Nu așezați obiecte străine (cum ar fi unelte sau hârtie) în interiorul tabloului de comandă electric pentru a preveni ca praful sau obiectele străine să provoace scurtcircuite sau să deterioreze componentele;
Nu conectați și nu deconectați cablurile de alimentare sau cablurile de semnal în timp ce echipamentul funcționează pentru a preveni scurtcircuitele care ar putea deteriora controlerul sau componentele electrice.
2.2 Siguranța operațională
When using the winding tool, be careful not to pinch your hands, and apply force slowly when turning the handle;
When installing or removing a specimen, make sure the equipment is powered off;
Temperatures reach extremely high levels during hot-wire annealing and testing; special high-temperature-resistant gloves must be worn, and direct contact with the hot wire or high-temperature components is strictly prohibited;
The High Temperature Chamber door must be closed during testing. Observe the test process through the chamber viewing window to avoid burns from high-temperature radiation or sparks from burning materials;
After the test is complete, wait until the hot wire has cooled to room temperature before disassembling and cleaning it to avoid burns;
In the event of a malfunction or abnormality, immediately stop the test and troubleshoot the issue. For guidance, refer to “Chapter 7: Troubleshooting and Resolution of Common Problems” or contact our after-sales service;
Do not open the control cabinet door while the equipment is in operation to avoid touching internal high-voltage components and causing an electric shock;
Do not disassemble core components without authorization. Modifying the equipment will void the warranty and may result in safety incidents;
2.3 Siguranța mediului
2.3.1 Cerințe de instalare
Echipamentul trebuie instalat într-o încăpere climatizată, unde temperatura ambiantă este menținută între 5°C și 25°C, iar umiditatea relativă este ≤85%. Dacă umiditatea ambiantă este ridicată, se poate forma condens în apropierea ușii echipamentului și a orificiilor de testare; în astfel de cazuri, îmbunătățiți ventilația încăperii sau utilizați un dezumidificator;
Locul de instalare trebuie să fie lipsit de concentrații mari de praf, gaze corozive (cum ar fi dioxidul de sulf și clorul) și atmosfere inflamabile sau explozive. Nu trebuie lăsat echipamentul să fie expus direct luminii solare pentru a preveni coroziunea carcasei echipamentului și deteriorarea componentelor electrice;
The storage of flammable and explosive materials (such as alcohol, gasoline, etc.) is strictly prohibited in the test area to prevent the risk of fire or explosion;
The work area is equipped with fire extinguishers (dry powder or carbon dioxide), and operators are familiar with how to use them;
Keep it away from areas with significant temperature fluctuations, such as near vents or indoor entrances;
Stay away from sources of strong magnetic and electric field interference (such as large electric motors and high-voltage equipment).
2.3.2 Cerințe de spațiu
The distance between the equipment enclosure and the wall, as well as surrounding structures (such as other test equipment and shelves), must be at least 1000 mm to facilitate maintenance;
At least 2000 mm of space must be left at the equipment door opening to ensure that the door can be opened in any direction, facilitating the placement and removal of test specimens.
2.3.3 Plasare orizontală
The device must be placed on a flat surface. Use a level to ensure the device is level: Place the level on the top surface of the device and make sure the bubble is centered. Note: The device has four adjustable feet that can be used to level it. Once leveled, ensure that all four feet are firmly in contact with the floor.
2.4 Altele
Pentru aspectele care nu sunt acoperite de acest manual, vă rugăm să procedați cu prudență sau să ne contactați.
3. Pregătiri înainte de test
3.1 Conectarea echipamentului
| Număr | notițe |
| ① | Exhaust vent, 100 mm in diameter, securely connected using an exhaust pipe and clamps and extending to the outside |
| ② | Power Cord Connection—see Section 2.1 |
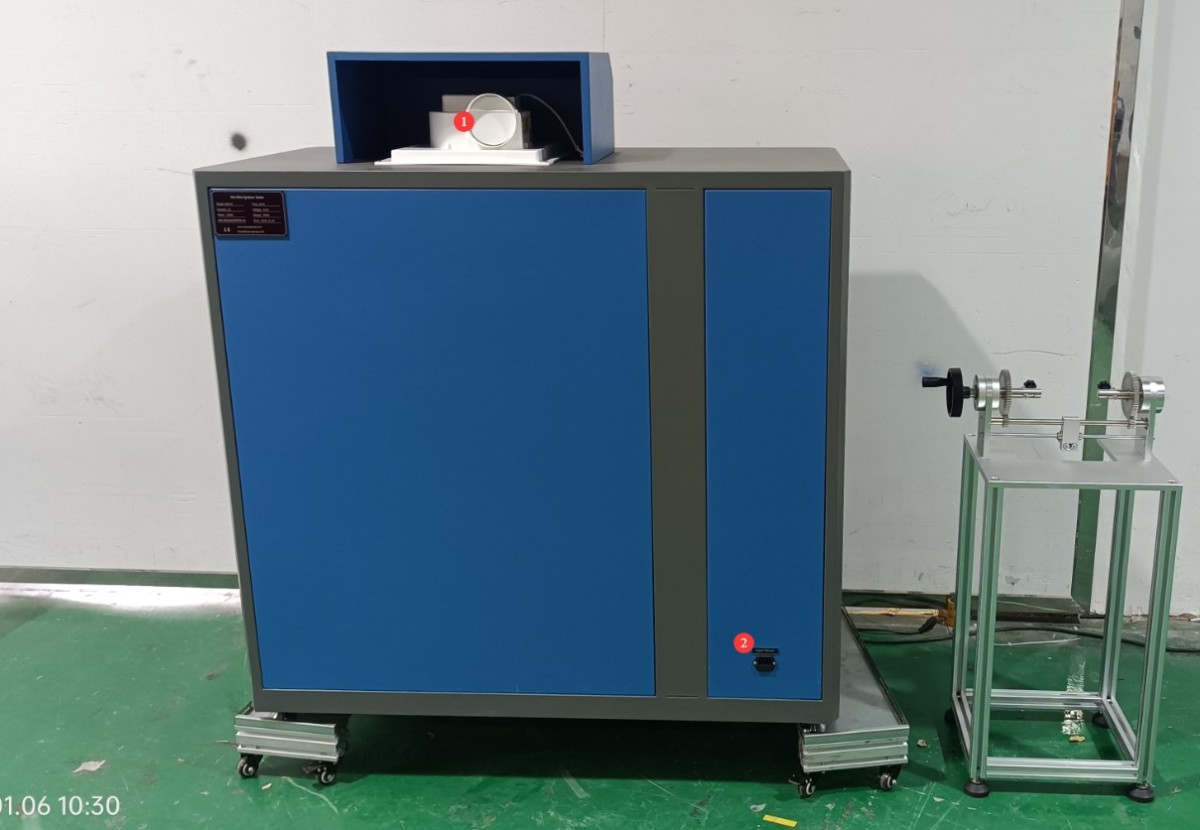
Figura 3
3.2 Sample Preparation and Pretreatment
3.2.1 Specifications for Test Specimens
Dimensions: Length (125±5) mm × Width (13.0±0.5) mm; suitable for molded or sheet materials with thicknesses ranging from 0.25 mm to 6.4 mm;
Appearance Requirements: The specimen must be free of burrs and flash on all edges; the corner radius must be ≤1.3 mm; and the surface must be free of oil, damage, and cracks;
Quantity Requirements: Five test specimens must be prepared for each type of material to ensure that the test results are representative.
3.2.2 Sample Pretreatment Procedure
Drying: If the sample is damp, place it in a forced-air oven and dry it at (70±2)°C for 168 hours, then place it on silica gel or another desiccant and allow it to cool for at least 4 hours;
Environmental Conditioning: Place the dried specimens in an environment with a temperature of (23±2)°C and a relative humidity of (50±5)% and allow them to stand for at least 40 hours to ensure that the specimens are in a stable condition before conducting the test.
4. Introducere în programul cu ecran tactil
4.1 Interfața principală
| Număr | notițe |
| ① | Comutați între chineză și engleză |
| ② | Annealing Interface |
| ③ | Hot-Wire Ignition Test Interface |
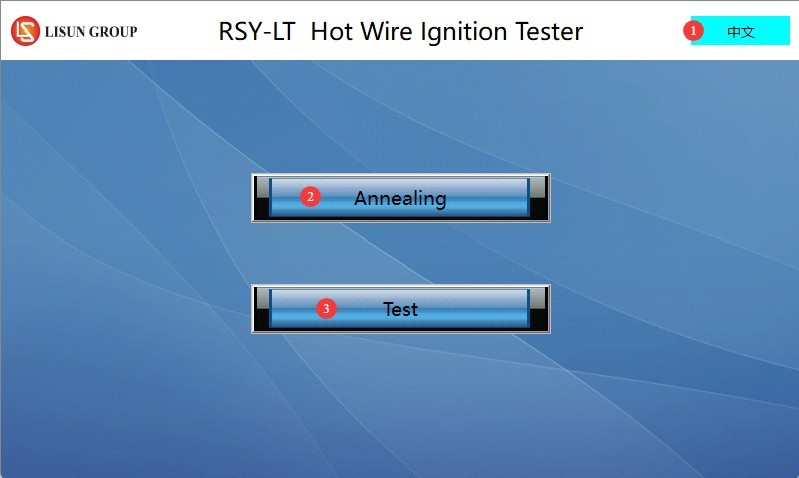
Figura 4
4.2 Annealing Interface
| Număr | notițe |
| ① | Click to turn the lighting inside the test chamber on or off |
| ② | Click to turn the exhaust fan on or off |
| ③ | Annealing Time Settings |
| ④ | Current annealing time displayed |
| ⑤ | Click to reset the current annealing time |
| ⑥ | Click to turn the test power on or off |
| ⑦ | Click to start or stop the annealing timer |
| ⑧ | Reveniți la ecranul principal |
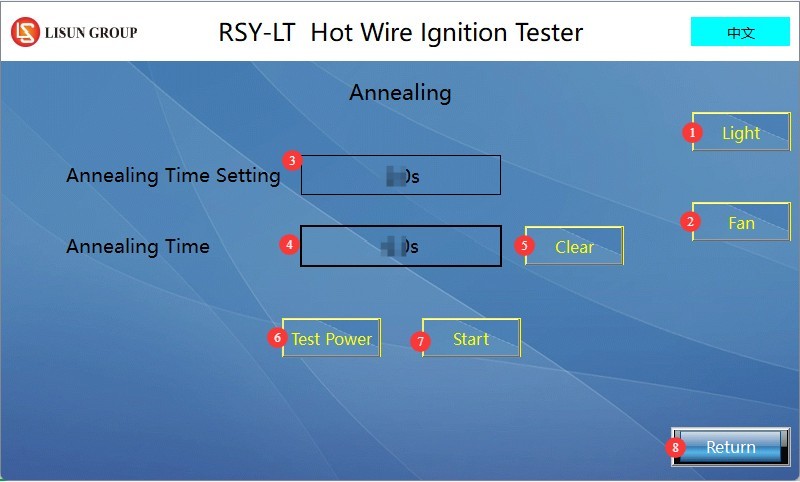
Figura 5
4.3 Hot-Wire Ignition Test Interface
| Număr | notițe |
| ① | Click to turn the lighting inside the test chamber on or off |
| ② | Click to turn the exhaust fan on or off |
| ③ | Setări durată test |
| ④ | Current Test Time Display |
| ⑤ | Click to reset the current test time |
| ⑥ | Click to turn the test power on or off |
| ⑦ | Click to start or stop the test timer |
| ⑧ | Reveniți la ecranul principal |
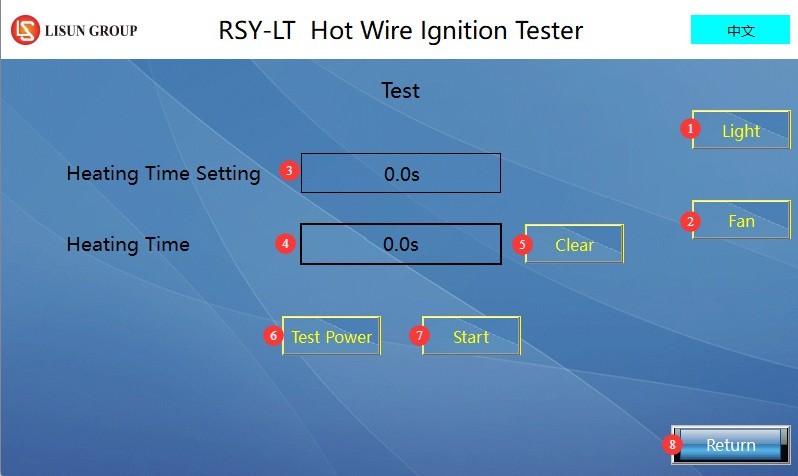
Figura 6
5. Operating Procedures for the Glowing Wire Ignition Test (Reference: GB/T 14048.1-2023, Appendix M)
5.1 Hot-wire Annealing Treatment
5.1.1 Heating Element Handling and Installation
Cut the heating wire to the standard length of 250 mm ± 5 mm. After cutting, straighten the wire to ensure it is straight and free of bends. Wipe the surface of the heating wire with anhydrous ethanol to remove oil, dust, and other contaminants, then allow it to air dry.
Secure both ends of the straight heating wire to the annealing support, ensuring that the wire is taut and free of slack.
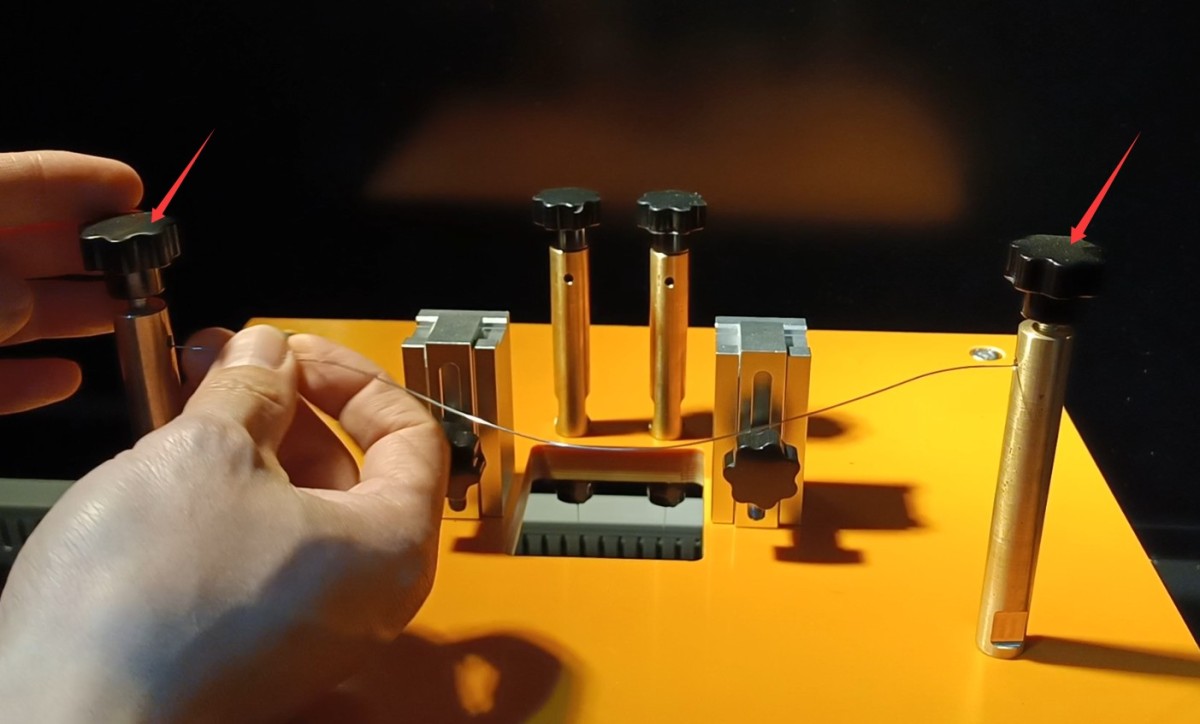
Figura 7
5.1.2 Annealing Process
Close the test chamber door. Note: The test chamber is equipped with a safety device; if the door is open, the test power supply will not start.
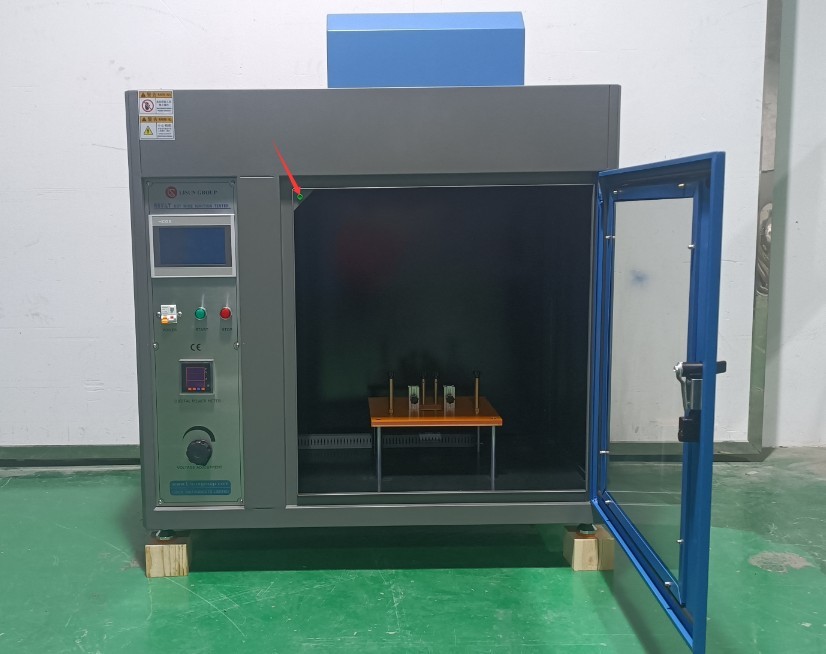
Figura 8
Navigate to the annealing screen in the touchscreen program and set the annealing time to 8–12 seconds (10 seconds recommended). Turn on the test power supply and slowly rotate the voltage adjustment knob to ensure the annealing power meets the standard requirements. If the heating wire power loss is 0.26 W/mm, the total heating wire power should be 250 mm × 0.26 W/mm = 65 W.
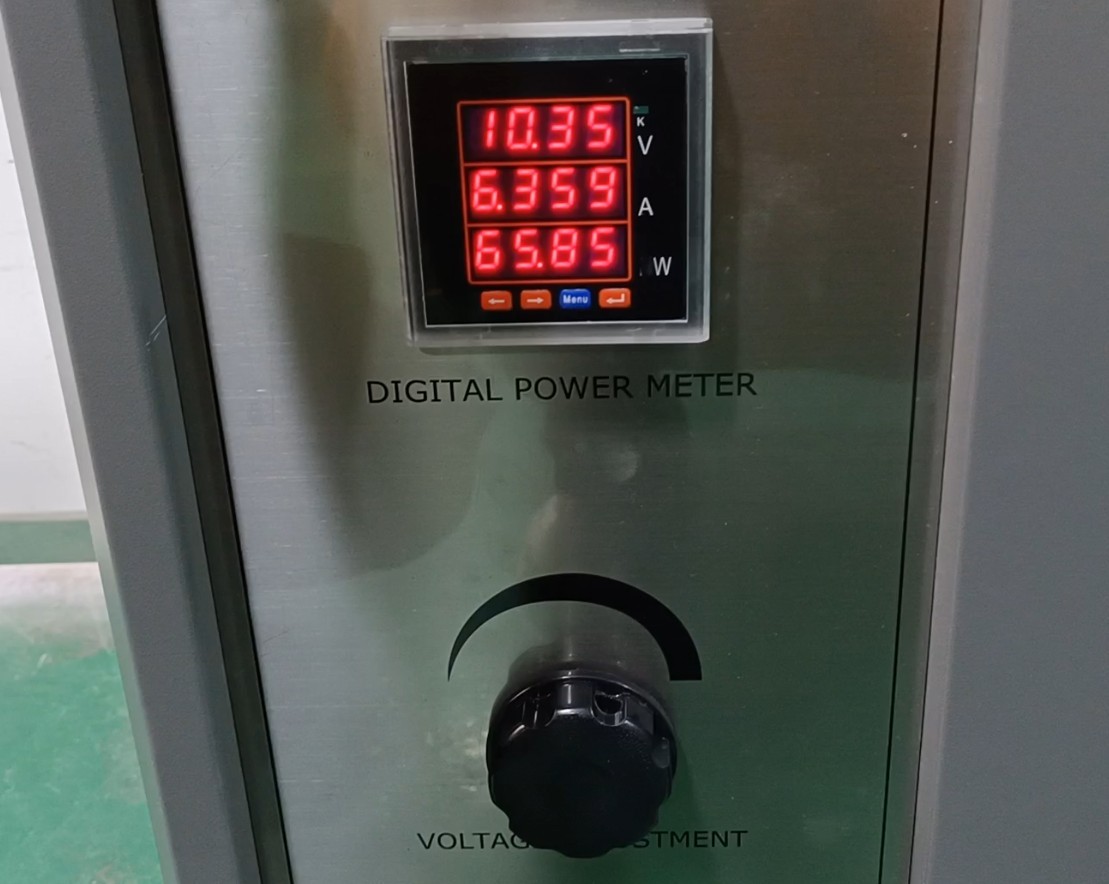
Figura 9
Then, reset the current annealing time to zero and click to start the annealing timer. Once the annealing time reaches the set duration, the test power supply will automatically shut off.
Note: Do not turn on the fan during the annealing process. Allow the annealed filament to cool completely (approximately 5–10 minutes).
5.2 Using a Winding Tool
As shown in the figure below, use a special winding tool.
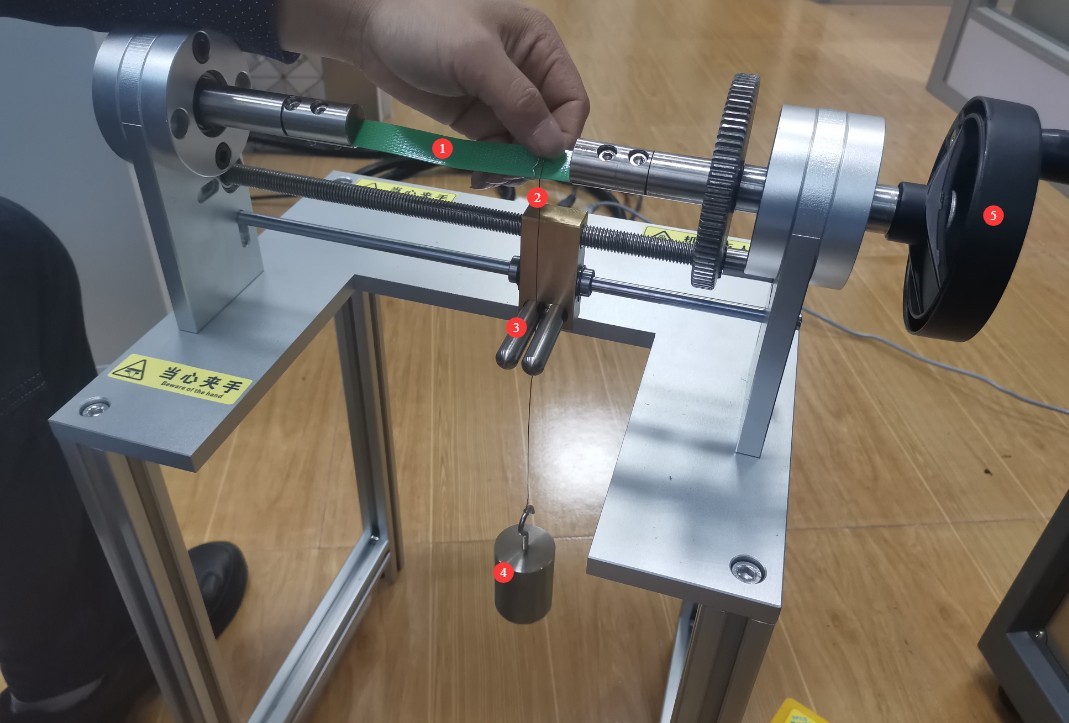
Figura 10
| Număr | notițe |
| ① | Clamp the specimen |
| ② | First, manually rotate the hot wire one full turn on the specimen. |
| ③ | The hot wire passes through the coil spacing control device; the standard specifies that the distance between each coil is (6.35 ± 0.05) mm. |
| ④ | A 5.4 N weight is suspended from the other end of the hot wire. |
| ⑤ | Slowly rotate the handle clockwise to automatically wind the hot wire around the specimen in 5 complete turns, spaced 6.35 mm apart. |
5.3 Glowing Wire Ignition Test
5.3.1 Instalarea specimenului
Mount and secure the specimen with the coiled heating wire to the heating wire ignition test apparatus. See the figure below.
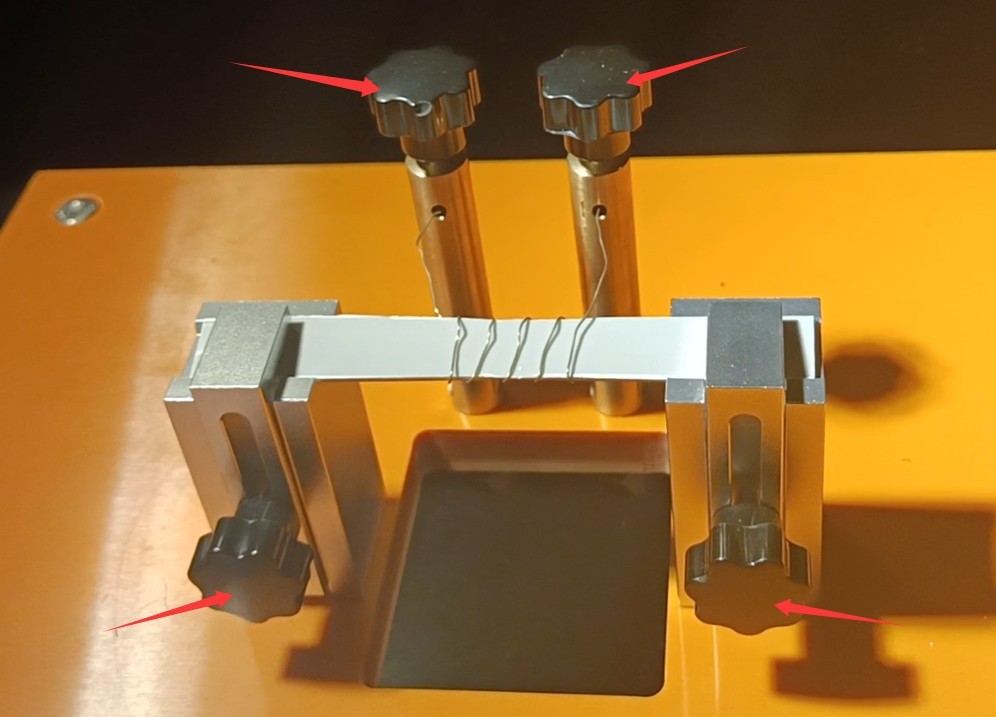
Figura 11
Then close the test chamber door.
5.3.2 Initiation of the Glowing Wire Ignition Test
Close the test chamber door. Navigate to the glow wire ignition test screen on the touchscreen. Set the test duration to 120 seconds in accordance with the standard. Reset the current test time to zero. Turn on the test power supply and check whether the current power of the glow wire is still 65 W; if there is a discrepancy, make a slight adjustment. Then immediately start the test timer.
Observe the condition of the test specimen through the observation window in the test chamber door.
Note: Do not turn on the fan during the hot-wire ignition test.
5.3.3 Termination of the Glow Wire Ignition Test
If the specimen ignites during the test, immediately click “Stop” to halt the test (the test power will automatically shut off), and record the time at which the specimen ignited.
If, during the test, the specimen does not ignite but melts and is no longer in close contact with any of the five coils of the hot wire, stop the test (the test power supply will shut off automatically) and record the specimen’s melting time.
If, during the test, the specimen neither ignites nor melts, the test automatically stops after 120 seconds.
5.4 Tests on Multiple Specimens
After each test specimen has been tested, turn on the fan for at least 10 minutes to ensure that all exhaust gases are completely vented from the chamber, and then remove the specimen.
Wipe down the interior walls of the test chamber, the annealing rack, and the hot-wire ignition device with a dry cloth to remove any residual soot or drippings.
Each heating wire may be used only once. Refer to this chapter and perform the same test on five specimens.
5.5 Organization of Experimental Data
The thickness of each specimen and the ignition time or melting time should be recorded.
The test results are the average ignition time of the material at the specified measured thickness, recorded in seconds.
6. Proceduri post-test
6.1 Equipment Operation After Testing
Turn the voltage adjustment knob to the minimum setting, then turn off the unit.
6.2 Pregătirea probei
Remove the test specimens after testing. If the specimens contain toxic or hazardous substances, they must be sealed and handled separately; the rest should be stored according to the classification of hazardous waste.
Set aside a portion of the samples for subsequent re-inspection or traceability, and label them with the test number and date.
6.3 Depozitarea echipamentelor
6.3.1 Cerințe privind depozitarea pe termen scurt
Dacă echipamentul este utilizat zilnic, nu este necesară nicio altă acțiune după finalizarea fiecărui test și curățarea echipamentului.
6.3.2 Cerințe privind depozitarea pe termen lung
If the device will not be used for an extended period (more than 1 month), please unplug the power cord and cover the device with a dust cover to prevent dust buildup.
Echipamentul trebuie pornit o dată pe lună și lăsat în standby timp de o jumătate de oră pentru a preveni îmbătrânirea componentelor electrice (cum ar fi condensatoarele și contactoarele).
7. Depanarea și rezolvarea problemelor comune
| Simptome de eroare | Cauze posibile | Pași de depanare | Procedură |
| Touchscreen is unresponsive or lagging | 1. There are smudges on the touchscreen; 2. The device has been running for too long, causing the system to lag; 3. The touchscreen is malfunctioning | 1. Wipe the touchscreen surface with a clean cloth; 2. Turn off the power and restart the device; 3. If the device still does not respond after restarting, check the touchscreen cable | 1. Clean the touchscreen regularly; 2. Avoid running the device continuously for long periods; shut it down for a 10-minute break every 2 hours; 3. If any cables are loose, tighten them. |
| The heating element is not heating up | 1. The heating element is not securely connected; 2. The voltage control knob is not set correctly; 3. The heating element is broken | 1. Check that the heating wire is securely connected to the device terminals; 2. Turn the voltage adjustment knob and observe whether the power meter reading changes; 3. Check the heating wire for any abnormalities. | 1. Reconnect the heating element and ensure good contact; 2. Adjust the power control knob to the standard power setting; 3. Replace the heating element and repeat the test. |