
 Engleză
 中文简体
中文简体 Русский
 Español
 Português
 Türkçe
 العربية
 Deutsch
 Polski
 Italiano
 Français
 한국어
한국어 ไทย
ไทย Tiếng Việt
 日本語
日本語





























Generator de supratensiuni
Manual de utilizare
Aplicabil LISUN modele: SG61000-5H,SG61000-5H-SP,SG61000-5H12,SG61000-5H12-SP、SG61000-5H15,SG61000-5H15-SP,SG61000-5H20,SG61000-5H20-SP,SG61000-5H30,SG61000-5H30-SP、SG61000-5H40-SP
1. Despachetarea și familiarizarea de bază cu echipamentul
1.1 Specificații tehnice cheie
| LISUN Model | SG61000-5H-SP | SG61000-5H15-SP | SG61000-5H |
| Forma de undă a tensiunii de pornire | 1.2/50 μs ± 20% | ||
| Forma de undă a curentului de scurtcircuit | 8/20 μs ± 20% | ||
| Impedanță de ieșire | 2Ω, 12Ω, and 500Ω | ||
| Gama de tensiune de ieșire | 0–10 kV ±5% | 0–15 kV ±5% | 0–10 kV ±5% |
| Gama de curent de ieșire | 0–5 kA ±5% | 0–7.5 kA ±5% | 0–5 kA ±5% |
| Numărul de supratensiuni | 1-9999 ori | ||
| Polaritate | Terminal pozitiv, terminal negativ și complet automat | ||
| Schimbare de fază | Asincron, sincron: testare la unghiul specificat de la 0° la 360° | ||
| Caracteristici speciale | Brand-new free upgrade: Features a built-in Voltage Probe and digital oscilloscope, allowing you to view output waveforms directly on the touchscreen! | ||
| Instrucțiuni de operare | Intrare ecran tactil LCD, sistem de operare Android încorporat | ||
| Dimensiuni (L x D x H) | 72 × × 61 175 cm | ||
| Greutate Brută | Despre 120 kg | Despre 150 kg | Despre 130 kg |
| Rețea de cuplare și decuplare (CDN încorporată) | CDN monofazat CA 240 V/16 A | AC 440 V/32 A Three-Phase CDN | |
| Coupling Decoupling Network for Power Lines (Optional External CDN) | Select based on the maximum surge output voltage and the EUT’s maximum input; for details, see the Shanghai Lishan LISUN CDN61000-5P. | ||
| Coupling Decoupling Network for Communication Lines (Optional External CDN) | Options are available based on the type of test object, data transmission rate, and surge output waveform. For details, see the Shanghai LISUN CDN61000-5C. | ||
| Transformator de izolație EUT (extern, opțional) | LISUN ITEU-SP4K (monofazat 220V) sau ITUS-SP2K (110V) | ||
1.2 Despachetarea și verificarea conținutului
1.2.1 Despachetare și inspecție vizuală
When unpacking the device, handle it gently to avoid scratching the casing with sharp tools. After unpacking, first inspect the exterior of the device to ensure there are no obvious deformations or dents, and that the buttons are not damaged or loose.
Dacă observați orice deteriorare sau deformare a echipamentului sau a accesoriilor, nu porniți alimentarea. Vă rugăm să ne contactați imediat.
1.2.2 Unitatea principală și accesoriile
Main Equipment: ① SG61000-5 Surge Generator; ② ITEU Series Isolation Transformers, used to power test specimens via lightning surges;③ PD-E01, EUT sample box (see Figure 1), used to prevent sparks from the EUT during testing; furthermore, the PD-E01 sample box automatically disconnects the EUT cables when opened to prevent accidental electric shock.
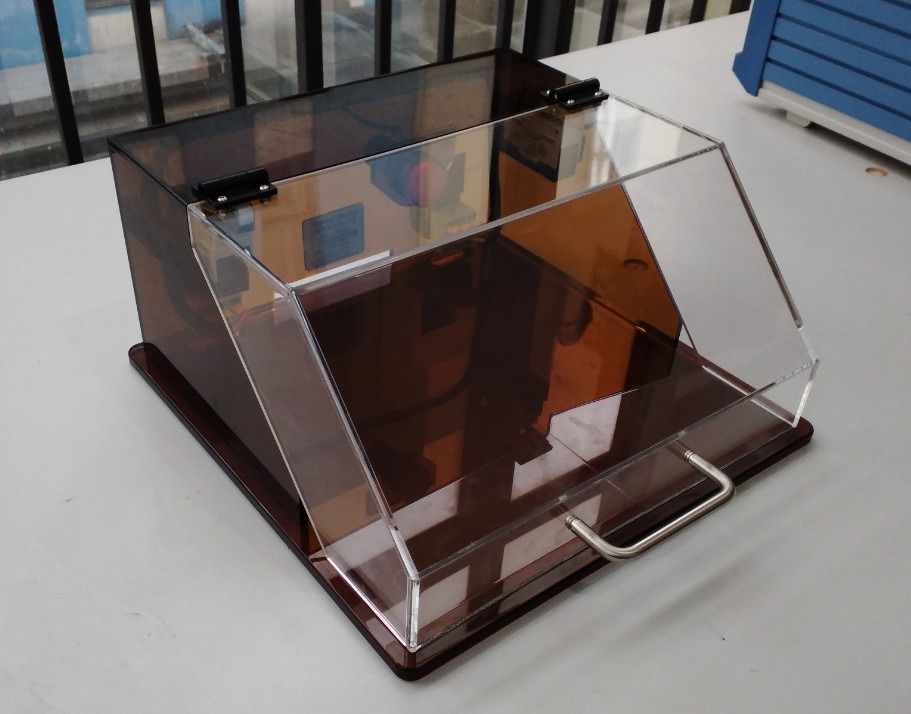
Figura 1
Nota 1: Generatoarele de supratensiune trebuie utilizate împreună cu transformatoarele de izolație pentru a proteja rețeaua electrică; acest manual utilizează ca exemplu seria ITEU de transformatoare de izolație.
Note 2: The PD-E01 sample tray is optional. During testing, samples may be severely damaged by surges or even cause parts to fly off; place the sample in the sample tray to ensure a safe testing environment. The dimensions of the sample tray can be customized to fit the size of the EUT sample.
Standard Accessories: ① Isolation Transformer power cord; ② Isolation Transformer output cable, connecting the Isolation Transformer’s output terminal to the CDN input terminal of the Surge Generator; ③ Ground wire, used to connect to the PGND protective ground terminal; ④ Discharge tube (spare), used to check whether the device is outputting a surge in the event of a malfunction;⑤ Coaxial cable, used to connect to an external oscilloscope for monitoring surge waveforms; ⑥ Surge Generator power cord; ⑦ and ⑧ Test specimen connection cables, connecting the Surge Generator to the EUT (Equipment Under Test).
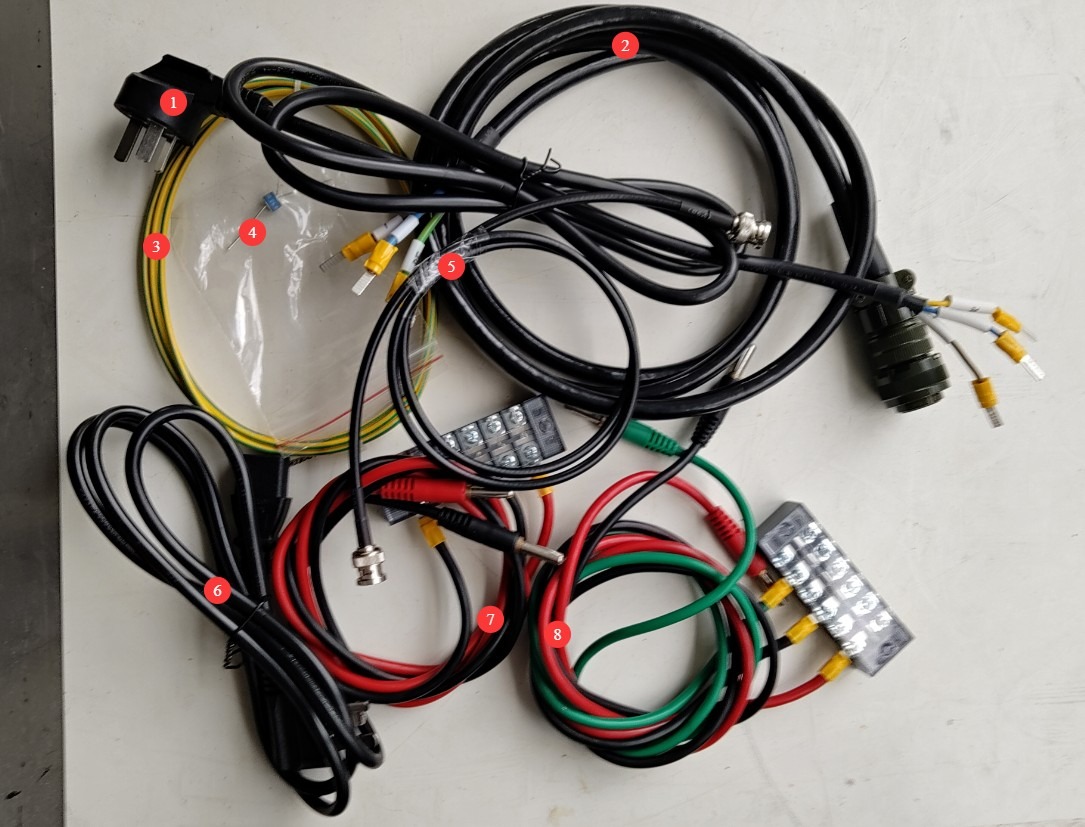
Figura 2
Download links for the digital user manual, warranty card, and other documents have been sent to you via email. Please download them as soon as possible. If you missed the email, please feel free to contact us to request a new download link.
2. Măsuri de siguranță
2.1 Ghid de plasare
Place the Surge Generator on a level surface; avoid tilting or inverting it, and keep it away from sources of vibration;
Transformator de izolare: Păstrați-l la cel puțin 0.5 metri distanță de unitatea principală pentru a preveni interferențele de cuplare electromagnetică;
The premises must be free of strong electromagnetic interference, corrosive gases, and flammable or explosive materials, and must be well-ventilated;
The distance between the equipment and walls or surrounding structures (such as other testing equipment or shelving) must be at least 1000 mm to facilitate maintenance; at least 2000 mm of space must be left in front of the equipment to ensure smooth operation and keep the surrounding area free of obstructions.
2.2 Standarde de siguranță pentru înaltă tensiune
2.2.1 Verificare de securitate
Verificați dacă tensiunea de alimentare a echipamentului corespunde cu tensiunea rețelei electrice (CA 220 V ±10%, 50/60 Hz) și asigurați-vă că sursa de alimentare este împământată corespunzător și că firul de împământare nu este deteriorat sau slăbit;
Cerințe de împământare: Terminalul de împământare de protecție (PGND) al unității gazdă trebuie conectat la masă, cu o rezistență de împământare de ≤4 Ω, pentru a asigura descărcarea în siguranță a tensiunii înalte;
Confirm ambient temperature: 15°C to 35°C, relative humidity: 10% to 75% (non-condensing), atmospheric pressure: 86 kPa to 106 kPa;
Operatorii trebuie să aibă mâinile uscate și nu trebuie să poarte bijuterii metalice.
2.2.2 Cerințe de siguranță pentru procedurile operaționale
The equipment generates high voltages (up to 10 kV to 15 kV) and high-current surges during operation. Under no circumstances should you touch the pulse output connector, the EUT terminals, or the CDN port.
Înainte de a comuta conexiunile sau de a înlocui EUT-ul, trebuie să vă asigurați mai întâi că ieșirea de înaltă tensiune este oprită (indicatorul luminos HV este stins) și să așteptați cel puțin 5 minute pentru a vă asigura că condensatoarele interne de înaltă tensiune sunt complet descărcate.
Nu mâncați și nu beți în timpul testului pentru a preveni accidentele cauzate de electrocutare.
Când sunt implicate mai multe persoane, definiți clar rolurile și responsabilitățile și confirmați-le reciproc înainte de a începe testul pentru a evita erorile.
Do not disassemble the equipment or work with the casing open without authorization. The equipment contains high voltage, and repairs by non-professionals may result in electric shock or damage to the equipment.
2.3 Măsuri de răspuns în caz de urgență
În caz de electrocutare: Întrerupeți imediat alimentarea principală a echipamentului, mutați operatorul într-o zonă sigură, administrați primul ajutor dacă este necesar și contactați personalul medical.
Defecțiune a echipamentului (fum, zgomote neobișnuite, mirosuri neobișnuite): Opriți imediat echipamentul și deconectați alimentarea cu energie electrică; deconectați toate cablurile; nu reporniți echipamentul; contactați producătorul pentru reparații.
Supratensiune anormală la ieșire: Întrerupeți testul, contactați producătorul pentru depanare și nu atingeți portul de testare direct cu mâinile.
2.4 Altele
Pentru aspectele care nu sunt acoperite de acest manual, vă rugăm să procedați cu prudență sau să ne contactați.
3. Pregătiri înainte de test
3.1 Cablajul echipamentului
① Isolation Transformer input terminal: Connect the power cord to the Isolation Transformer; ② and ③ Isolation Transformer output terminals: Depending on the current of the EUT (Equipment Under Test) and the wiring configuration, select one to connect to the surge generator’s built-in CDN input terminal;④ Connect the surge generator’s power cord; ⑤ Built-in CDN input terminal; ⑥ PGND protective ground terminal; ⑦ Built-in CDN output terminal, used to connect the EUT sample.
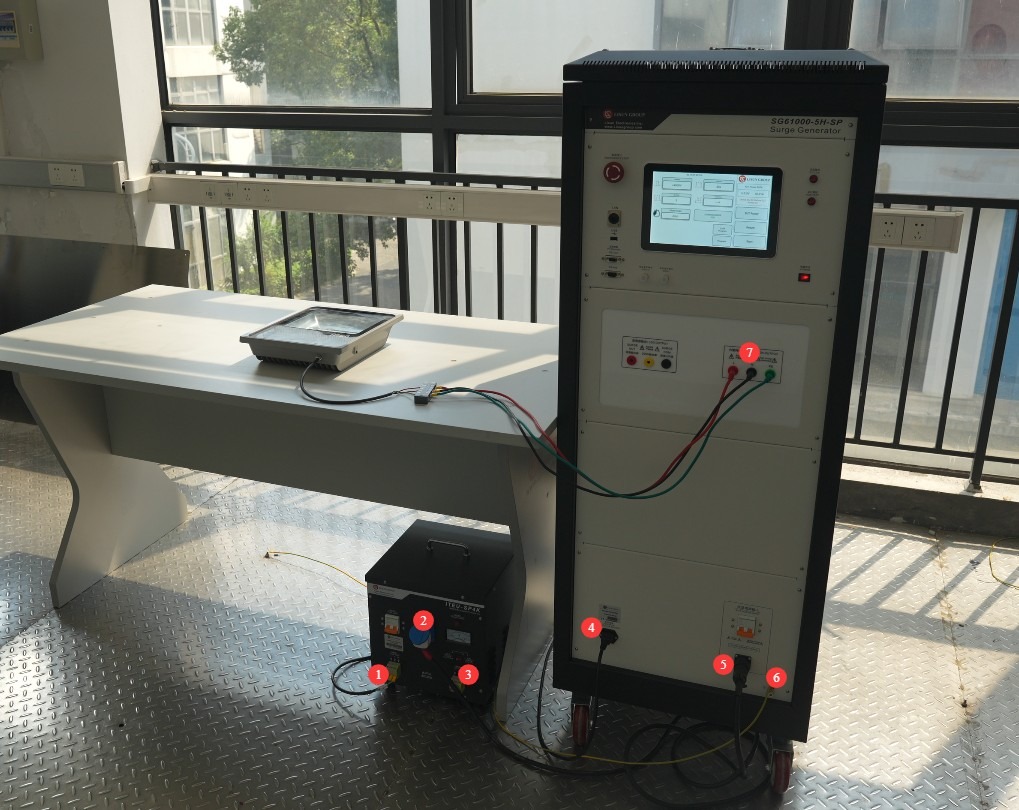
Figura 3
For safety reasons, the EUT sample may be placed in a sample box.
Note: Before testing, verify that the EUT is in normal operating condition and meets the product’s rated operating conditions.
Next, connect the power cords for the surge protection unit and the Isolation Transformer to an appropriate power source.
Note: The Isolation Transformer is used only to supply power to the EUT via the Surge Generator; the power supply for the Surge Generator itself does not need to be connected to the Isolation Transformer.
3.2 Confirmarea parametrilor de testare
3.2.1 Selectarea nivelului de testare
Based on the EUT installation environment and product standards, select the corresponding test level (the priority levels are listed in the table below); lower levels must meet compatibility requirements:
| Nivelul testului | Tensiune de testare a străpungerii (±10%) | Scenarii aplicabile |
| Nivel 1 | 0.5 kV | Un mediu interior bine întreținut |
| Nivel 2 | 1.0 kV | Mediu interior tipic |
| Nivel 3 | 2.0 kV | Medii exterioare sau semi-exterioare |
| Nivel 4 | 4.0 kV | Harsh Outdoor Environments |
| Nivelul X | Tensiune specifică | Scenarii speciale specificate în standardele de produs |
3.3 Încălzirea și autotestarea echipamentului
Porniți comutatorul de alimentare de pe panoul frontal al dispozitivului gazdă; dispozitivul intră în modul standby, indicatorul luminos de alimentare se aprinde și ventilatorul de răcire pornește.
Please turn on the protective grounding switch on the back of the surge generator—that is, set it to the “1” position—and ensure that the red indicator light is on.
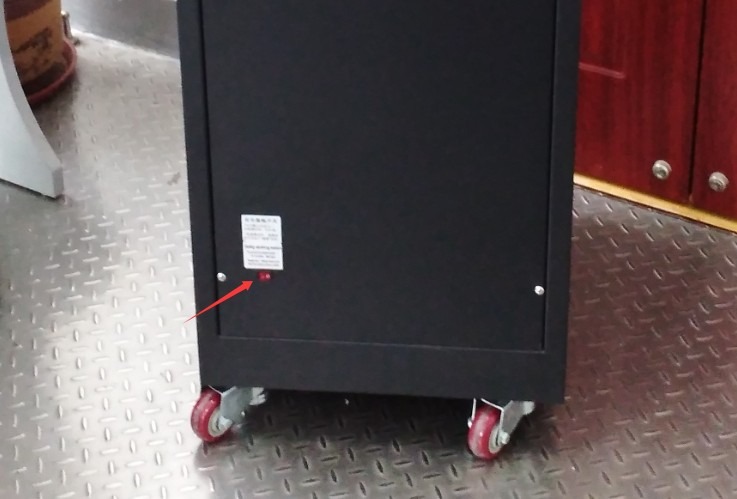
Figura 4
Wait 5 minutes for the device to warm up, and check that the touchscreen is displaying normally and that there are no error messages.
4. Introducere în programul cu ecran tactil
Program Startup Screen: ① Oscilloscope Settings Screen; ② General Usage Precautions (this feature is not yet fully developed; do not perform any operations here at this time); ③ System Information Screen; ④ Chinese/English Language Switch; ⑤ Program Screen; ⑥ Surge Test Screen.
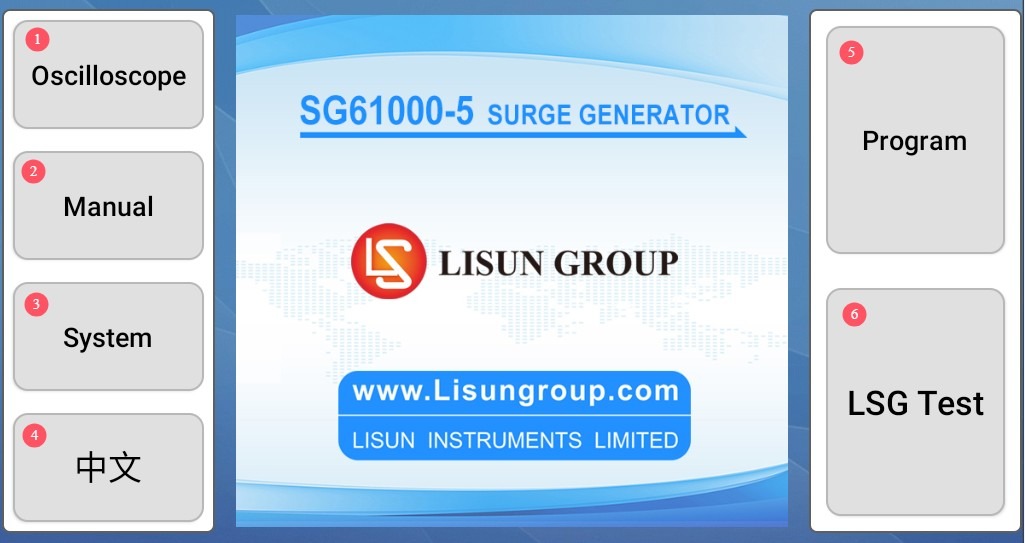
Figura 9
4.1 Interfața setărilor funcțiilor osciloscopului
Just check all the boxes, and the current surge waveform will be displayed automatically after each surge test.
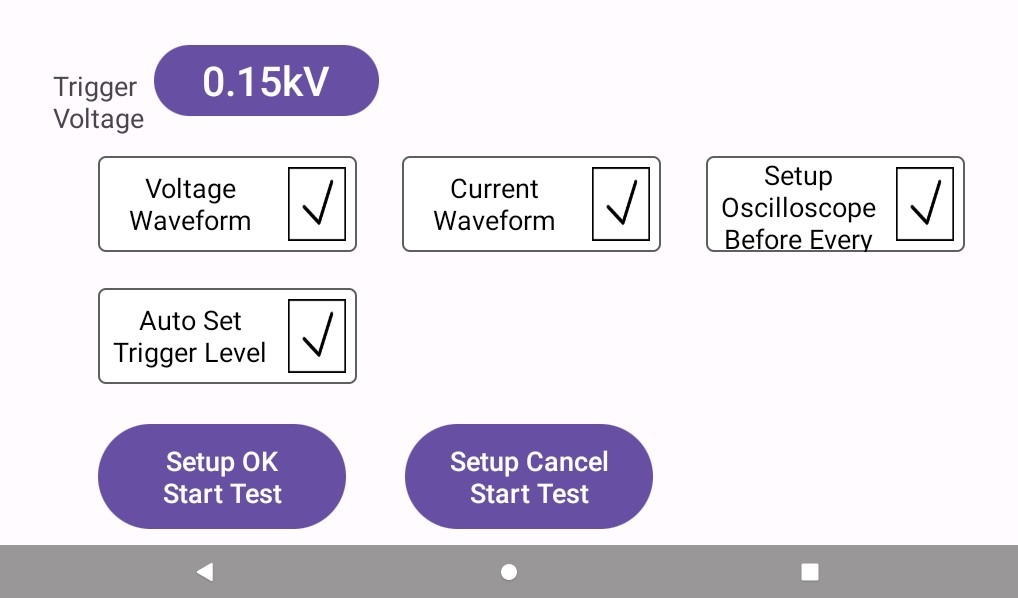
Figura 10
4.2 Interfața programului
Used to create new programs or manage existing ones.
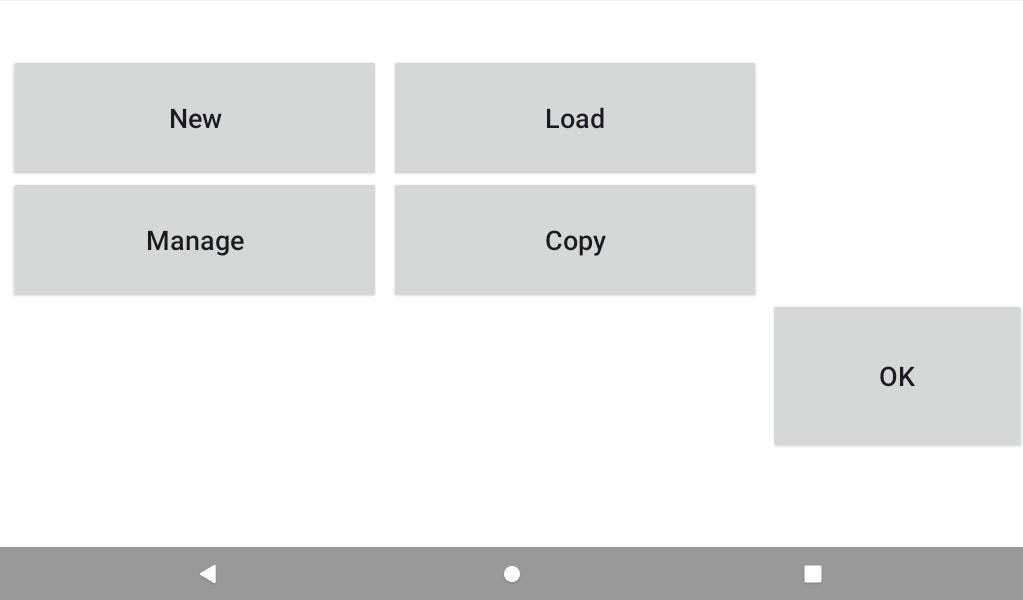
Figura 16
If you need to test the program, simply enter all the parameters you want to test step by step as needed, and then save.
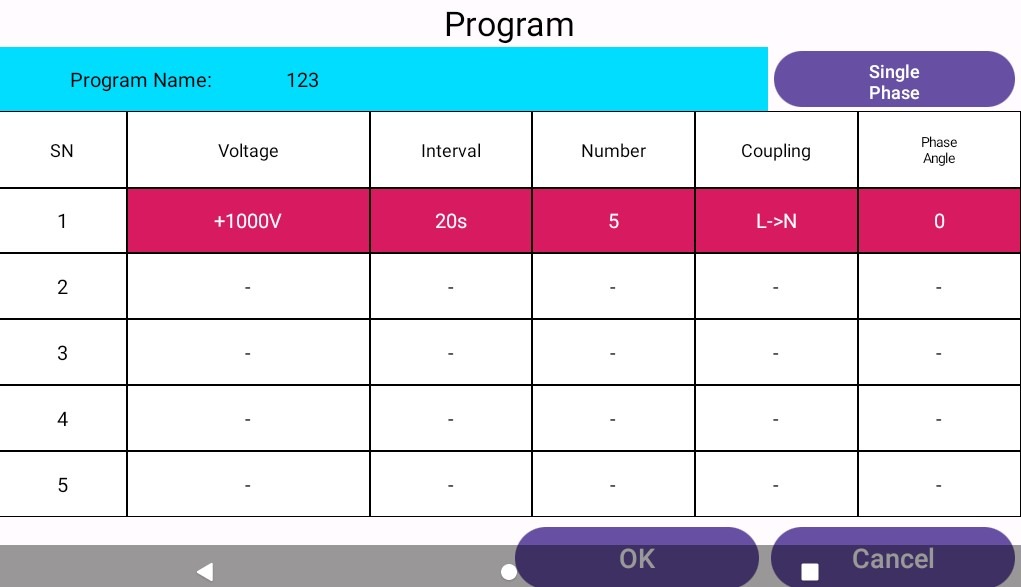
Figura 17
4.3 Interfața de testare a supratensiunii
① Surge voltage and polarity settings; ② Surge interval settings; ③ Surge count settings; ④ Surge coupling direction settings; ⑤ Surge phase angle settings; ⑥ Common-mode impedance selection (default is 12 Ω, 2 Ω optional; no setting required for differential mode, fixed at 2 Ω);⑦ EUT parameter monitoring settings; ⑧ Directly call up a pre-edited program to run a test; ⑨ EUT voltage and current display; ⑩ Click to turn the EUT power on (or off); ⑪ Click to start or stop the surge test.
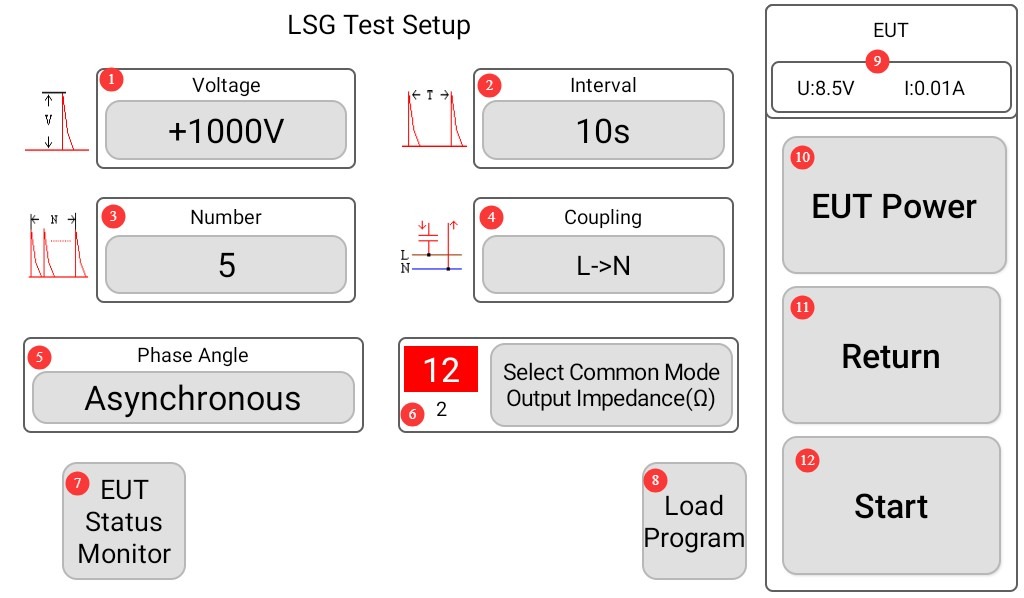
Figura 11
Notă: Pentru a afișa automat forma de undă a supratensiunii curente pe ecran, setați intervalul de supratensiunii la cel puțin 10 secunde; în caz contrar, programul nu va avea suficient timp pentru a afișa forma de undă a supratensiunii.
4.3.1 Interfața Setări Direcție Cuplare Supratensiune
You can select a single coupling direction, or click “Auto” to select multiple coupling directions at once.
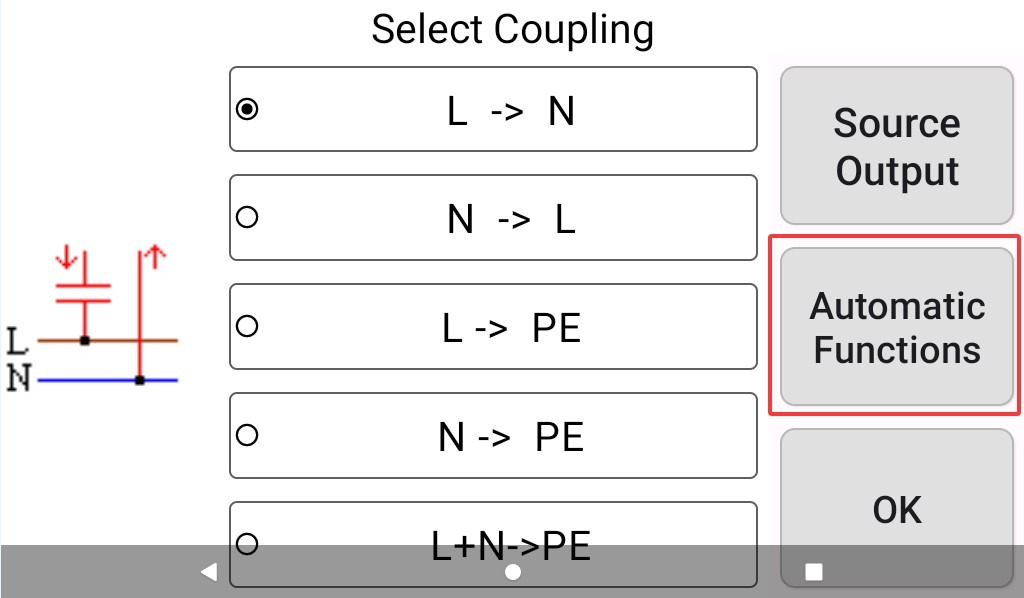
Figura 12
On the “Automatic Functions” screen, you can select from various combinations of coupling directions, or click “General” to return to selecting a single coupling direction.
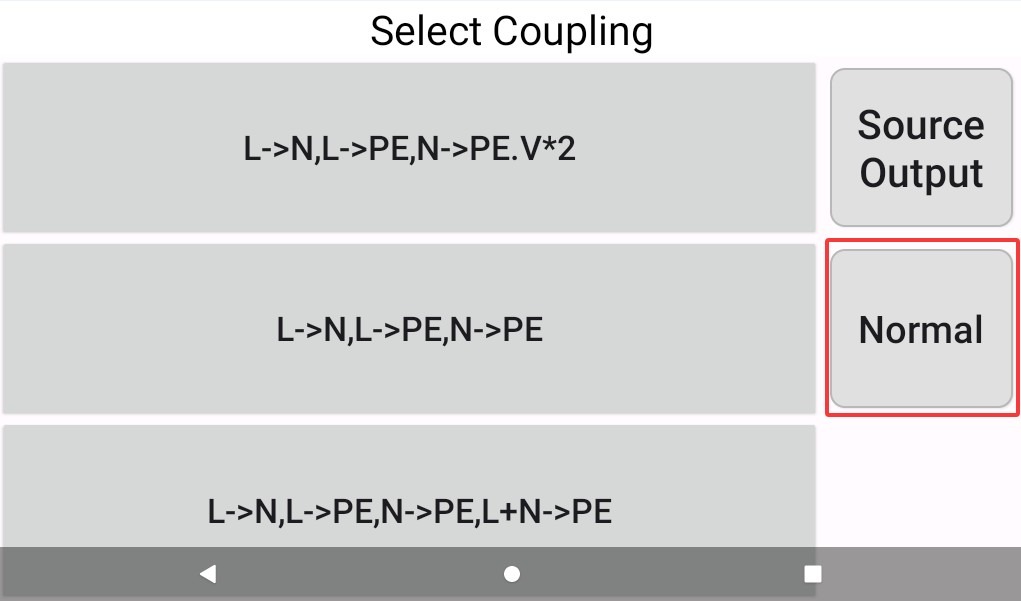
Figura 12.1
4.3.2 Interfața Setări Unghi de Supratensiune
You can choose asynchronous, a single surge angle, or click “Auto” to select multiple coupling angles simultaneously.
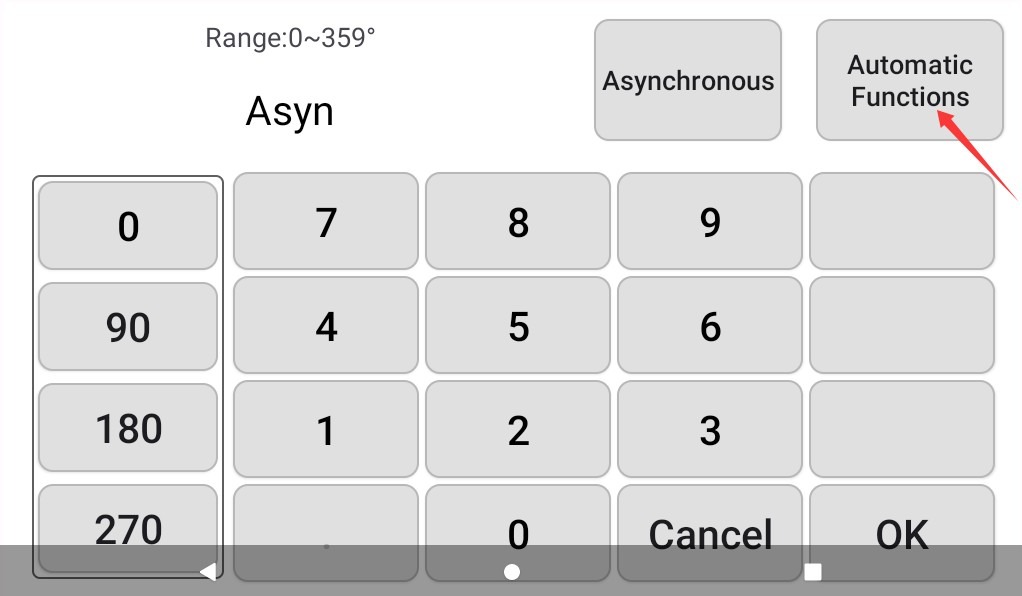
Figura 13
On the “Auto Function” screen, you can choose from a variety of angle combinations. Tap the button marked in the image below to return.
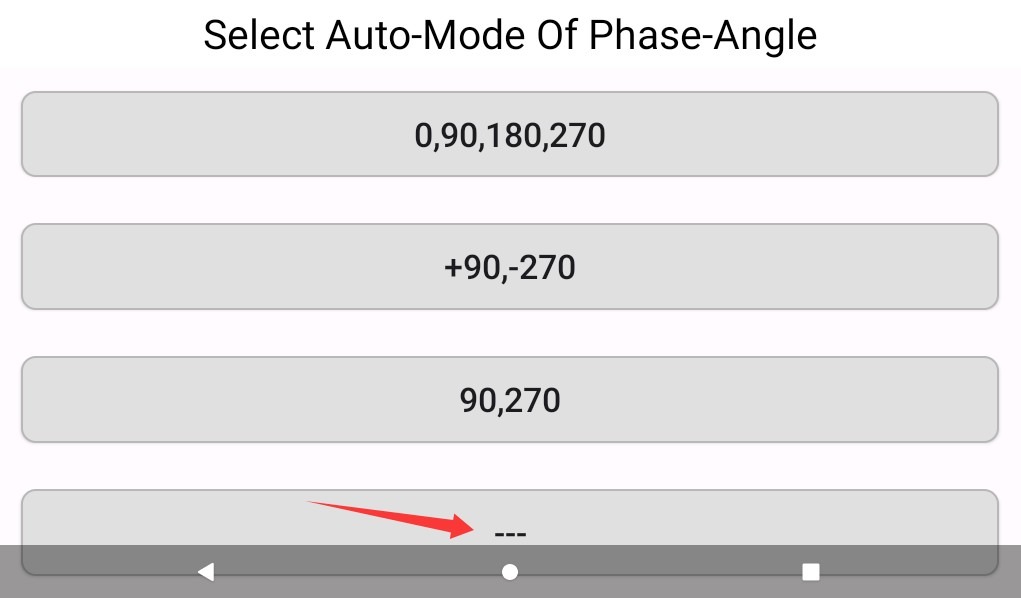
Figura 14
4.3.3 Interfața setărilor de monitorizare a parametrilor EUT
① √ indicates that EUT parameters are monitored; × indicates that EUT parameters are not monitored; ② √ indicates that surge peak data is monitored; × indicates that surge peak data is not monitored; ③ √ indicates that the equipment automatically stops the surge test when the EUT voltage or current data exceeds the set limits;④ A check mark (√) indicates that the device automatically stops the surge test when the surge peak voltage or current data exceeds the set limits.
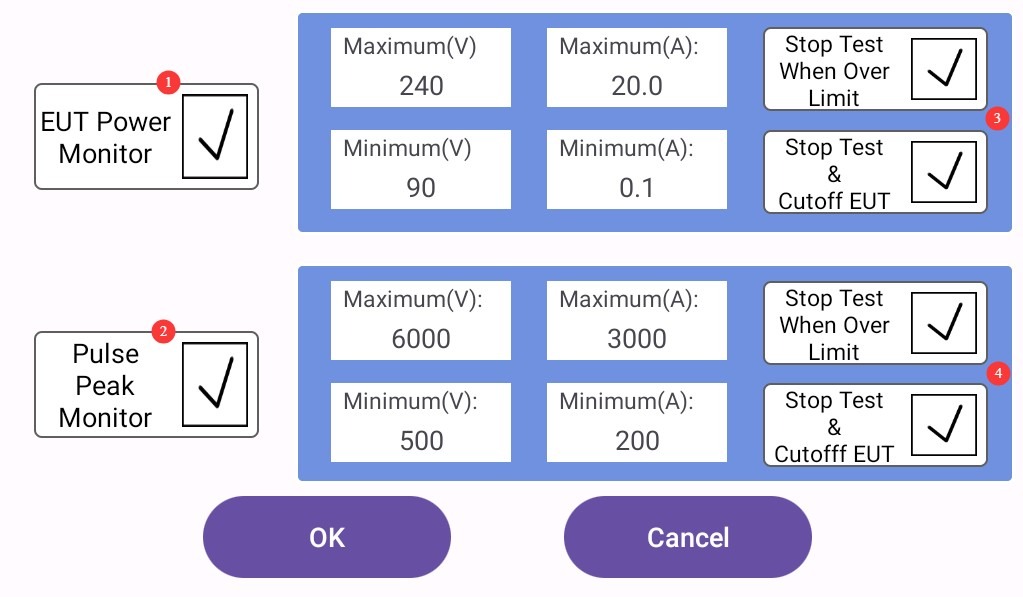
Figura 15
Nota 1: Utilizatorii pot alege dacă doresc sau nu să monitorizeze parametrii EUT și datele privind vârfurile de supratensiune în timpul testului; acest lucru nu afectează testul de supratensiune.
Note 2: If you select option ③ or ④, the surge test may be unexpectedly terminated due to the activation of a protection mechanism. Please choose carefully and set appropriate limits.
5. Testarea supratensiunii
5.1 Proceduri de operare
After all the parameters in the touchscreen program have been set, turn on the Isolation Transformer. Turn on the circuit breaker for the host’s built-in network CDN.
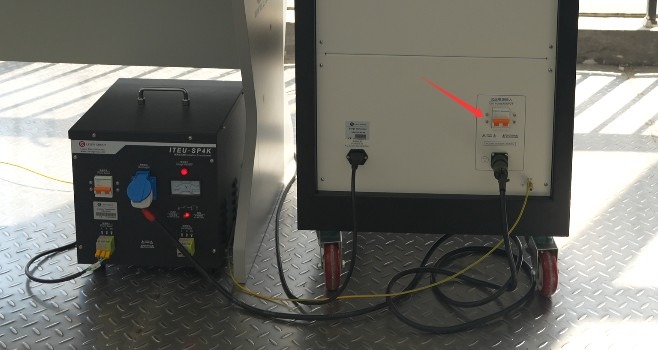
Figura 18
① Click “EUT Power” to power on the EUT; ② Then click “Start” to begin the test.
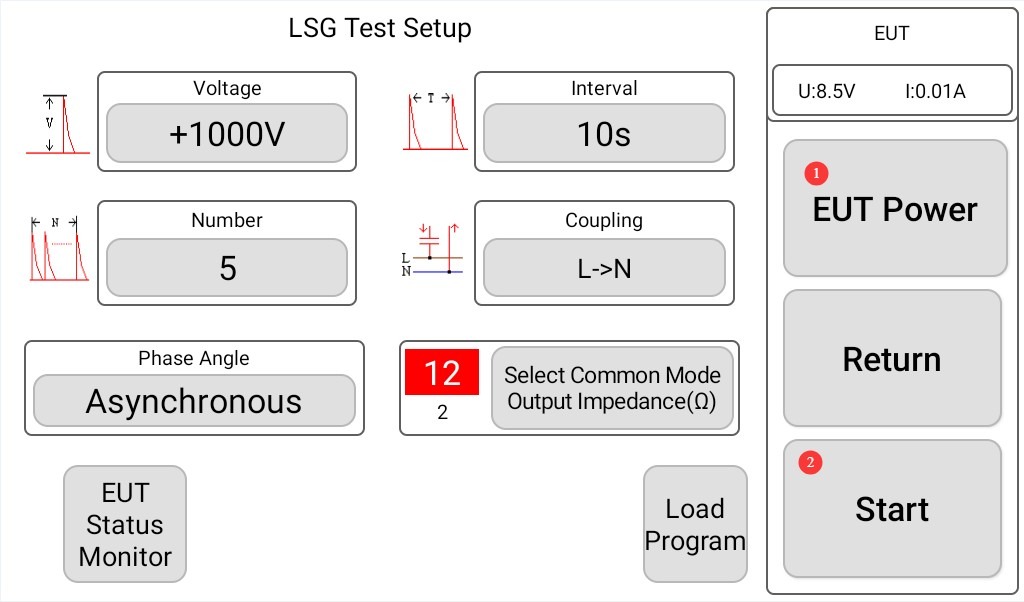
Figura 19
If the oscilloscope function is checked, the program interface will display the surge voltage and current waveforms after each surge output:
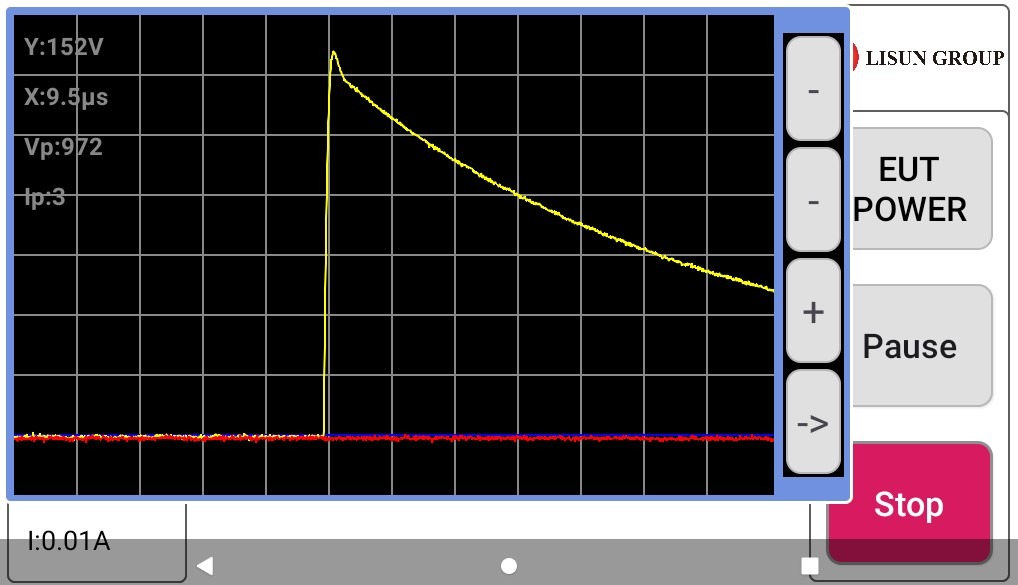
Figura 20
Note: When the EUT is connected and testing is proceeding normally, the surge voltage and current values and waveforms will be affected. The surge voltage and voltage waveform (1.2/50 μs) specified in the standard must be measured under fully open-circuit conditions; the surge current and current waveform (8/20 μs) specified in the standard must be measured under fully short-circuit conditions.
Open circuit, meaning that no EUT or cables are connected to the CDN output, as shown in the figure below:
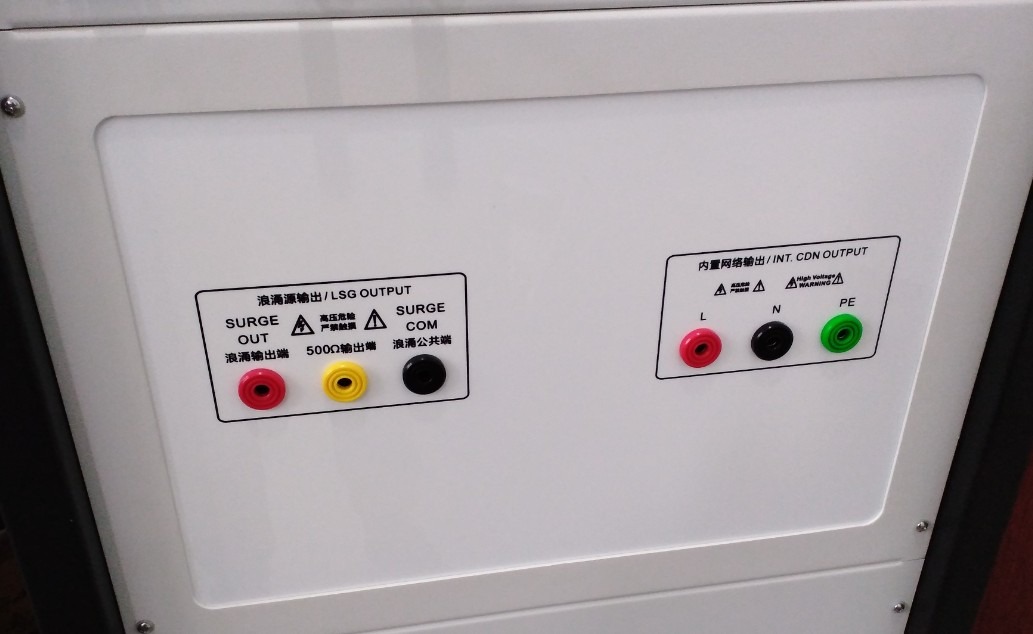
Figura 21
For a complete short circuit, the two ends of the surge coupling direction must be short-circuited. For example, if the current coupling direction is set to L> N, the L and N terminals at the CDN output shown in the figure above must be short-circuited using a wire.
5.2 Determinarea dacă EUT a trecut testul
| Nivel | Criteriu de evaluare | Adus sau respins | Simptome tipice |
| Gradul A (Criteriul A) | Performanța este complet normală în limitele specificate, fără nicio anomalie. | De obicei, se consideră că a trecut | No downtime, resets, display glitches, or data loss; key parameters are within acceptable limits. |
| Gradul B (Criteriul B) | Pierdere sau reducere temporară a funcției sau performanței, dar recuperarea are loc automat odată ce perturbarea încetează, fără a fi necesară intervenția operatorului | Trebuie aranjat în avans; în general acceptabil | Reia automat după o scurtă întrerupere a comunicării; revine la normal după pâlpâirea ecranului; revine la normal după o scurtă abatere de la parametri |
| Clasa C (Criteriul C) | Pierdere sau reducere temporară a funcției sau performanței care necesită intervenție manuală pentru restabilire (de exemplu, repornire, resetare) | Trebuie aranjat în avans; acceptabil în anumite situații | If the equipment freezes, it must be manually restarted; if the program crashes, it must be reloaded; if parameters are abnormal, they must be adjusted manually. |
| Gradul D (Criteriul D) | Irrecoverable loss of functionality or reduced performance due to hardware/software damage or data loss | Hotărât să fie un eșec | Componente arse, plăci de circuit deteriorate, date stocate pierdute definitiv, funcții de bază irecuperabile |
6. Proceduri post-test
6.1 Testul a fost oprit
Dacă EUT-ul este vizibil deteriorat în timpul testului, atingeți imediat „Opriți testul” pe ecranul tactil și atingeți „Alimentare EUT” pentru a opri alimentarea EUT-ului.
If no anomalies occur during the test, wait for the surge test to complete automatically, then click “EUT Power” to turn off the EUT’s power.
Wait 5 minutes to ensure that the high-voltage capacitors inside the unit have fully discharged before proceeding with the next steps.
Turn off the circuit breaker for the built-in network CDN located on the back of the host.
Then replace the EUT for testing, or turn off the power to the host and the Isolation Transformer.
6.2 Post-Test Cleanup and Tidying Up
Verify whether the EUT has passed the test (no performance degradation, no damage).
Clean the test area and wipe it down with a dry cloth; do not use alcohol or corrosive cleaning agents.
Surge testing is a destructive test; it does not automatically generate a test report, but the device automatically saves the test data. Go to “System Information,” click “Test Log,” and export the corresponding test data to a USB flash drive via the USB port. The exported file is in TXT text document format.
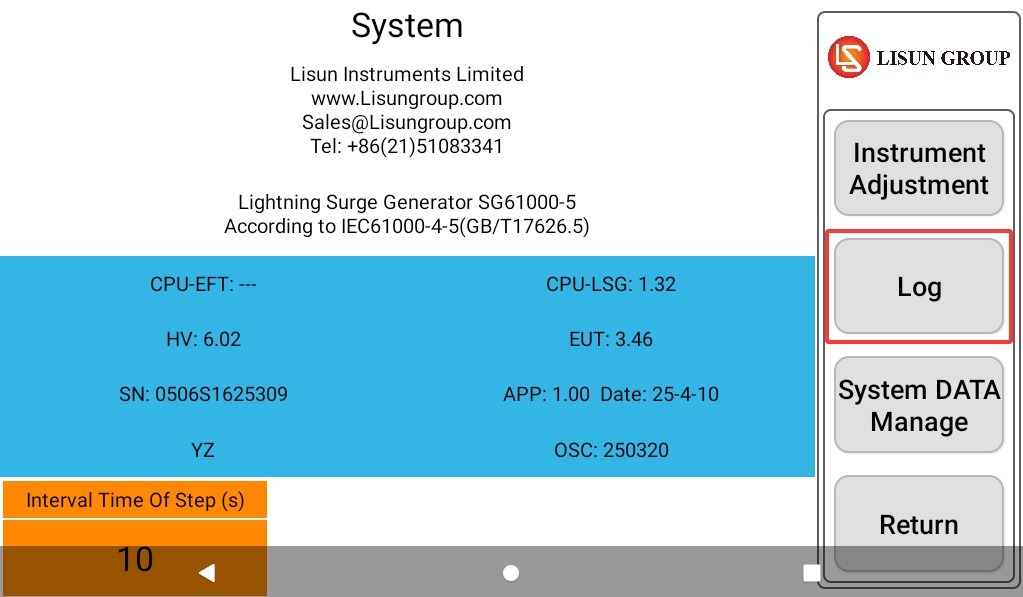
Figura 23
6.3 Depozitarea echipamentelor
6.3.1 Cerințe privind depozitarea pe termen scurt
Dacă echipamentul este utilizat zilnic, nu este necesară nicio altă acțiune după finalizarea curățării în urma fiecărui test.
6.3.2 Cerințe privind depozitarea pe termen lung
Dacă dispozitivul nu va fi utilizat pentru o perioadă lungă de timp (mai mult de o lună), deconectați toate cablurile și acoperiți dispozitivul cu o husă de praf pentru a preveni acumularea de praf.
Dispozitivul trebuie pornit o dată pe lună, timp de doar o jumătate de oră, pentru a preveni îmbătrânirea componentelor electrice (cum ar fi condensatoarele și contactoarele).
7. Folosiți un dispozitiv extern pentru a verifica ieșirea de supratensiune
7.1 Using an External Oscilloscope (Using a LISUN Osciloscopul din seria OSP ca exemplu)
7.1.1 Utilizarea portului CRO
7.1.1.1 Vizualizarea formelor de undă ale tensiunii de supratensiune
Set the Surge Generator to the following parameters: Set the surge voltage to +1 kV, set the coupling direction to L to N, set the interval time as short as possible (e.g., 5 seconds), and set the number of surges to a higher value to facilitate viewing each waveform. Do not connect any EUT; ensure the circuit is completely open. Then, use the coaxial cable provided to connect the “CRO-V” port of the lightning surge generator to the oscilloscope.
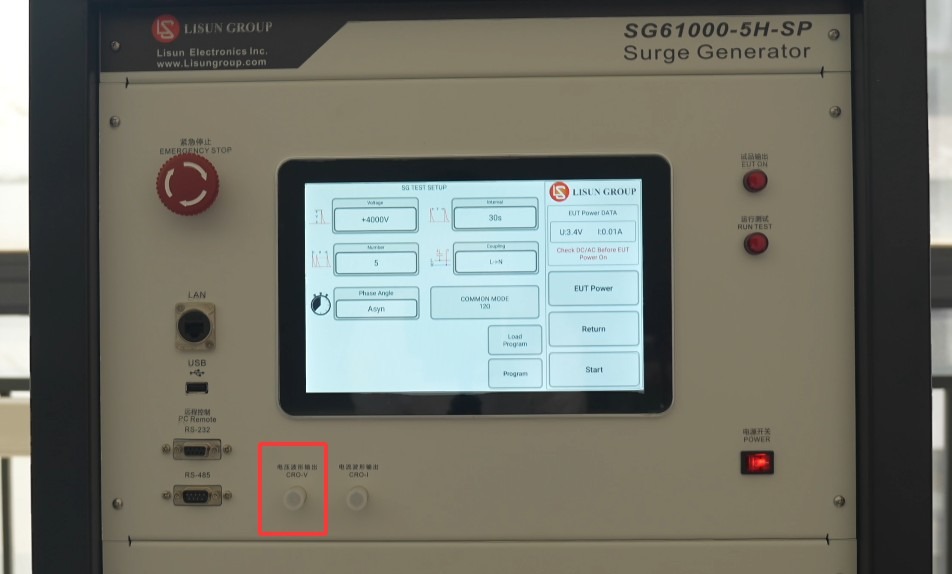
Figura 24
Press the ① “Menu” button below ② “Trigger.”
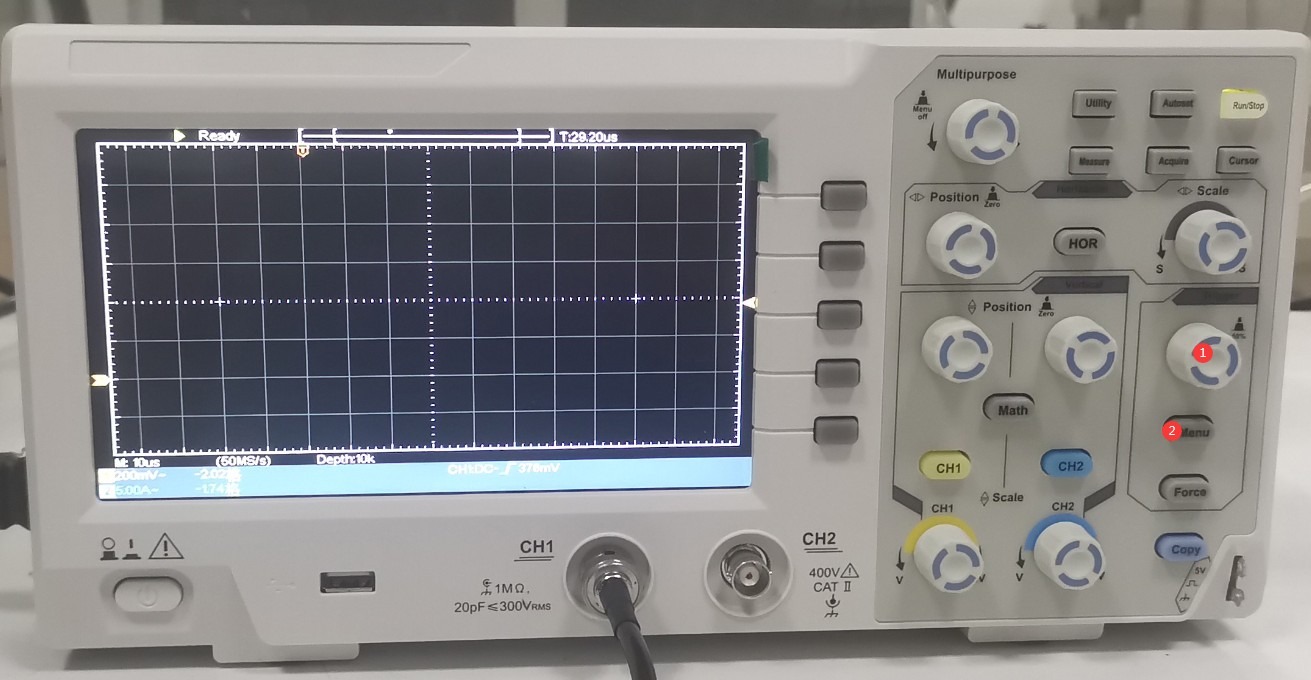
Figura 25
① Select the connected channel, ② set the trigger mode to “Normal,” ③ click to proceed to the next page.
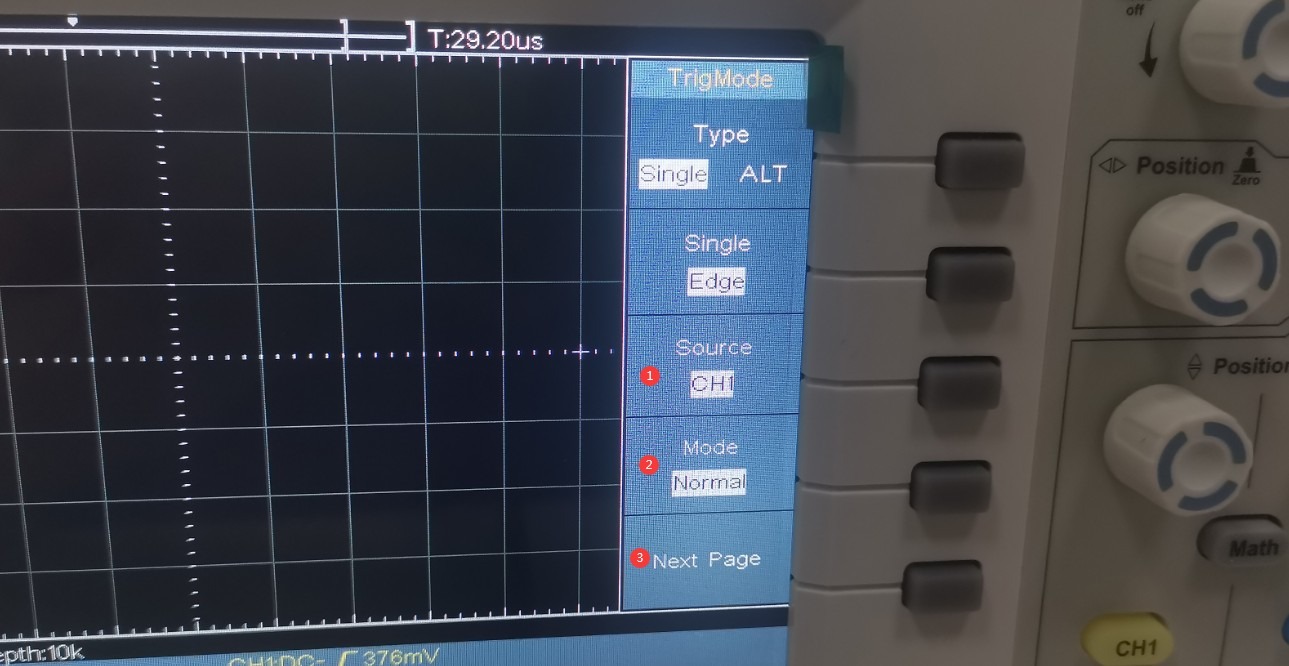
Figura 26
① Select the rising edge.
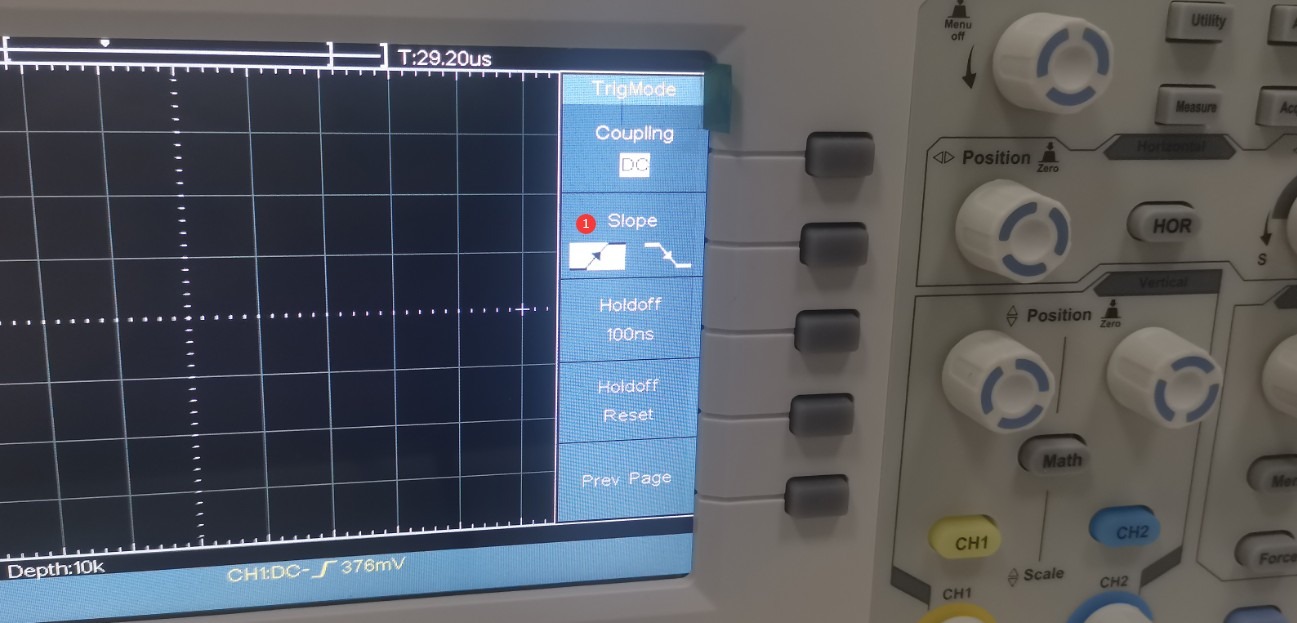
Figura 27
Press the CH1 knob (①).
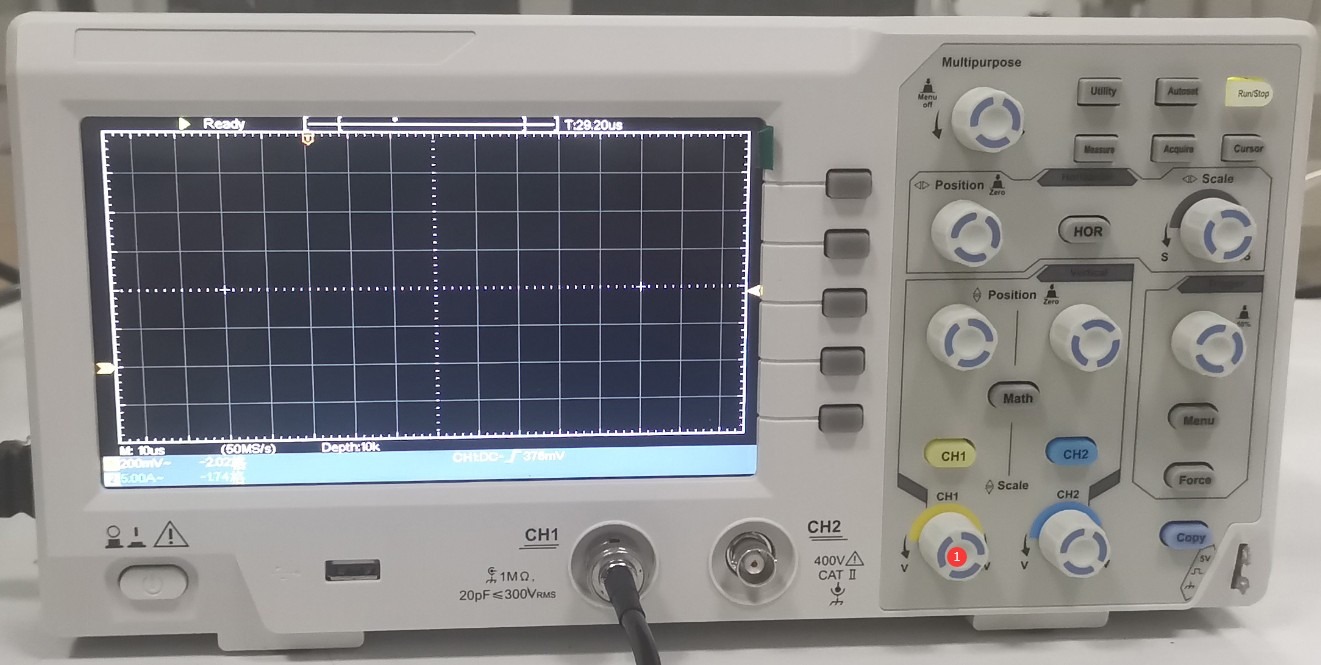
Figura 28
① Select a multiplier of 1X; ② Turn off the current test function.
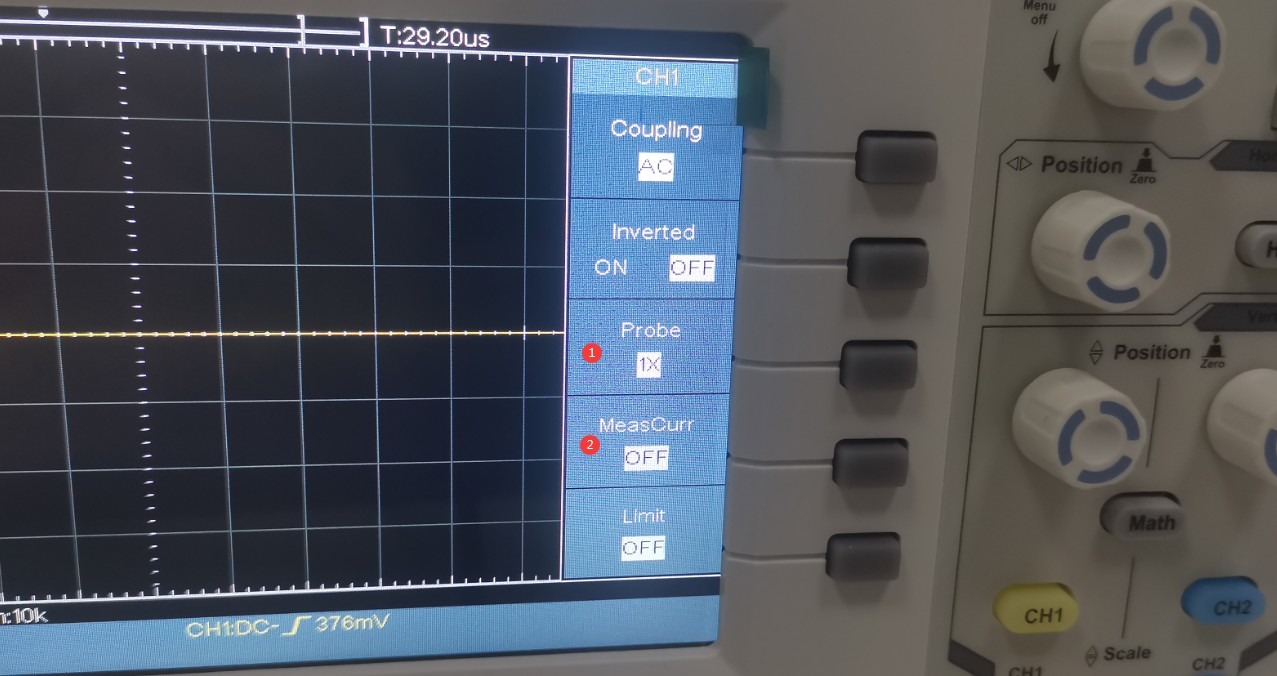
Figura 29
SG61000-5 series surge generator has a built-in 1000:1 Voltage Probe at the CRO interface. If the surge voltage is set to +1 kV, the actual voltage applied to the oscilloscope is 1 V. Turn the ① CH1 knob to set the ② vertical axis of the oscilloscope to 1/5 per division, or 200 mV, which makes it easier to view the entire waveform. Turn the ③ “Scale” knob to set the ④ horizontal time axis of the oscilloscope to 10 μs per division.
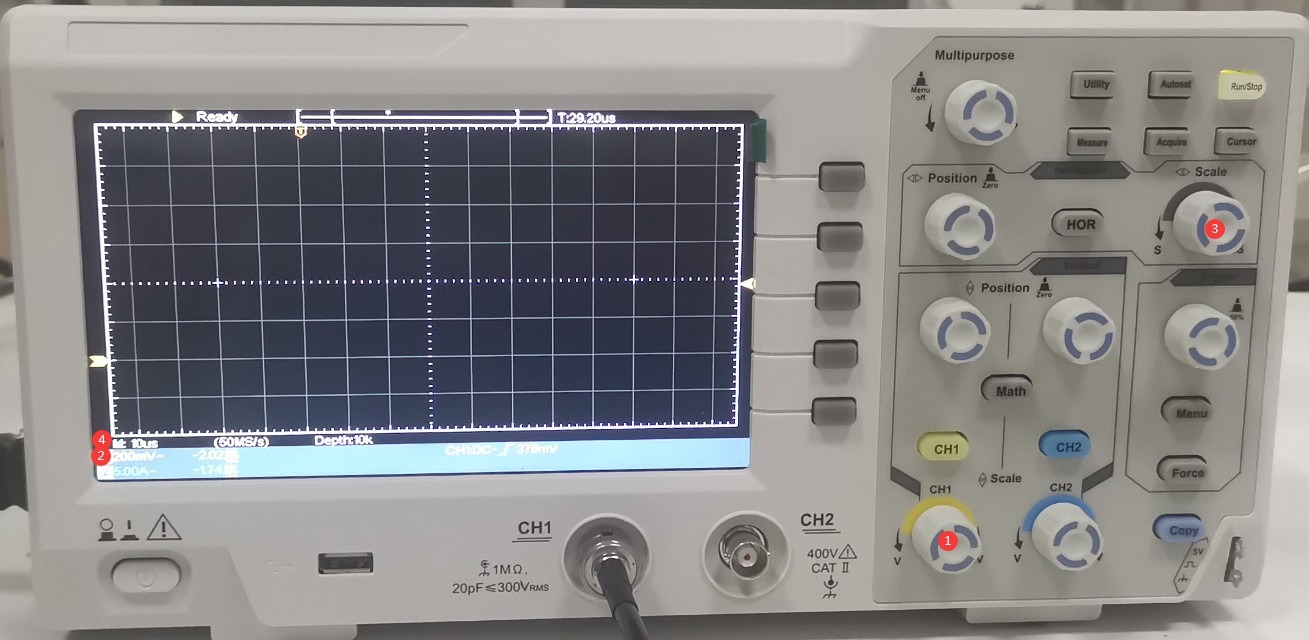
Figura 30
Turn the two knobs—① left and right, and ② up and down—to adjust the waveform display position to the appropriate location shown in the figure. Turn the ③ “Trigger” knob to adjust the level to approximately the middle position.
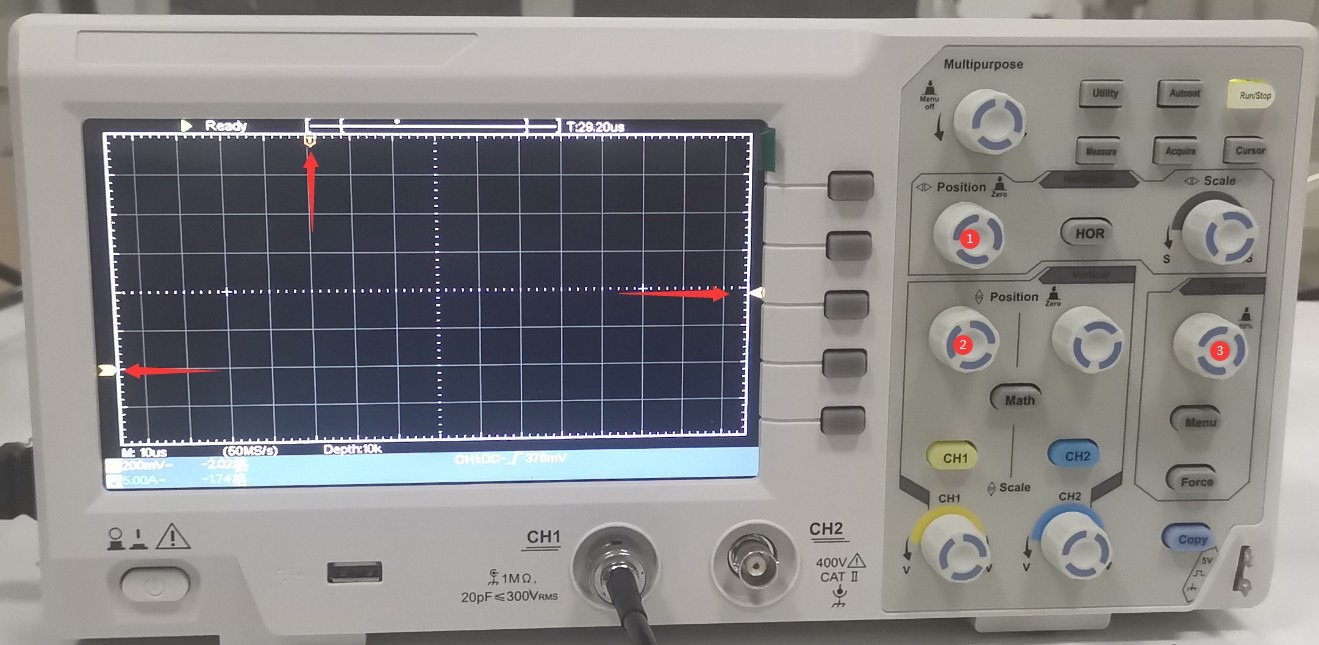
Figura 31
When applying a lightning surge to the touchscreen, do not click “EUT Power”; instead, click “Start” directly. Each time a surge is output, the oscilloscope will capture a surge voltage waveform as shown in the figure below. Use the horizontal cursor to verify the surge output voltage. Since the Surge Generator is set to 1 kV, the oscilloscope should display 1 V.
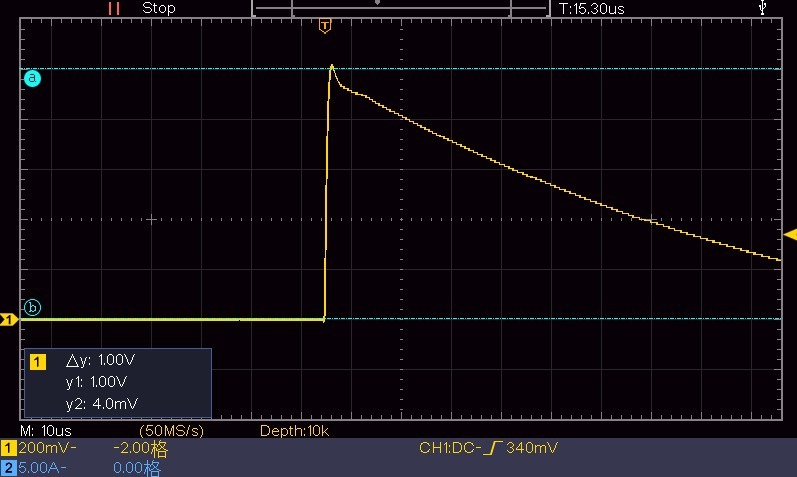
Figura 32
Use the vertical cursor to confirm the surge half-width time.
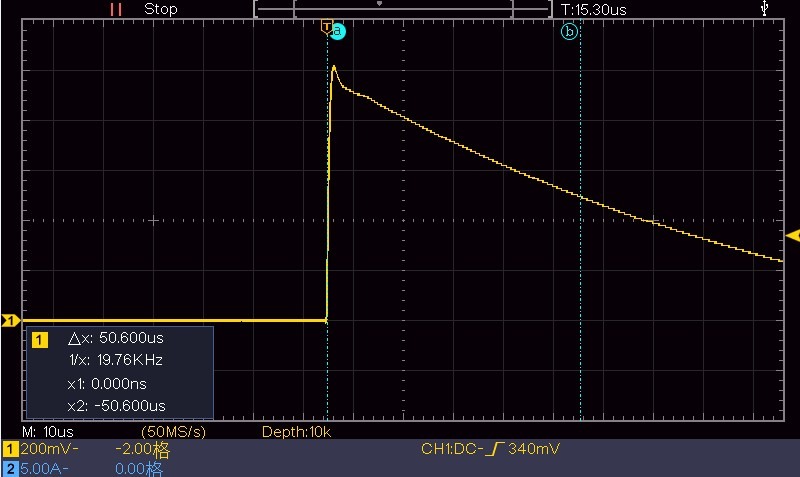
Figura 33
Set the time scale to 1 μs, leaving all other settings unchanged. Wait for the next surge output, then use the vertical cursor to determine the rise time of the surge.
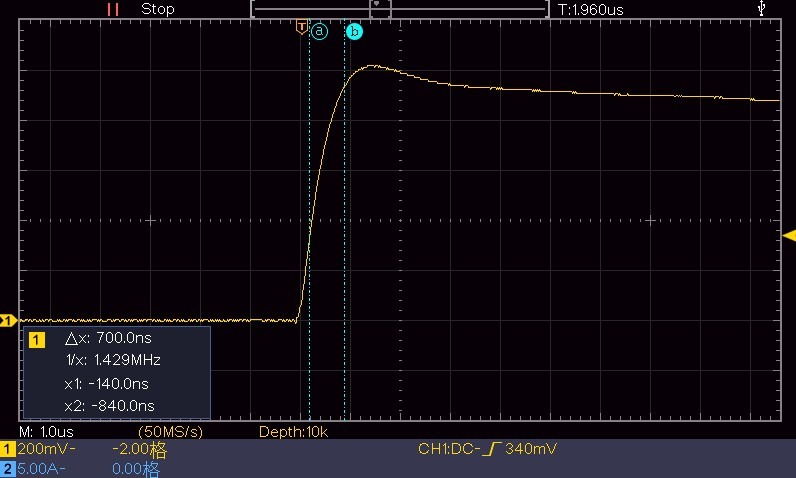
Figura 34
7.1.1.2 Vizualizarea formei de undă a curentului de supratensiune
Keep the Surge Generator settings unchanged. ① Switch the coaxial cable to the “CRO-I” interface to prepare to monitor the surge current waveform. ② Short-circuit the CDN output terminals L and N to ensure a complete short-circuit condition.
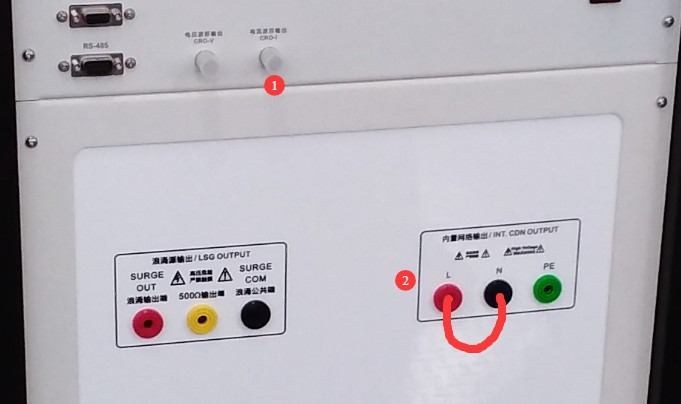
Figura 35
The impedance between L and N in differential mode is 2 Ω, so the vertical scale on the oscilloscope is set to 1/2/5 = 100 mV. The horizontal scale is set to 5 μs. The other settings are the same as when viewing voltage waveforms. The output surge is measured using the same method. The oscilloscope displays the following waveform.
Note: Here, the current is measured using a method designed to measure voltage; the actual current is 1000 V / 1000 / 2 Ω = 500 mA, which corresponds to the 500 mV shown in the figure below.
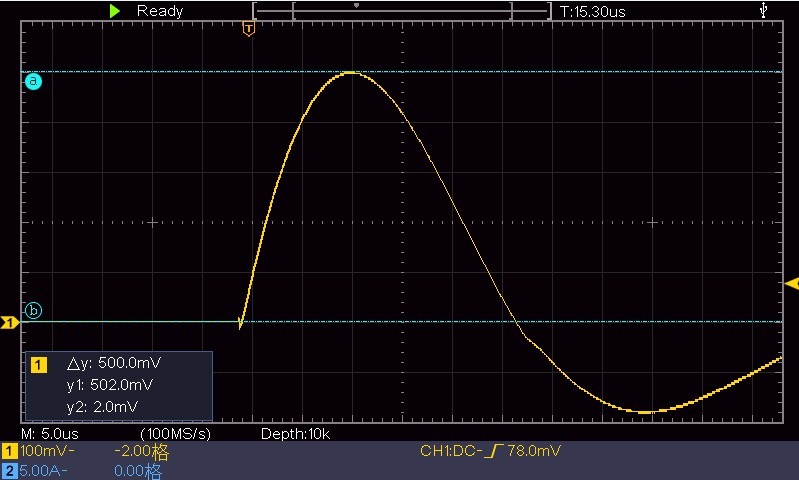
Figura 36
View half-width.
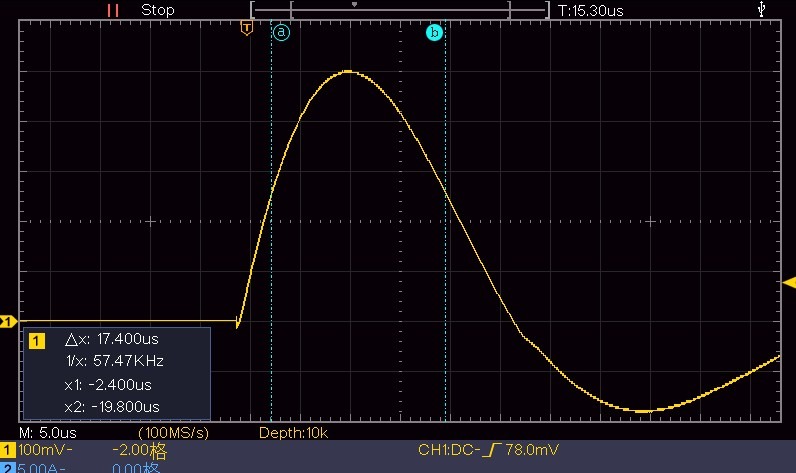
Figura 37
Check the release date.
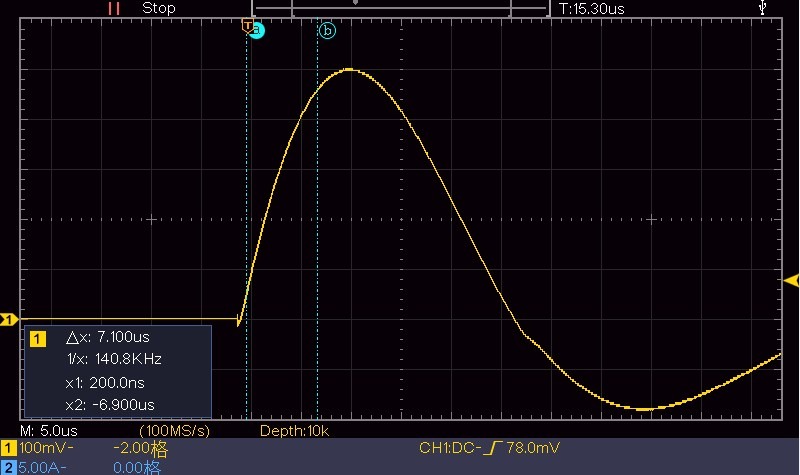
Figura 38
7.1.2 Utilizarea portului de ieșire CDN
The built-in digital oscilloscope and CRO port are both designed to help users view waveforms. However, if you need to calibrate the device, you must provide your own high-voltage probe and connect the oscilloscope directly to the CDN output port on the front panel of the surge generator. Refer to Section 7.1.1 and the ratio of the high-voltage probe you are using for instructions on how to operate the oscilloscope.
7.2 Utilizarea unui tub de descărcare
Un tub de descărcare poate fi utilizat pentru a verifica cu ușurință dacă un dispozitiv produce o supratensiune.
Connect the discharge tube as the EUT to the Surge Generator—for example, connect it to the L and N terminals of the built-in CDN output. Set the surge voltage to 4 kV. Do not click to turn on the “EUT Power”; instead, click “Start” directly to begin the surge test. The discharge tube will flash the moment the surge is applied; please dim the lights in the room to facilitate observation. See the figure below:
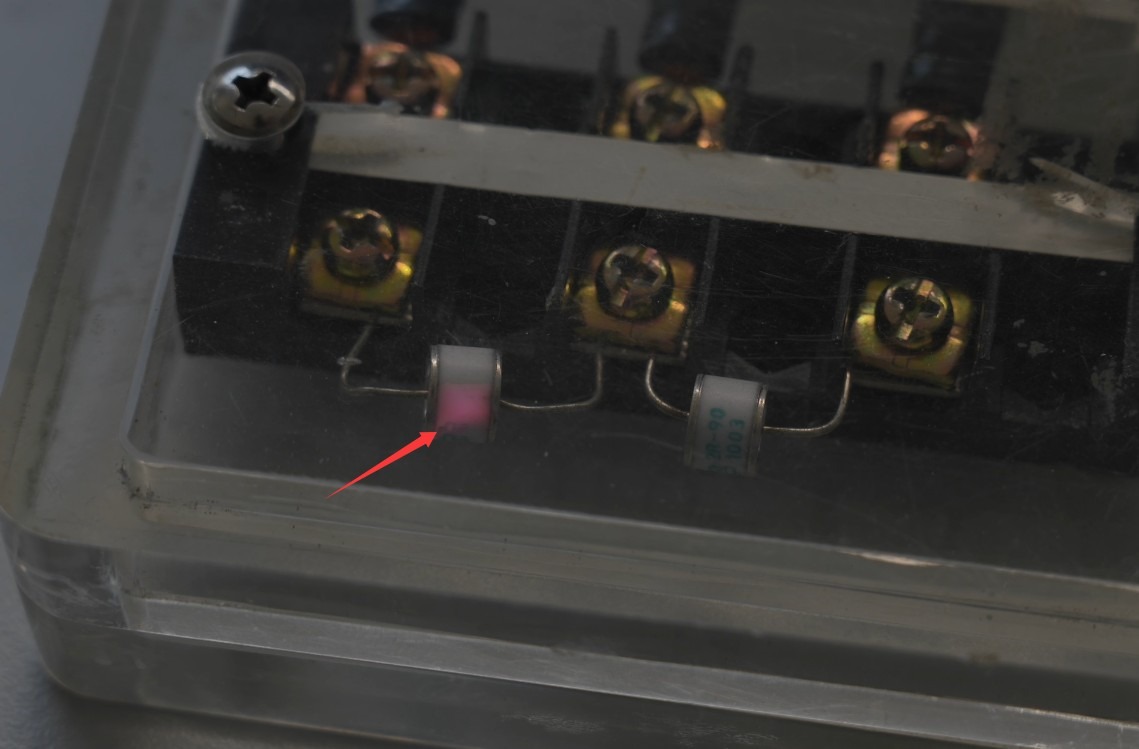
Figura 38.1
This confirms that the device is indeed producing an output surge. If the discharge tube does not flash, please contact customer service.
8. Depanarea și rezolvarea problemelor comune
8.1 Dispozitivul nu pornește
Simptom: După pornirea întrerupătorului de alimentare, dispozitivul nu răspunde (indicatorul luminos nu se aprinde și ventilatorul nu se învârte).
Cauze posibile: ① Cablul de alimentare nu este conectat corect sau este deteriorat; ② Tensiune de alimentare anormală; ③ O siguranță arsă; ④ Un varistor (MOV) ars.
Troubleshooting: Ensure the power cord is intact and securely connected. Power supply issues—such as unstable voltage, excessively high voltage, or harmonic interference—can cause fuses and varistors to blow. We recommend using a regulated, clean sine-wave AC power supply to power the device. Replace the fuse or varistor with one of the same type.
Figura de mai jos prezintă amplasarea siguranței:
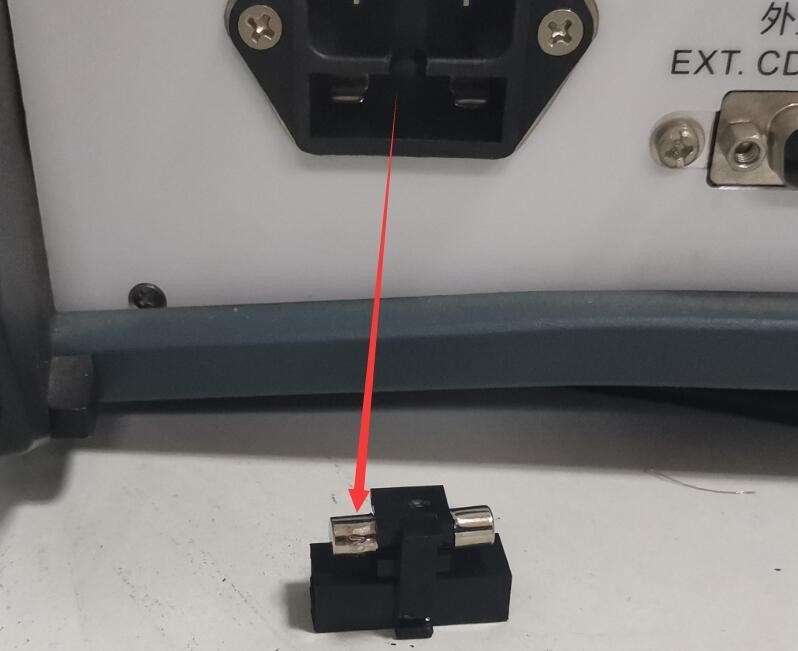
Figura 39
The figure below shows the location of the MOV (metal oxide varistor) inside the filtered power supply:
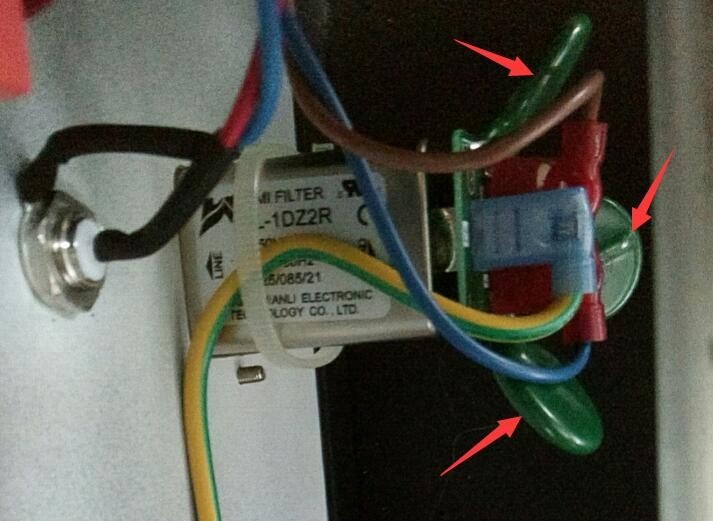
Figura 40
8.2 Circuit Breaker Tripping in the Laboratory
Symptom: The laboratory ground-fault circuit interrupter trips when a surge is output.
Cauză posibilă: Transformatorul de izolare nu este conectat.
Procedură: Conectați transformatorul de izolare așa cum este descris în Secțiunea 3.1. Testarea la supratensiune generează curenți de impuls instantanei mari; dacă un transformator de izolare nu este conectat, acesta poate provoca declanșarea întrerupătorului de circuit de defect la masă al laboratorului.
8.3 Repornirea automată a dispozitivului
Simptom: Dispozitivul repornește automat când apare o supratensiune.
Cauză posibilă: Firul de împământare nu este conectat corect.
Soluție: Consultați Secțiunea 3.1. Conectați terminalul de împământare PGND de pe spatele dispozitivului gazdă la masă și asigurați-vă că rezistența de împământare este ≤4Ω; în caz contrar, este posibil ca tensiunea înaltă să nu fie disipată în siguranță, ceea ce va duce la repornirea automată a dispozitivului.
8.4 Testul unghiului de fază al supratensiunii eșuat
Symptom: The synchronous phase angle was set, but the surge test was not performed according to the corresponding phase angle.
Possible cause: The EUT power supply is not turned on.
Procedură: EUT trebuie alimentat de la o sursă de curent alternativ și trebuie pornit în timpul testării, astfel încât generatorul de supratensiune să poată detecta forma de undă a EUT și să efectueze testul de supratensiune în funcție de unghiul de fază setat.
8.5 Forma de undă conține interferențe.
Symptom: When using the built-in digital oscilloscope or the CRO port to inspect a standard surge waveform, some noise becomes visible when the waveform is magnified. See the figure below:
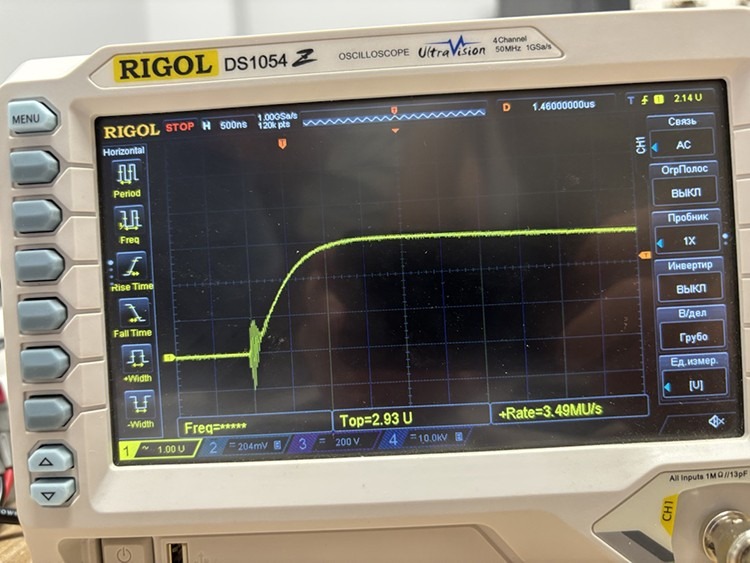
Figura 41
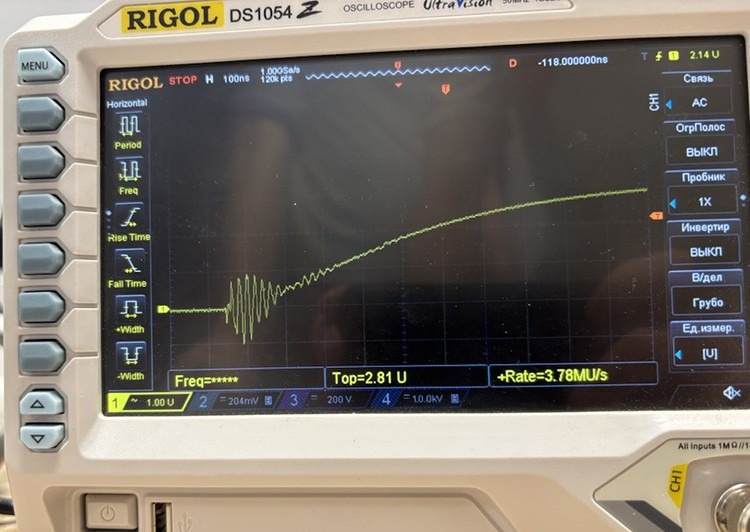
Figura 42
Possible cause: The built-in digital oscilloscope and CRO port are provided solely for user convenience, allowing quick and easy access to waveform data; however, they may generate a small amount of noise.
Procedure: If you need to obtain the actual output waveform of the surge generator or wish to calibrate the device, use an oscilloscope and a high-voltage probe to directly inspect the waveform at the CDN output terminal, as shown in the figure below:
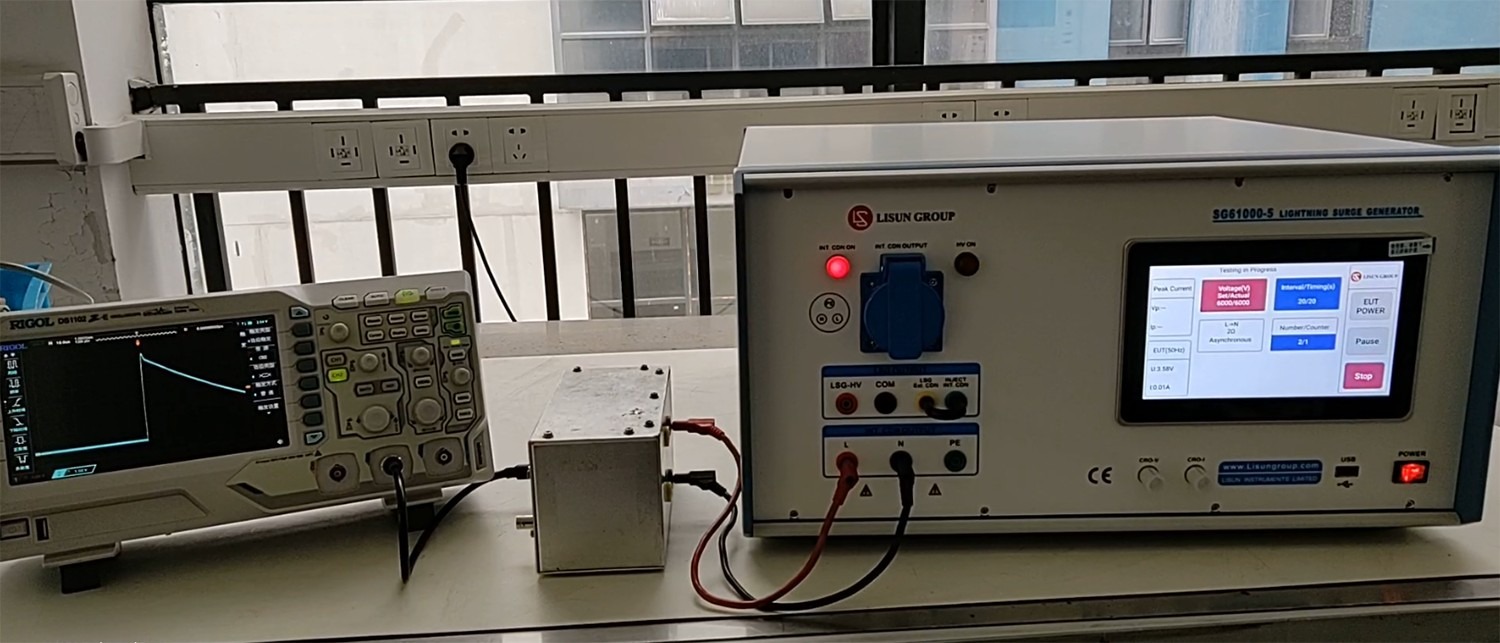
Figura 43
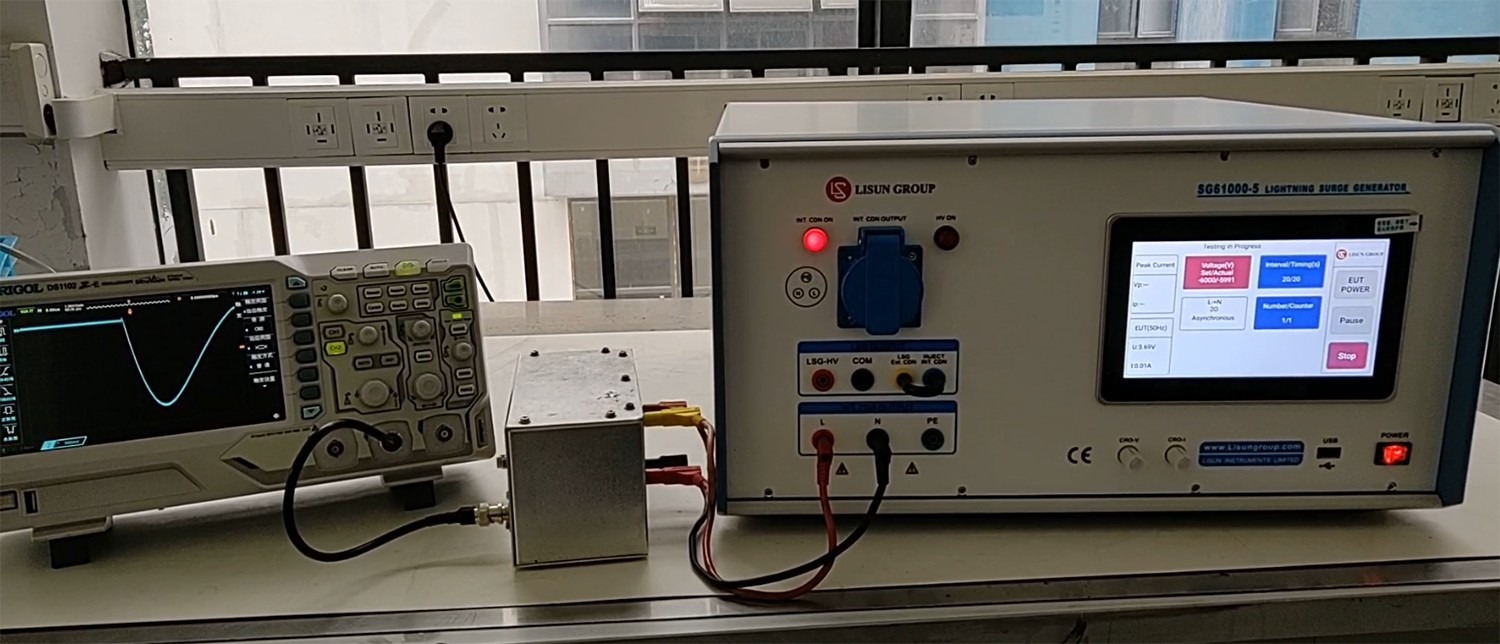
Figura 44