
 Engleză
 中文简体
中文简体 Русский
 Español
 Português
 Türkçe
 العربية
 Deutsch
 Polski
 Italiano
 Français
 한국어
한국어 ไทย
ไทย Tiếng Việt
 日本語
日本語





























Cameră de testare umedă cu dioxid de carbon, dioxid de sulf și aer
Manual de utilizare
Aplicabil LISUN modele: SQCO-300
1 Safety Instructions (Precautions)
Thank you very much for purchasing our company’s constant temperature and humidity programmable controller.
This user manual describes how to operate this product as follows.
| Precautions in This User Manual |
(A) Please provide this operating manual to the end user and keep it in a place where it can be easily accessed at any time.
(B) Vă rugăm să citiți cu atenție acest manual de utilizare înainte de a utiliza acest produs.
(C) Acest manual de utilizare oferă o descriere detaliată a diverselor funcții ale produsului; nu se oferă nicio garanție pentru aspectele care nu sunt acoperite de acest manual de utilizare.
(D) No part of this operating manual may be edited, copied, or used without permission.
(E) Conținutul acestui manual de utilizare poate fi modificat fără notificare sau anunț prealabil.
(F) Although every effort has been made to ensure the completeness of this user manual, there may still be some imperfections, typographical errors, or omissions. If you find any such issues, please contact the place of purchase or our company. Thank you very much.
| Safety and Modification (Change) Precautions for This Product |
(A) To ensure the maintenance and safety of this product and the systems connected to it, please be sure to carefully read the safety precautions (instructions) in this user manual before using this product.
(B) The Company assumes no liability for any losses resulting from failure to use or store the product in accordance with the instructions in this manual, or from negligence.
(C) To ensure the maintenance and safety of this product and the systems connected to it, if it is necessary to install additional protective devices or safety circuits, be sure to install them on the exterior of this product. Modifications (changes) or additions to the interior of this product are strictly prohibited.
(D) Please do not disassemble, repair, or modify this product without authorization, as doing so may result in electric shock, fire, or malfunction.
(E) Be sure to contact our Sales Department when replacing parts or consumables for this product.
(F) Please do not allow moisture to enter this product, as it may cause a malfunction.
(G) Please do not drop or strike this product, as this may cause damage or malfunction.
| Disclaimer for This Product |
(A) Except as set forth in the Company’s warranty terms, the Company makes no warranties and assumes no liability.
(B) Compania nu va fi răspunzătoare pentru daune directe sau indirecte suferite de utilizator sau de o terță parte, care decurg din defecte imprevizibile de către Companie sau din dezastre naturale în timpul utilizării acestui produs.
2 Operation and Settings
2.1 Basic Operational Flowchart
▶ After initially installing the product, plug it in, and the startup progress screen will appear.
☞ Ecranul de pornire se încarcă în aproximativ 15 secunde.

Ecran de pornire
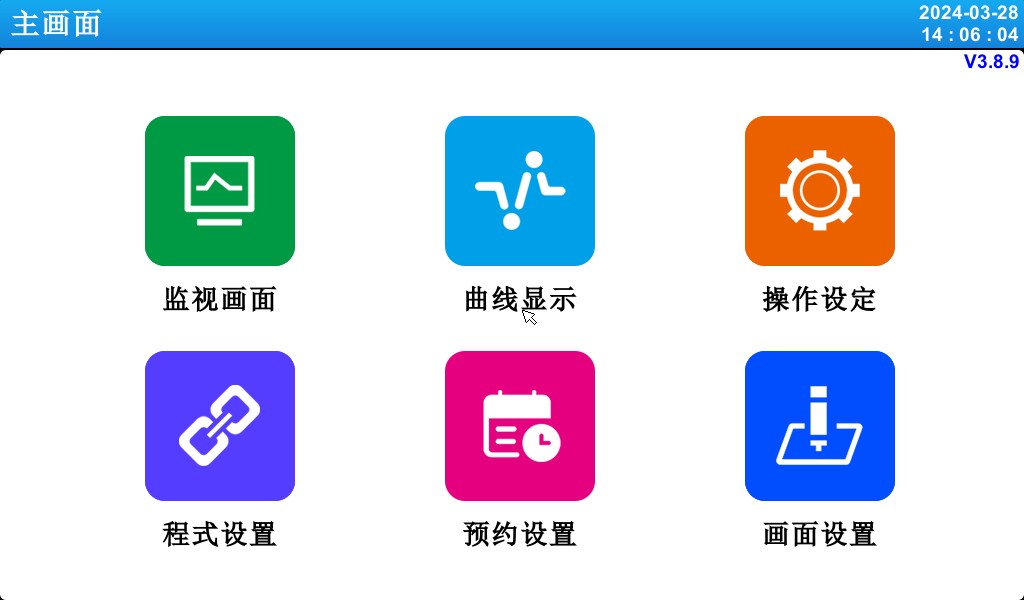
Ecranul principal
2.2 How To Set Parameters (PARAMETER)
Field for Numeric Input Only
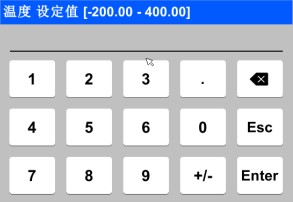
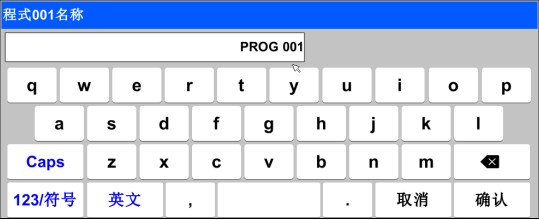
Input fields for setting the experiment name and the DI fault name
| Touchscreen Lock (KEY LOCK) Unlock ▶ You cannot enter settings while the “Lock” status is set to “ON (Locked),” so be sure to change the “Lock” status to “OFF (Unlocked)” before entering any values. ☞ For detailed setup instructions, refer to [4. Operation Settings]. |
2.2.1 Valabilitatea cheilor de setare și a valorilor de setare
▶ This product emits the following beeps to confirm that the set value input key has been pressed and to verify that the entered set value is valid.
☞ “Bi”: When you press the Basic Settings button and the entered value is correct
☞ “BBB”: When the value entered in the input field is outside the valid range
| Operating Precautions ▶ When pressing the Basic Settings button or the setting value input field, do not use sharp objects (such as pencils) or tap too hard. Doing so may cause the device to malfunction or damage the touchscreen. |
2.2.2 Methods for Entering Setpoints
▶ Features and Description of the Set Value Input Field


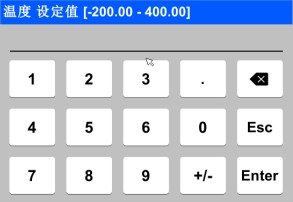
① Display “Parameter (PARAMETER).”
② Displays “Setting Range.”
③ este „Fereastra de afișare a valorii de referință”, care afișează o alertă de eroare („Eroare de intrare”) atunci când valoarea depășește intervalul setat.
④ Use this key to stop typing and return to the previous screen.
⑤ After saving the input value, return to the previous screen.
⑥ Use this when entering a decimal point.
⑦ Folosiți această funcție când introduceți semnul (+/-).
⑧ Use this when editing an input value; you can delete characters one by one.
3. Operating Mode Settings

3.1 Ecranul principal


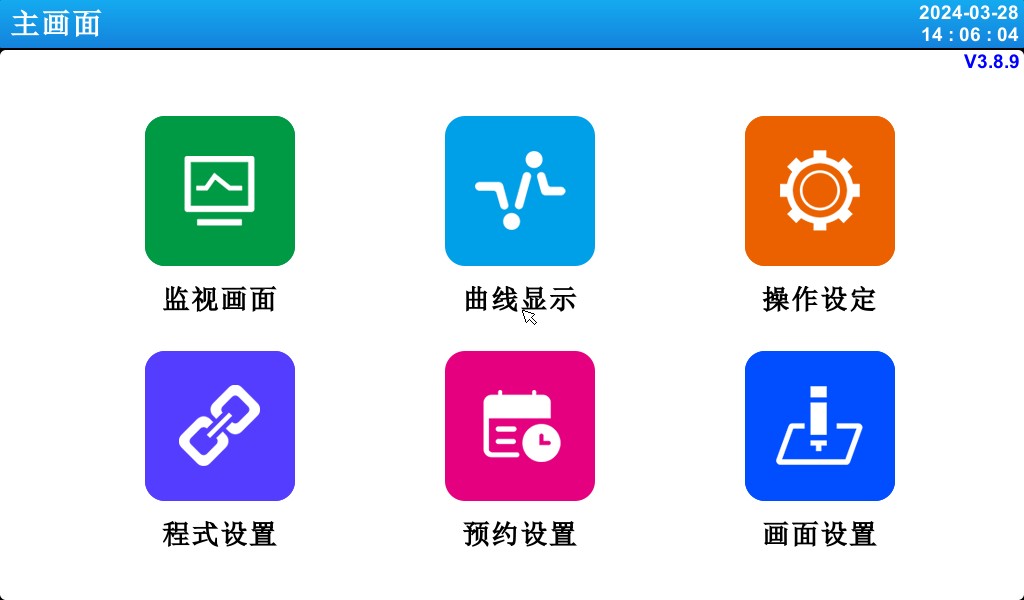

[Figure 3-1] Main Screen
| Număr | Instrucțiuni | Descrierea conținutului |
| ① | Filmări de supraveghere | Switch to the Run screen. |
| ② | Afișare curbă | Switch to curve display and curve storage, USB storage devices, and curve export. |
| ③ | Setări de funcționare | Switch to the settings screen for functions and operating modes. |
| ④ | Setările programului | Switch to the main settings screen. |
| ⑤ | Setări de programare | Comutați la ecranul pentru setarea orei curente și a orei programate. |
| ⑥ | Setări de afișare | Use the prompt tone to display the settings screen. |
3.2 FIX Mode Operation
3.2.1 Operație cu valoare fixă (FIX): Oprire ecran 1
▶ Select the monitoring screen in [3.1 Main Screen] to switch to the “Fixed-Value (FIX) Operation, Screen 1.”
▶ In [4. Operation Settings], select “Fixed Value (FIX)” as the operating mode.
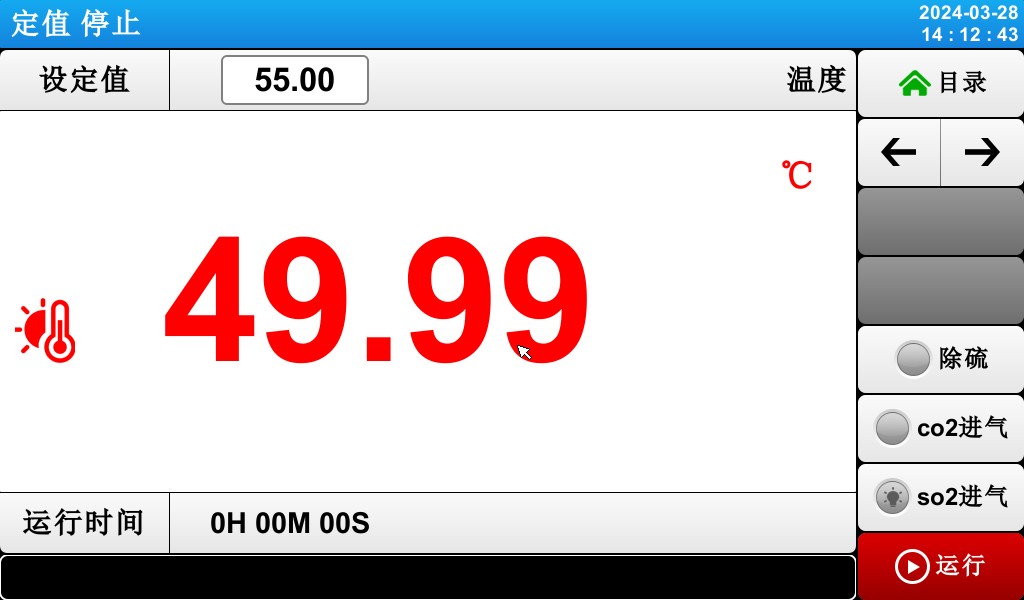
[Figure 3-2] Fixed-Value (FIX) Operation: Stop Screen 1
▶The methods for entering temperature setpoints and operating the system are as follows.
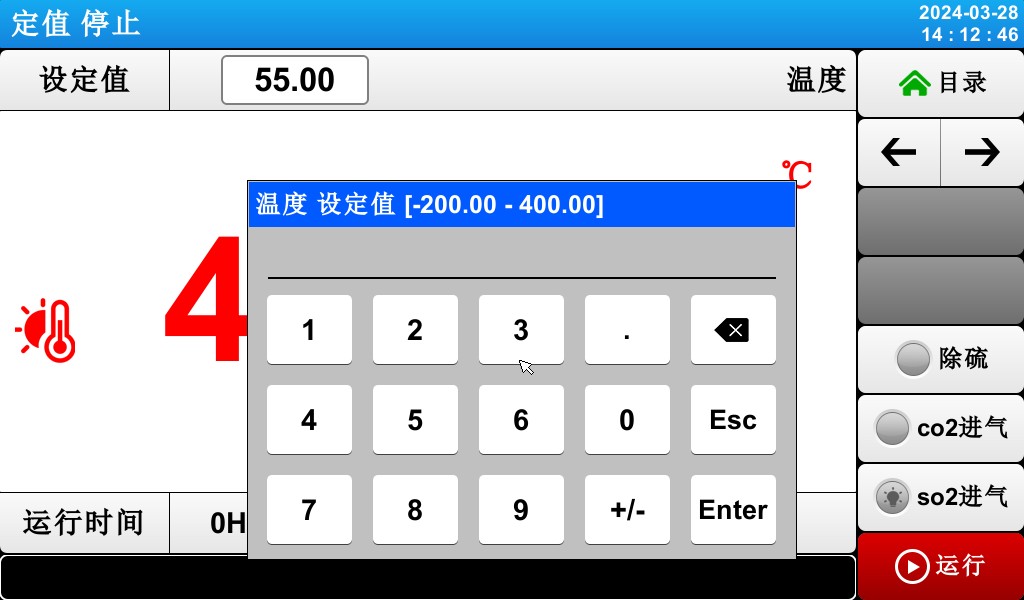
[Figure 3-3] Temperature Setpoint Input Field
▶ When entering a temperature setpoint, tap the red button in the upper-left corner to activate the temperature setpoint input field shown in [Figure 3-3: Temperature Setpoint Input Field].
3.2.2 Fixed-Value (FIX) Operation: Screen 1


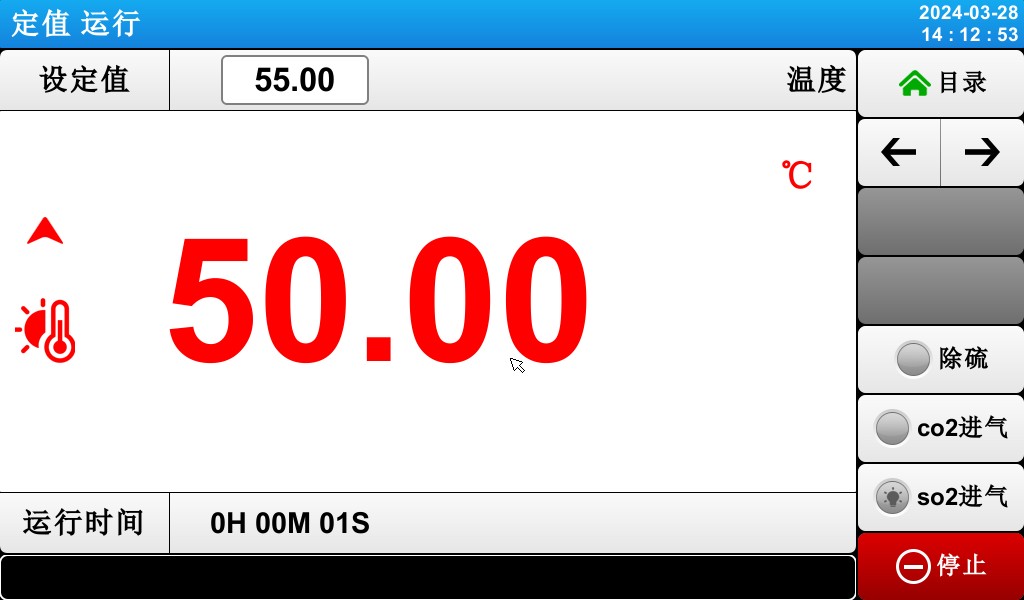
[Figure 3-5] Fixed-Value (FIX) Operation: Screen 1
① Indică valoarea de referință a temperaturii curente.
② indicates the current temperature.
③ Current runtime.
④ Afișează data și ora curente; atingeți pentru a opri ecranul LCD.
⑤ Switch from the current screen to the next screen.
⑥ Push-button switches for desulfurization, CO₂ inlet, and SO₂ inlet.
⑦ Tastele funcționale Start și Stop.
3.2.3 Fixed-Value (FIX) Operation: Screen 2
▶Ecran care prezintă valorile de comandă, valorile de referință, valorile ieșirii de control și starea de funcționare a indicatorilor de stare.


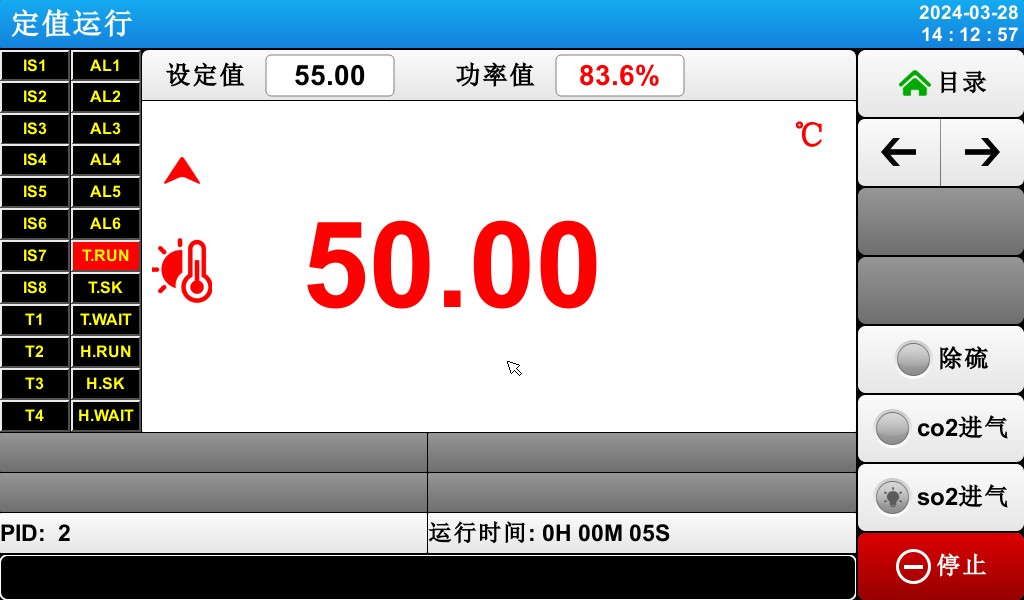

[Figure 3-6] Fixed-Value (FIX) Operation: Screen 2
The ON state is shown in red, and the OFF state is shown in dark gray.
Indicates the current temperature control output value.
Indică numărul zonei PID active în prezent.
④ Indicates the duration of fixed-value operation.
3.2.4 Fixed-Value (FIX) Operation: Screen 3
▶ The left side of the screen displays the setpoint values for temperature and humidity, as well as the control output values.
▶ Use the checkbox to specify whether to display the data.


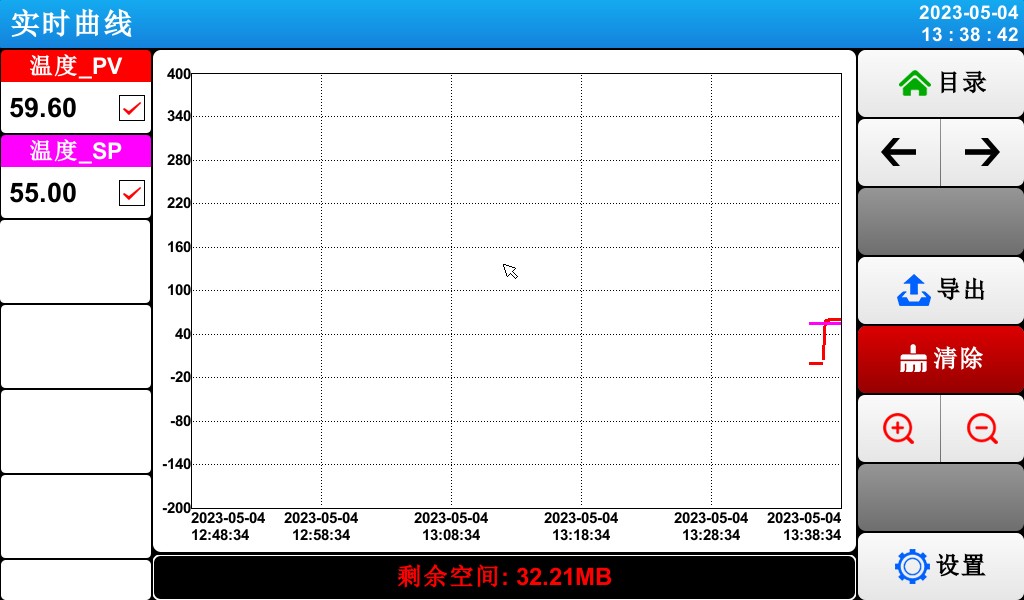
[Figure 3-7] Fixed-Value (FIX) Operation: Screen 3
① Valoarea de comandă, punctul de referință și valoarea de ieșire de control care reprezintă temperatura curentă.
= 2 * GB3② Export the curve.
= 3 * GB3③ Delete the current test curve.
☞ With a sampling interval of 30 seconds, data can be stored for approximately 56 days.
3.2.5 Fixed-Value (FIX) Operation Stop Screen
▶ Once the time set in [4. Operation Settings] has elapsed, the operation ends. As shown in the figure below, a “Test Complete” message will appear, and the fixed-value operation will terminate.
▶ If you click the “Stop” button to forcefully terminate the program while it is running, no message will appear on the screen.
▶ If a message indicating that the operation has ended appears when the operation ends, tap that area of the screen, and the message will disappear.
☞ The same applies when the program terminates.
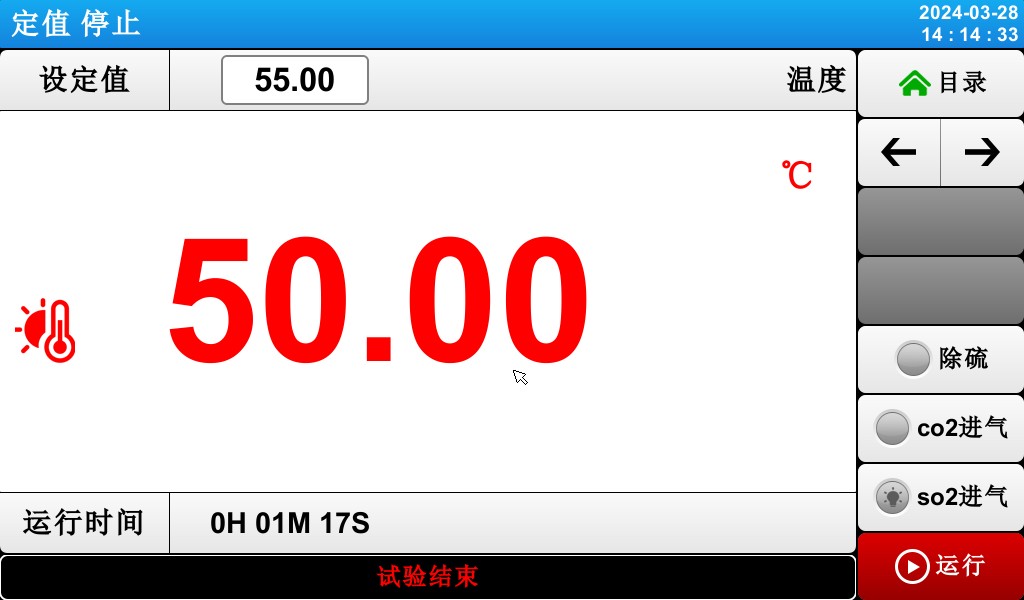
[Figure 3-8] Fixed-Value (FIX) Operation Stop Screen
3.3 Program Execution
3.3.1 Program Execution: Stop Screen 1
▶ When you select “Monitor Screen” on [3.1 Main Screen], the display switches to “Program (PROGRAM) Run: Run 1 Screen.”
▶ In [4. Operation Settings], select “Program” as the operating mode.
▶For instructions on how to configure the program, please refer to [5.1 Program Configuration].
▶ În [Figura 3-9: Ecranul 1 de oprire a programului (PROGRAM)], dacă faceți clic pe butonul (Run) din partea dreaptă jos, veți comuta la [Figura 3-10: Ecranul 1 de rulare a programului (PROGRAM)].
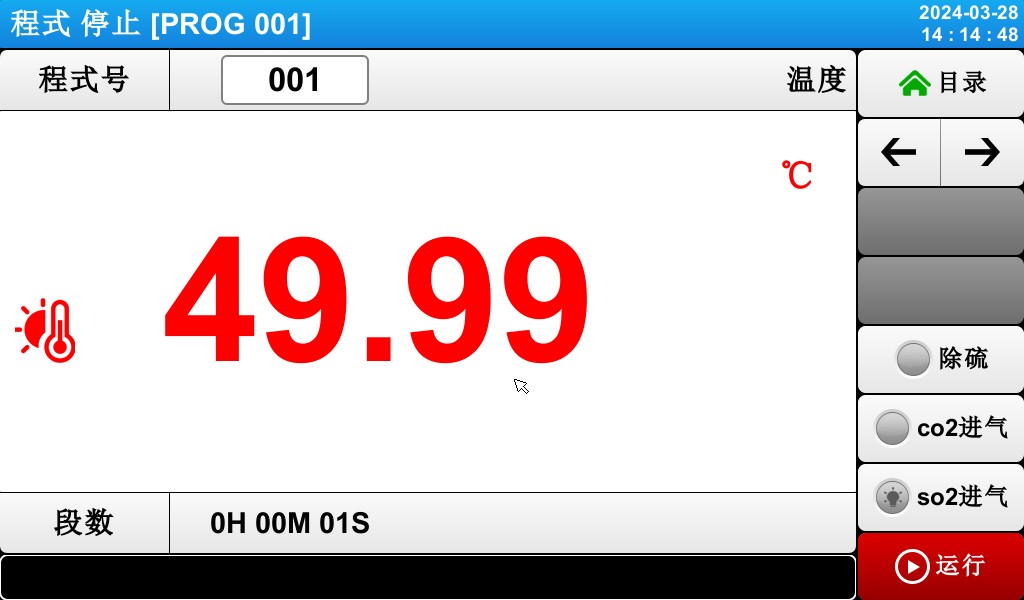
[Figure 3-9] Program (PROGRAM) Stop Screen 1
Notes on Running the Program:
▶If the number of segments is shown as 0, the program will not run.
3.3.2 Executarea programului: Primul ecran de execuție
[Figure 3-10] Program (PROGRAM) First Run Screen


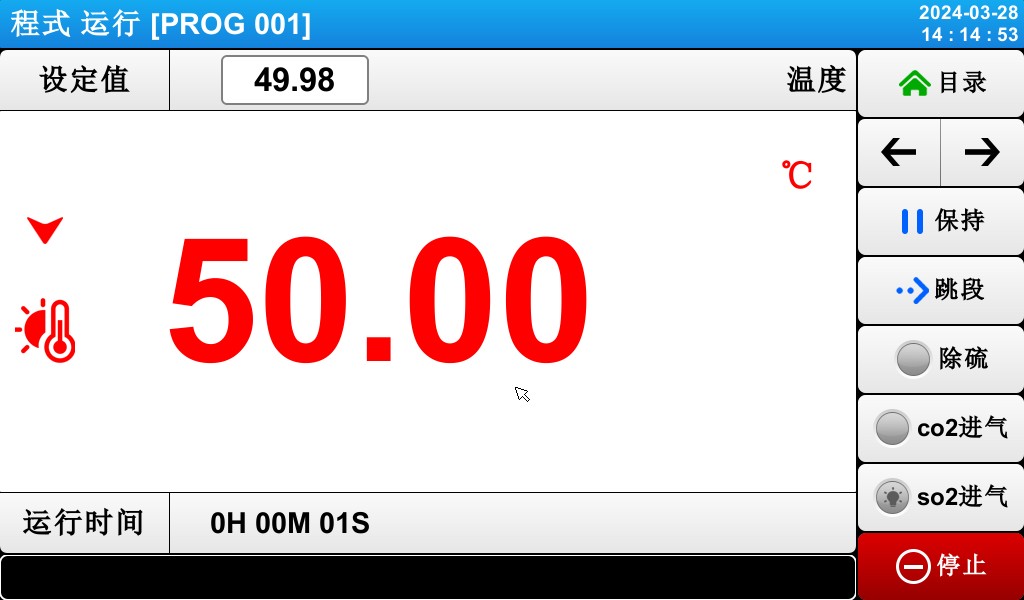
① Indicates the temperature setpoint for the currently running segment.
② indicates the current temperature.
③ Return to the menu screen.
④ Afișează data și ora curente; atingeți pentru a opri ecranul LCD.
⑤ Reveniți la pagina principală.
⑥ Switch to the next operation screen.
⑦ Întrerupeți modul de funcționare curent.
⑧ Skip to the next segment and execute it.
⑨ Comutatoare cu buton pentru desulfurare, admisie CO₂ și admisie SO₂.
⑩ Key to stop fixed-value operation.
☞ The (Run) button is displayed on the setpoint stop screen.
※ Pe ecranul de pauză a programului, tastele ⑤ până la ⑧ sunt dezactivate.
3.3.3 Program Execution: Run Screen 2
▶ Screen displaying command values, setpoints, control output values, and the operating status of status lights


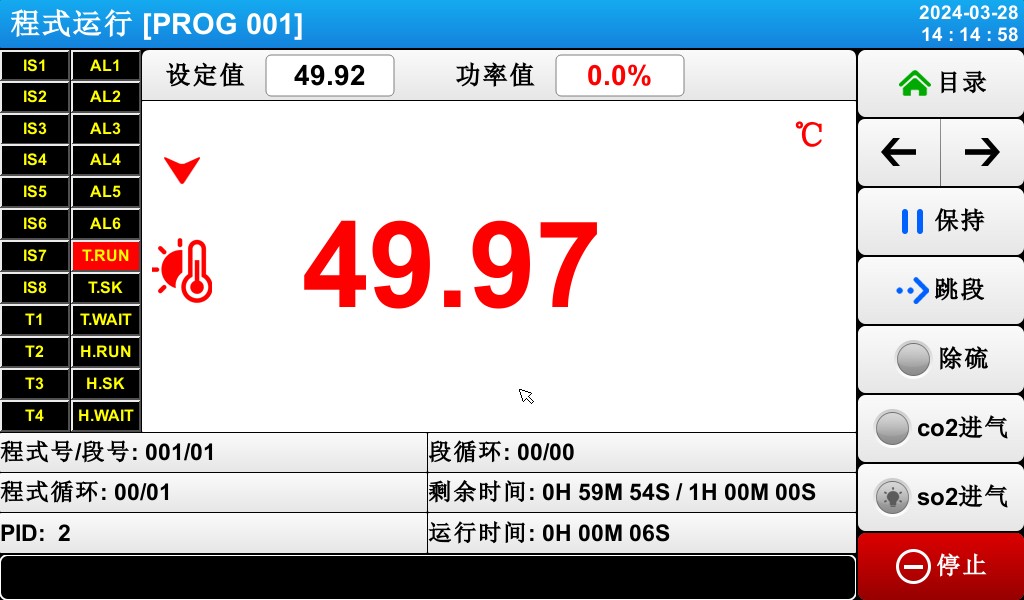
[Figure 3-11] Program (PROGRAM) Screen 2
① The ON state is shown in red, and the OFF state is shown in dark gray.
② Indicates the program number and segment number of the currently running program.
③ Indică o buclă de program.
☞ [Group Cycle: 000/000] The first number indicates the number of cycles completed, and the second number indicates the set
Numărul de iterații.
④ Indică numărul zonei PID active în prezent.
⑤ Indicates a partial loop state.
☞ [SEG Cycle Count: 00/00] The first number indicates the number of cycles already executed, and the second number indicates the set number of cycles.
⑥ Displays the elapsed time and the set time for the currently playing segment.
☞ [SEG Time: 000H00M/000H00M] The first time value indicates the duration of the segment, and the second time value indicates the time set in [5.1 Program Group Mode Settings].
⑦ Indică timpul scurs de execuție a programului.
3.3.4 Execuția programului: Ecranul 3


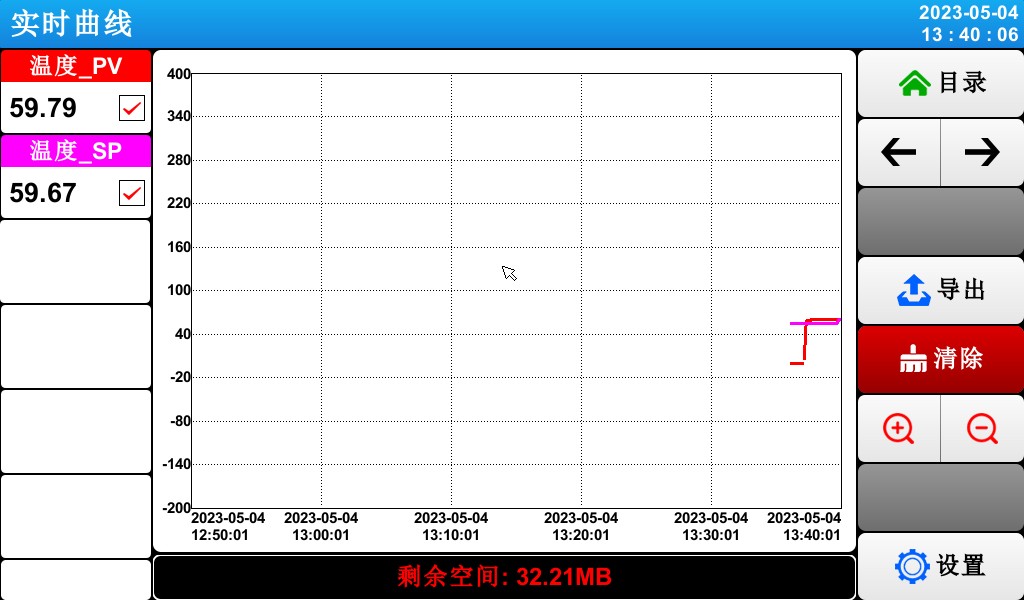
[Figure 3-7] Fixed-Value (FIX) Operation: Screen 3
① Valoarea de comandă, punctul de referință și valoarea de ieșire de control care reprezintă temperatura curentă.
= 2 * GB3② Export the curve.
= 3 * GB3③ Delete the current test curve.
☞ With a sampling interval of 30 seconds, data can be stored for approximately 56 days.
3.3.5 Program (PROGRAM) Run/Stop Screen
▶ Once the program has run through all the set intervals for the segments stored in the mode, a “Test Complete” message will appear as shown in the figure, and the program will then terminate.
▶ If you click the “Stop” button to force the program to close while it is running, no message will appear on the screen.
▶ If a message indicating that the operation has ended appears when the operation ends, tap that part of the screen, and the message will disappear.
☞ The same applies when fixed-value operation ends.
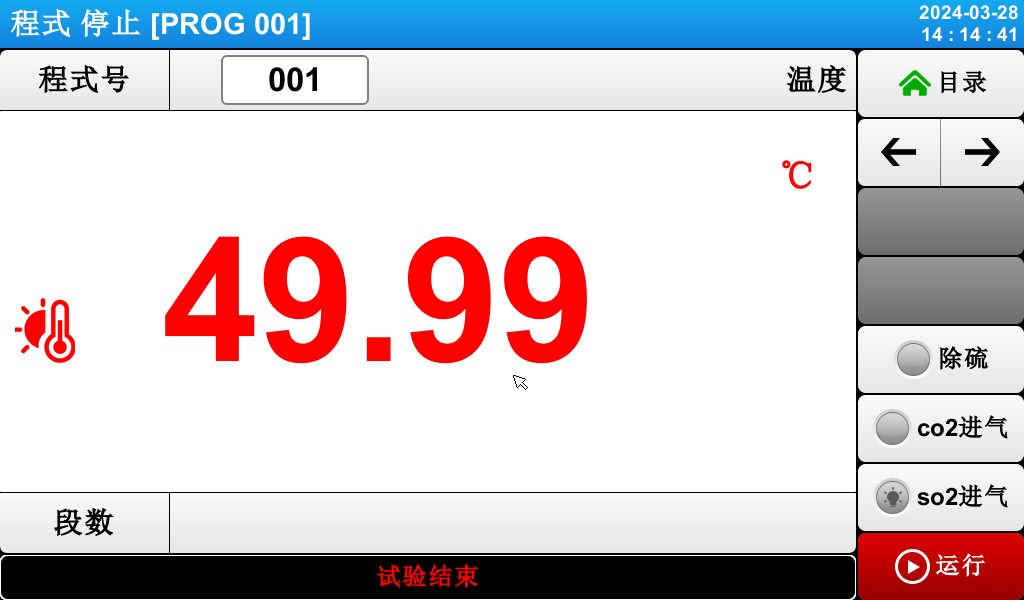
Figure 3-13: Program Stop Screen
4. Configure Related Operations
4.1 First Screen of Operation Settings


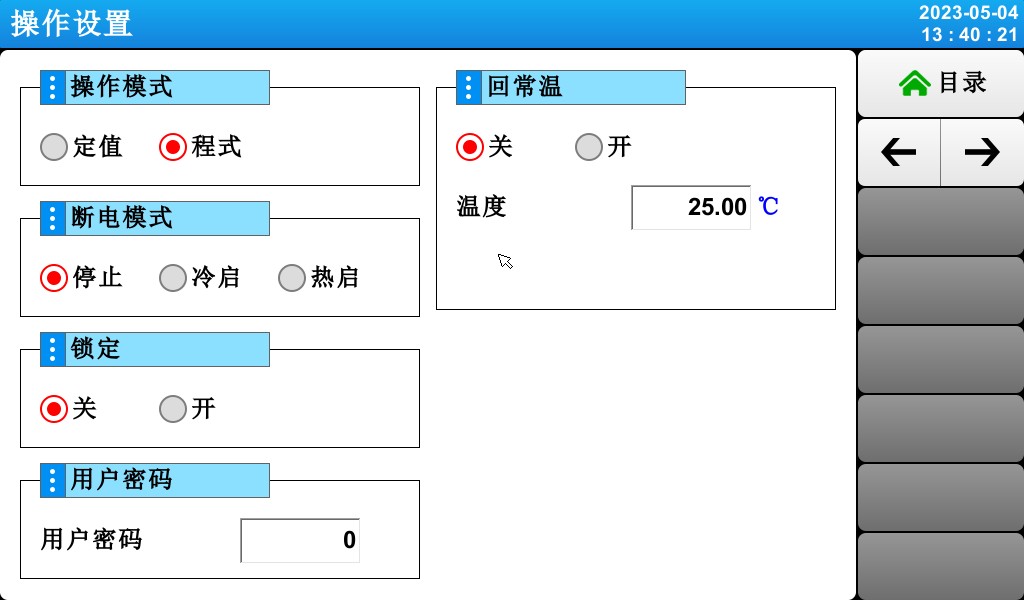
[Figure 4-1] Screen for Configuring Operation-Related Settings
① Select a setting from either “Program” (pgm) or “Fixed” (FIX) operation.
② Configure the power-on procedure in the event of a power outage.
☞ Oprire: O operațiune care readuce sistemul la starea „Oprire” atunci când alimentarea este restabilită după o pană de curent în timpul funcționării.
☞ Cold Start: The process of restarting operations after a power outage.
☞ Hot Start: An operation that restores the system to its pre-power-loss state when power is restored after an interruption.
③ When the lock is set to “On,” none of the parameter (PARAMETER) settings can be used.
④ Go to the Lock Settings [Screen 4-3].
4.2 Second Screen for Operation Settings


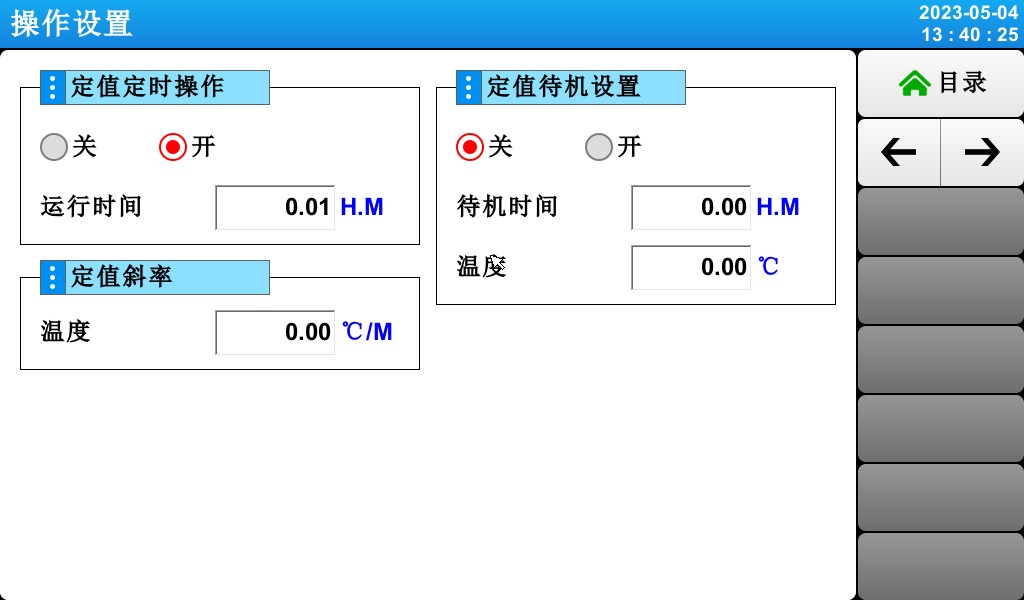
[Figure 4-2] Screen for Configuring Operation-Related Settings
① Set the fixed-value timer switch and the timer runtime.
② Set the slope for the constant temperature and humidity.
③ Fixed-value standby setting.
5. Program Group Settings
▶ Atingeți butonul de setări al grupului de programe din [3.1 Ecran principal] pentru a comuta la [Figura 5-1 Ecranul de setări al grupului de programe].
▶ Screen for setting parameters (PARAMETER) related to program group execution


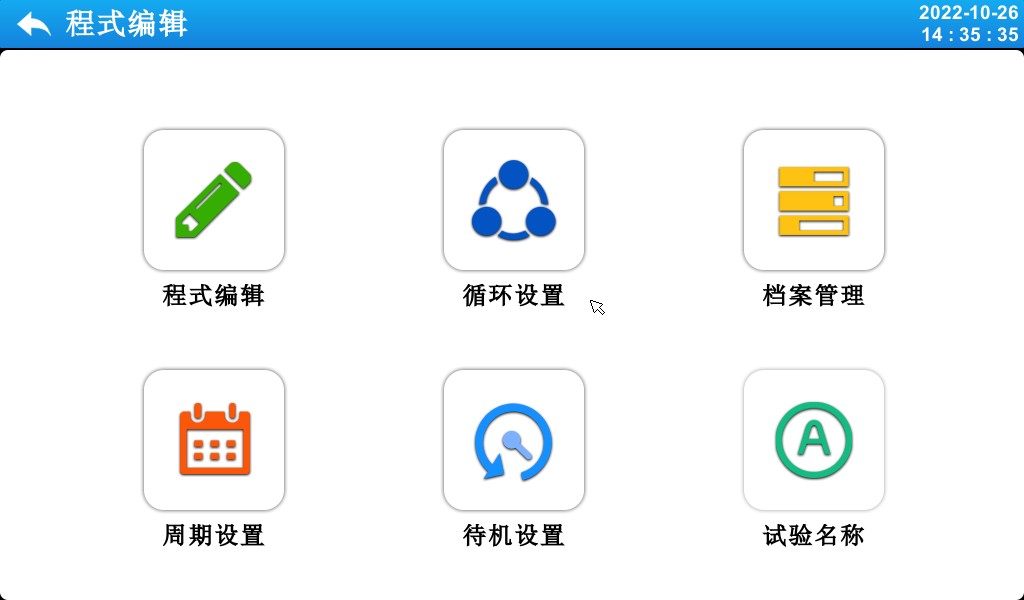
[Figure 5-1] Program Settings Screen

| Număr | Instrucțiuni | Descrierea conținutului |
| ① | Editarea programului | Switch to the program editing screen |
| ② | Setări buclă | Switch to the loop setting mode and the partial loop screen |
| ③ | Gestionarea inregistrarilor | Switch to the settings screen for copying and deleting |
| ④ | Setări de ciclu | Switch to the cycle settings screen |
| ⑤ | Se așteaptă configurarea | Switch to the screen for setting the wait action |
| ⑥ | Numele testului | Switch to the screen for setting the test name |
5.1 Setări de editare a programului
▶ Screen for setting segments by program number.
▶ Pentru setările semnalului orar, consultați [5.4 Funcționarea semnalului orar].
▶ For information on wait actions, see [5.5 Wait Actions].


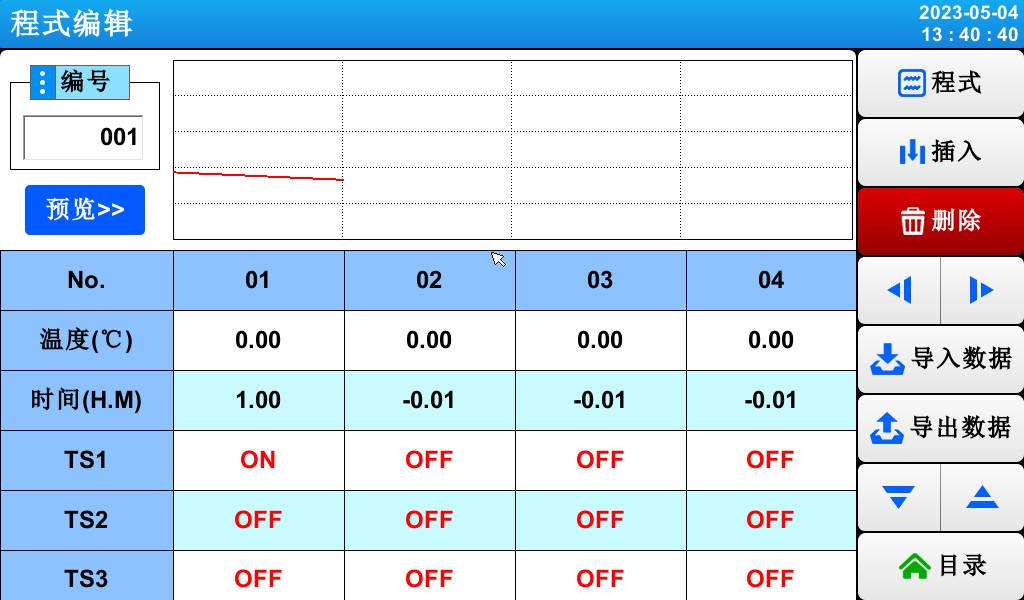
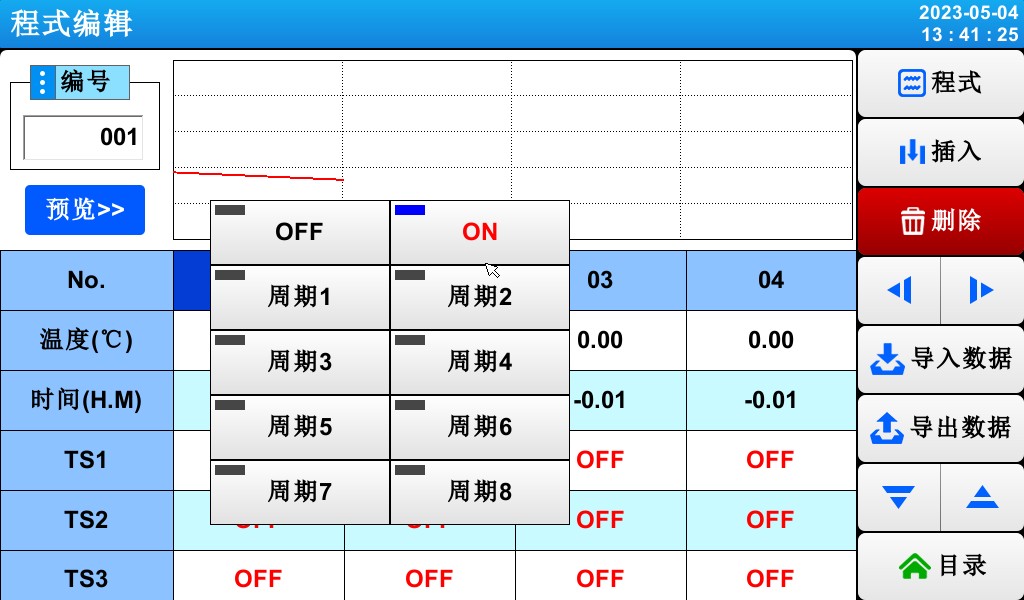
[Figure 5-2] Mode Edit Screen
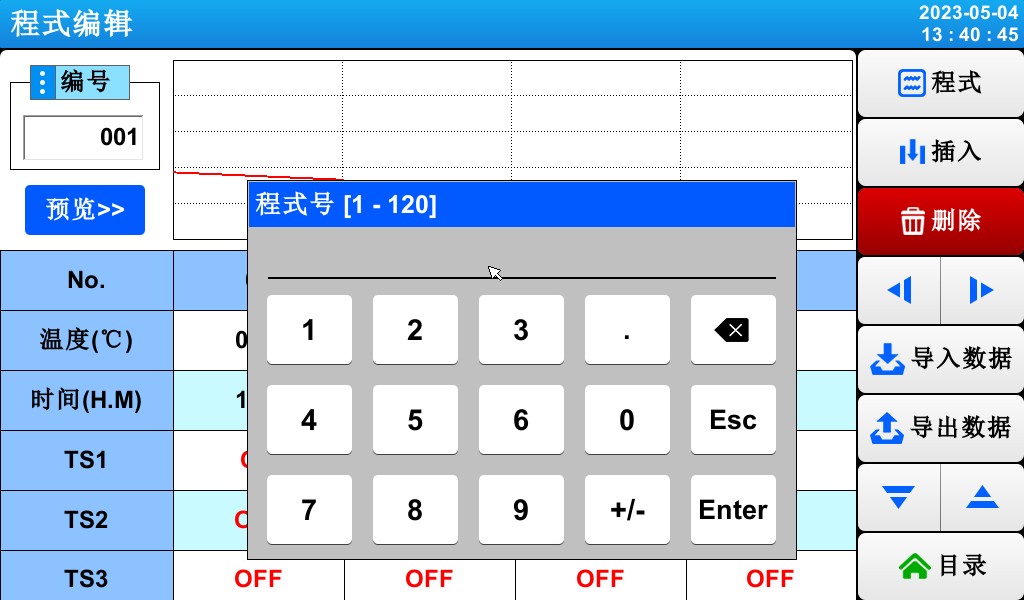
= 1 * GB3① Enter the program group number.
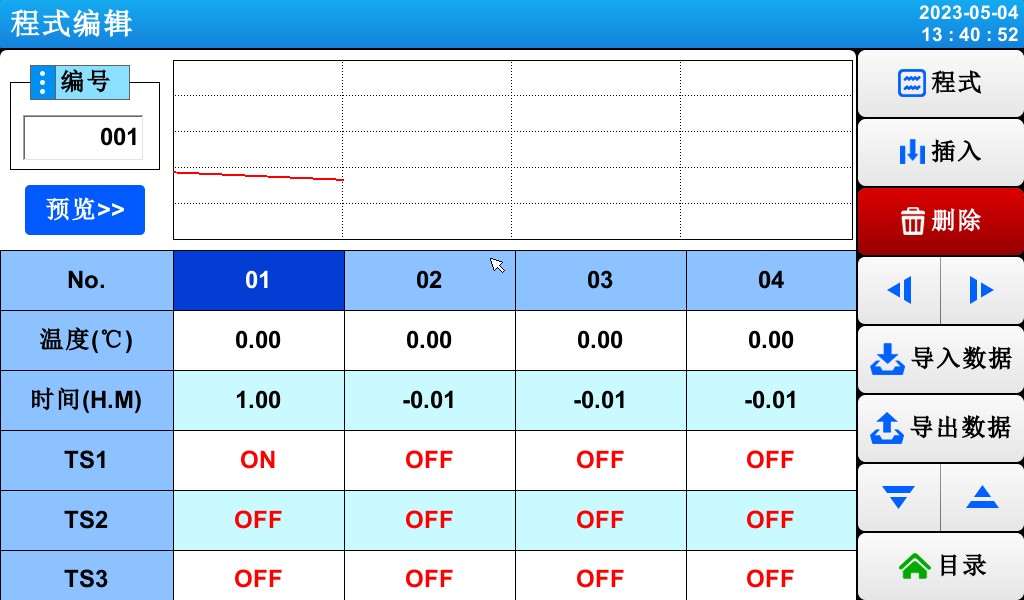
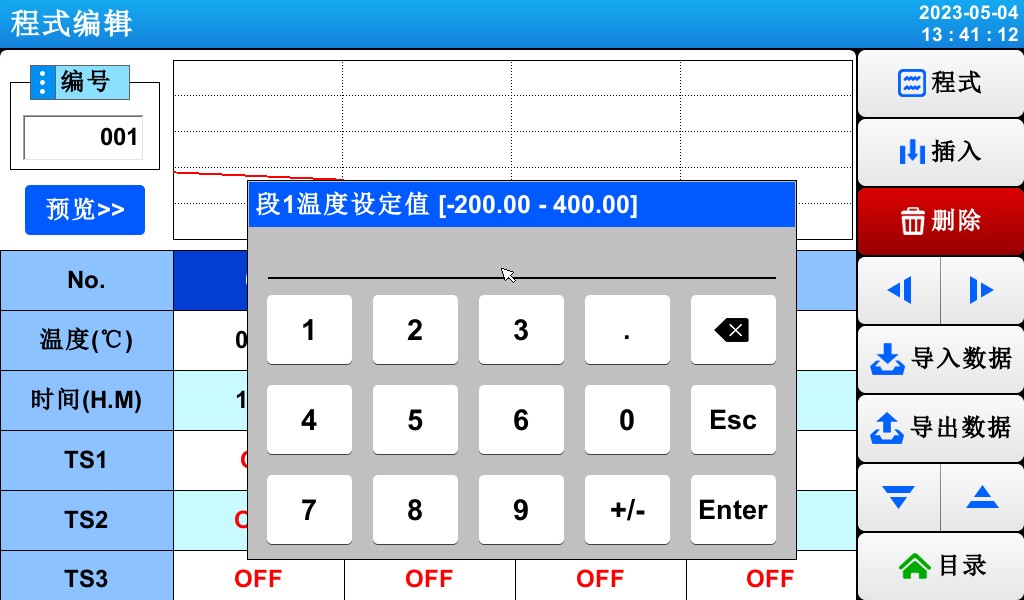
② Set the temperature for the program segment to be run.
= 3 * GB3③ Set the humidity for the program segment to be run.
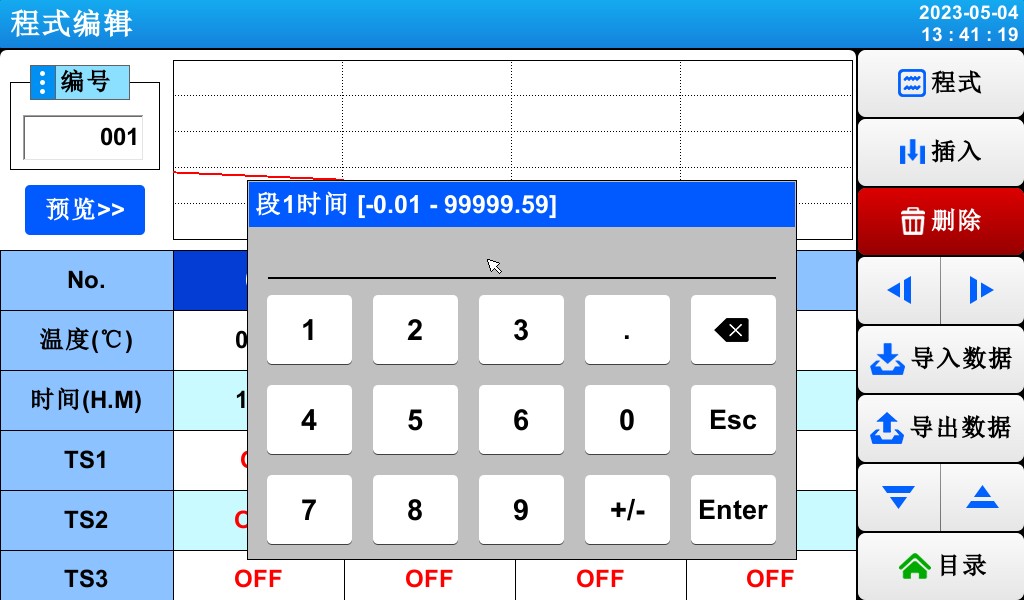
④ Set the duration for the program segment to be executed.
⑤ You can choose whether to use the wait action for the corresponding program segment.
☞ See [5.5 Waiting Actions]
⑥ Setați semnalul de temporizare pentru ca segmentul de program să fie executat
☞ Six time signals can be set for each program segment, and each time signal can be selected from among 12 types.
☞ See [5.4 Time Signal Operations]
= 7 * GB3⑦ When inserting a program segment, select a key from (Program Segments 01–99), then click to activate both the selected key in (Program Segments 01–99) and the (Insert) key. Clicking the (Insert) key inserts the program segment.
= 8 * GB3⑧ Pentru a șterge un segment de program, selectați o tastă din (Segmente de program 01–99), apoi faceți clic pe ea pentru a activa tasta selectată și tasta (Ștergere). Faceți clic pe tasta (Ștergere) pentru a șterge segmentul de program.
⑨ You can move the video to the left or backward in increments of 4 segments.
⑩ Switch to the second screen in the program editor.
▶ Press the (Program Number) key to display the input field for entering the program number.
▶ Apăsați tasta Activare (Secțiunea 01) pentru a activa tastele (Inserare) și (Ștergere).
▶ Apăsați butonul (Temperatură) pentru a afișa câmpul de introducere pentru temperatura setată.
▶ Click the (Time) button to display the input field for setting the time.
▶ Faceți clic pe butonul (TS) pentru a afișa câmpul de introducere pentru setarea intervalului de timp.
5.2 Program Loop Settings
▶ Un ecran pentru configurarea funcției buclă — fie în totalitate, fie parțial — pentru un program predefinit.


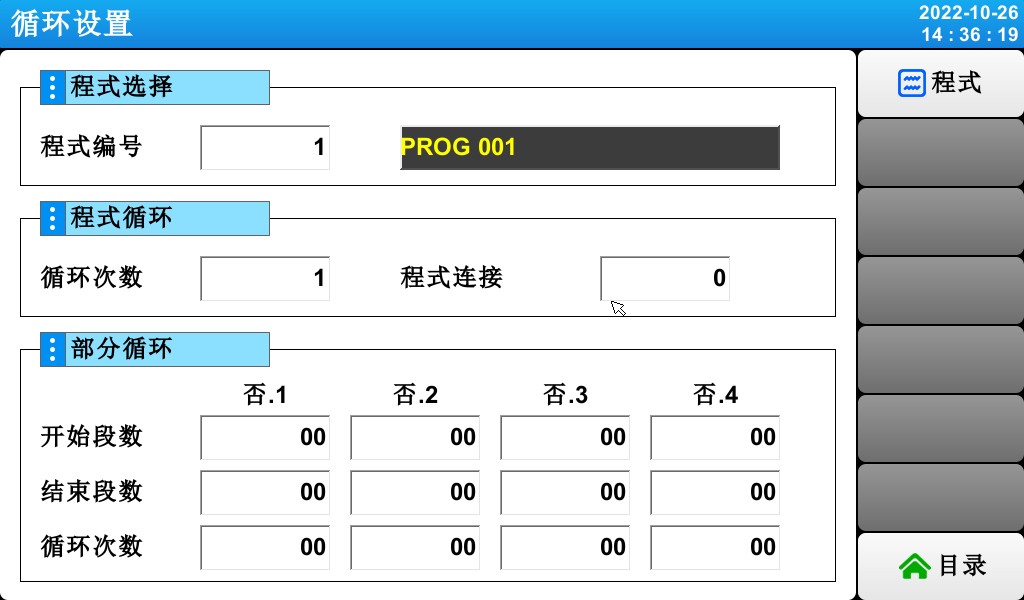
[Figura 5-3] Ecranul Setări Program și Buclă Parțială
① Set the program number for the cycle to be executed.
② Set the number of times the programmed sequence will repeat.
③ Set the program number for the program that will run continuously when the currently running program ends.
④ Set the program segment where the loop begins within the predefined program.
⑤ Set the program segment that terminates the loop in the predefined program.
⑥ Setați numărul de repetări ale unei anumite secțiuni a programului.
⑦ Enter a name for the programmed experiment.
☞ You can change the experiment name in [5.6 Setting the Experiment Name].
☞ Stare doar citire (READ ONLY); nu poate fi modificată.
5.3 Gestionarea înregistrărilor
▶ In [5.1 Program Group Settings], you can copy parameter values entered in a program to other programs, or delete them.
▶ You cannot delete a program number that is currently running.

▶ Programele șterse nu pot fi restaurate.


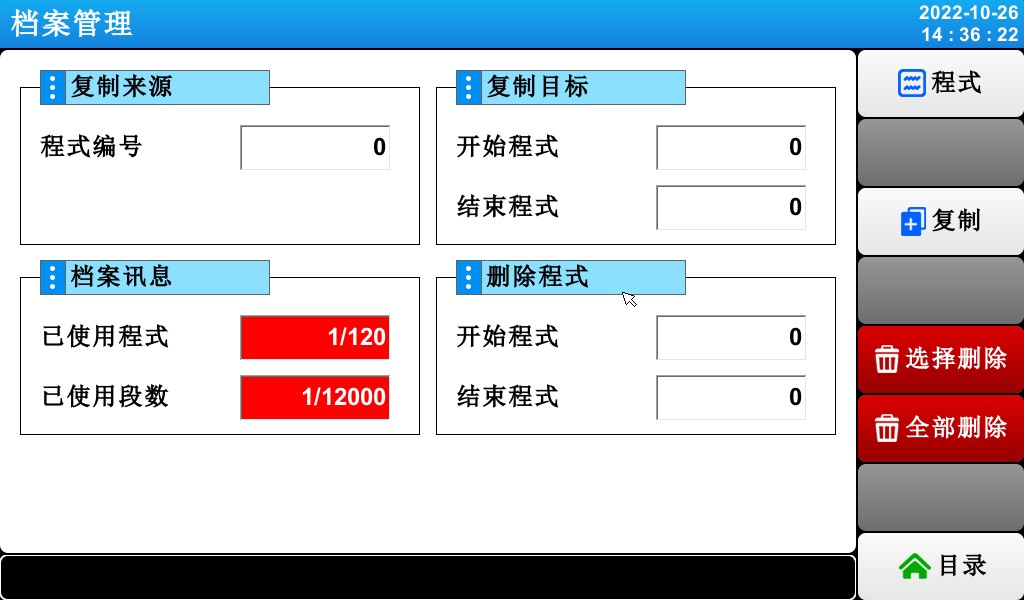
[Figura 5-4] Gestionarea înregistrărilor

① Set the original program number to be copied.
② Setați numerele de început și de sfârșit pentru programul care va fi copiat.
☞ Când cifra finală este „0”, se copiază doar începutul programului.
③ Displays the total number of programs configured in [5.1 Program Group Mode Settings].
☞ Stare doar citire (READ ONLY); nu poate fi modificată.
④ The total number of program segments set is displayed in [5.1 Program Group Mode Settings].
☞ Stare doar citire (READ ONLY); nu poate fi modificată.
5. Setați numerele de început și de sfârșit ale programelor care vor fi șterse.
☞ If the last program number is “0,” only the first program is deleted.
⑥ Copy the program set up in step ① into the program set up in step ②.
⑦ Initialize the program settings defined in ⑤.
⑧ Inițializați setările pentru toate programele.
5.4 Setări ciclu
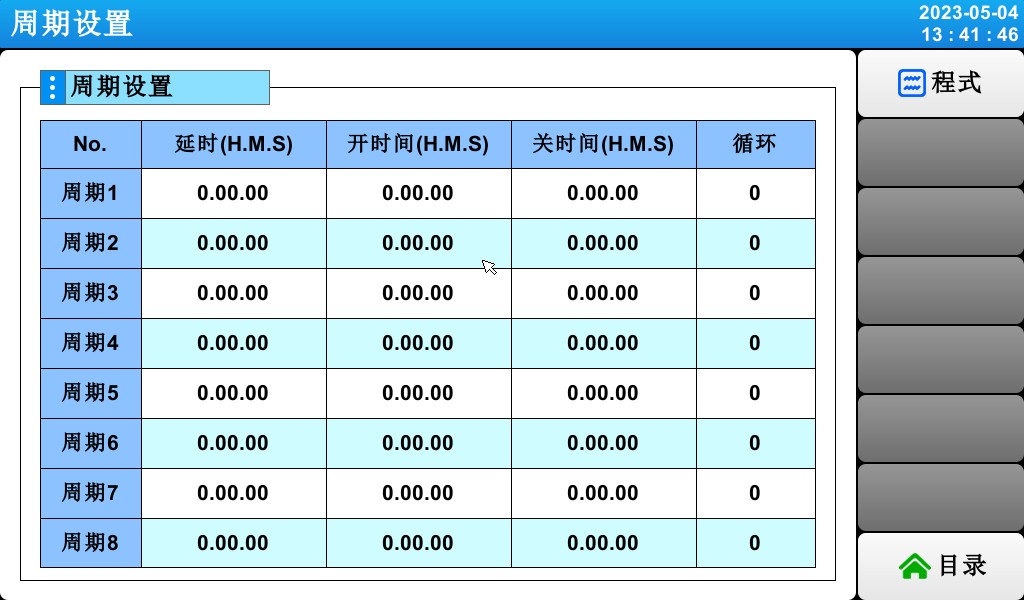
▶ Cycle settings consist of ON/OFF operations and time cycle settings. The cycle set here is used when configuring the time signal cycle in the program segment settings under [5.1 Program Group Mode Settings].
5.5 Standby Settings
▶ Un ecran pentru setarea intervalelor de temperatură și umiditate și a duratei de așteptare în timpul rulării programului.
▶ The wait action configured here applies to [5.1 Program Group Settings].
Waiting for action definition
① Wait for the action to meet the condition (“OR” condition)
☞ If, during the set program period, either the temperature or humidity falls outside the range specified for the next action,
② Wait for the action to be triggered (an “AND” condition)
☞ Când atât temperatura, cât și umiditatea se încadrează în intervalul setat pentru acțiune
③ If no wait time (initial value) is specified, the default wait time is infinite.


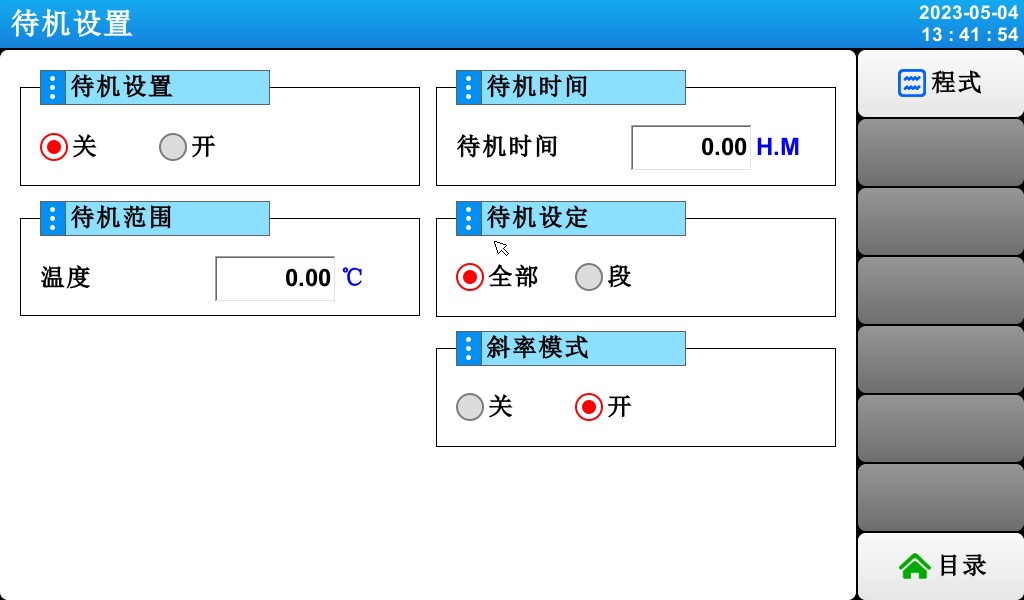
[Figure 5-10] Standby Settings
① Set whether to use the “Wait” action.
② Setați intervalul de temperatură pentru care se aplică acțiunea de așteptare.
③ Setați intervalul de umiditate pentru care se aplică acțiunea de așteptare.
④ The wait time to be applied when the setpoint for the temperature or humidity terminal (TEMP PV or HUMI PV) falls outside the wait action range.
☞ If the wait time is set to 00.00, the system will wait indefinitely until it enters the wait action range.
⑤ Setări de așteptare.
⑥ Set whether to use linear mode.
5.6 Setting the Experiment Name
▶ Setați numele pentru fiecare experiment de program.
▶ Consultați [Figura 3-9: Executarea programului (PROGRAM) – Ecranul 1]


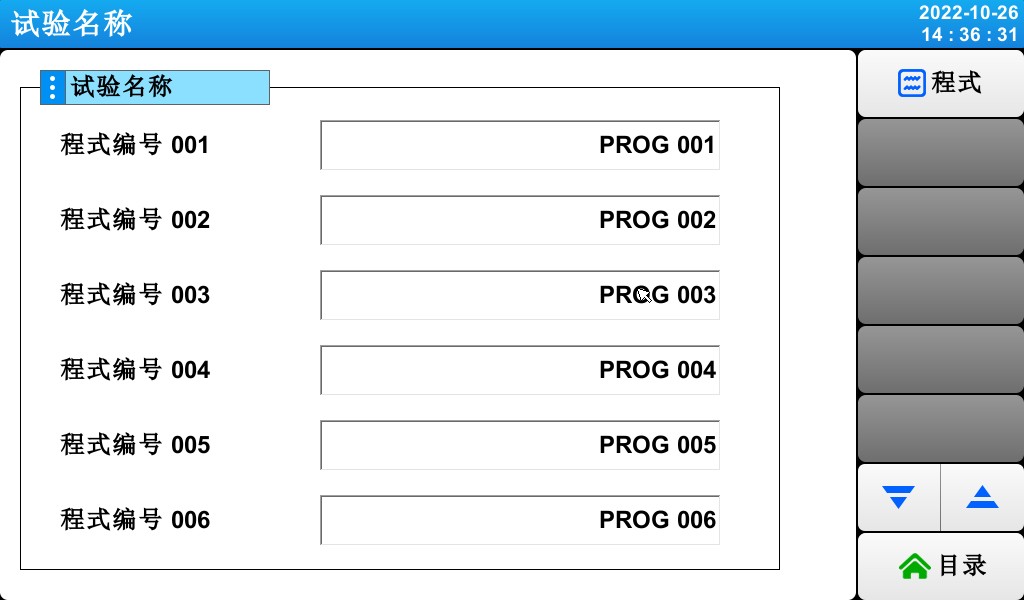
[Figure 5-11] Experiment Name Setup Screen
① Enter the experiment name for each program.
② Switch to the screen showing the previous or next experiment name.
▶ Click the (Name) button to display the input field for setting the experiment name.
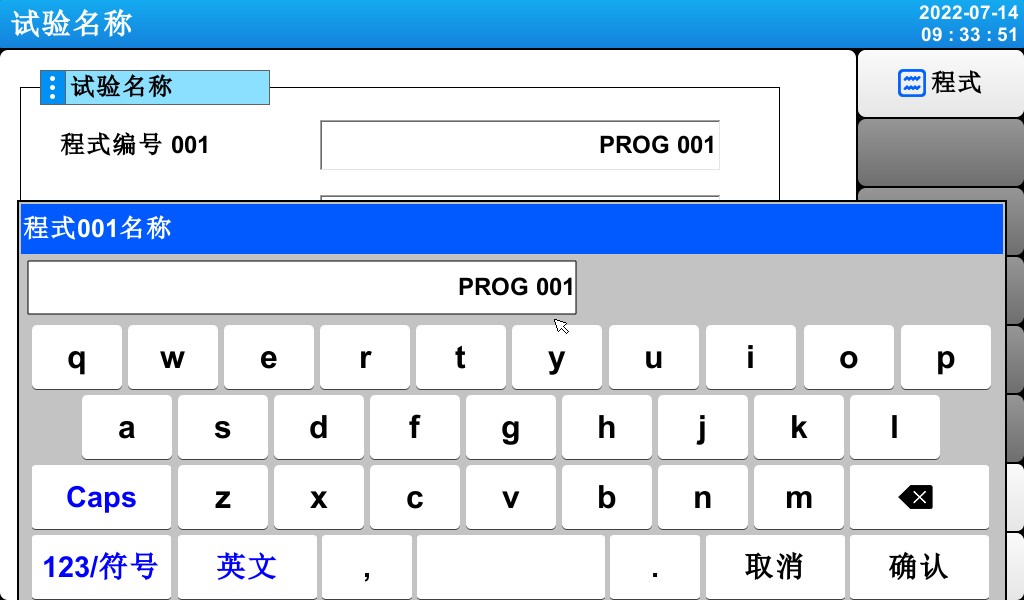
[Figure 5-12] Experiment Name Input Screen
* You can enter up to 20 characters (10 Chinese characters)
6. Tendințe istorice și dispozitive de stocare
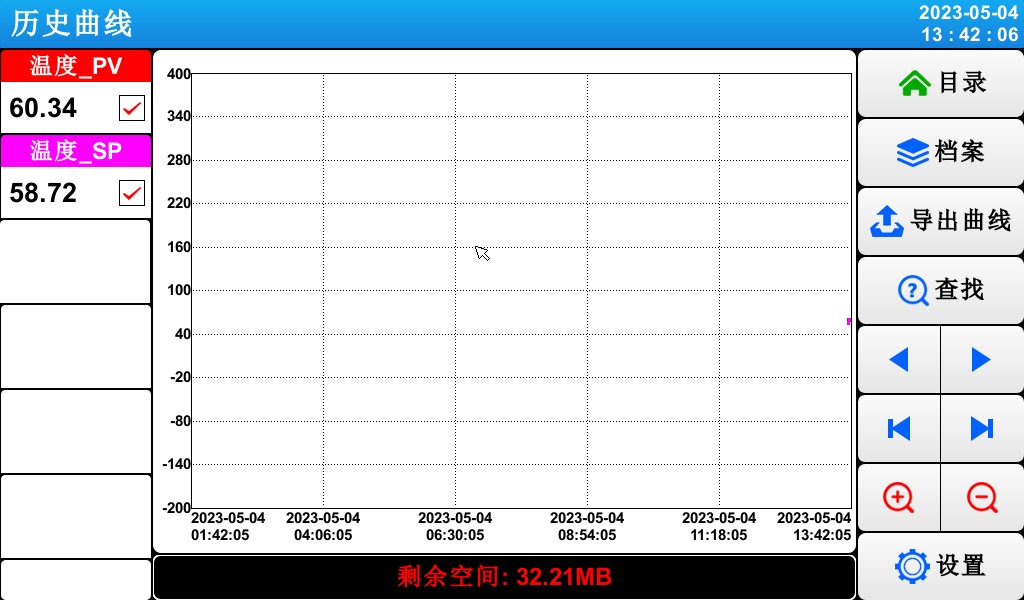
[Figure 6-1] Historical Curve Display Screen
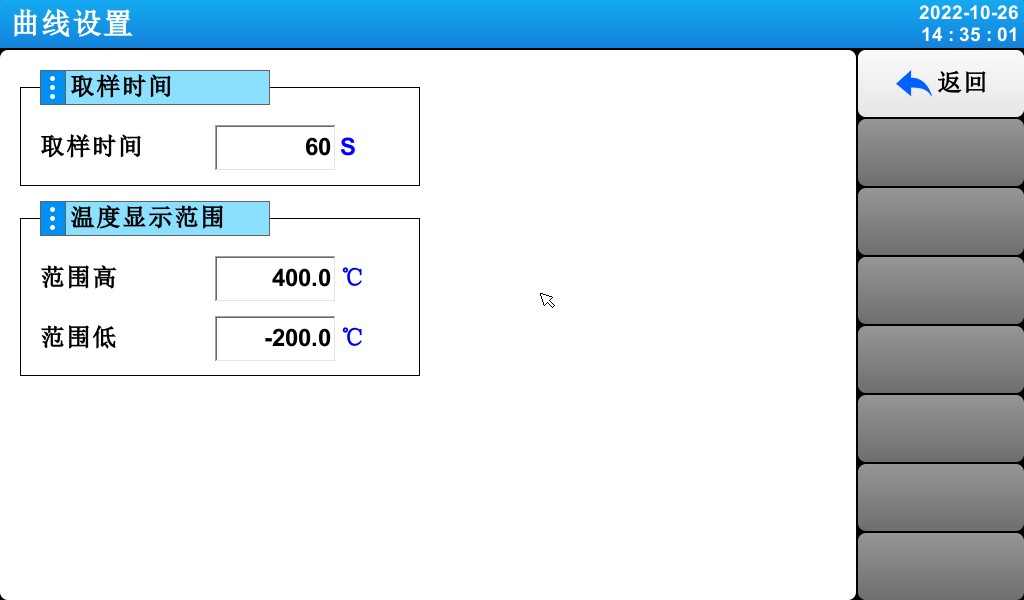
[Figura 6-2] Ecranul Setări Curbă
7 Setări de afișare
7.1 Setări de afișare


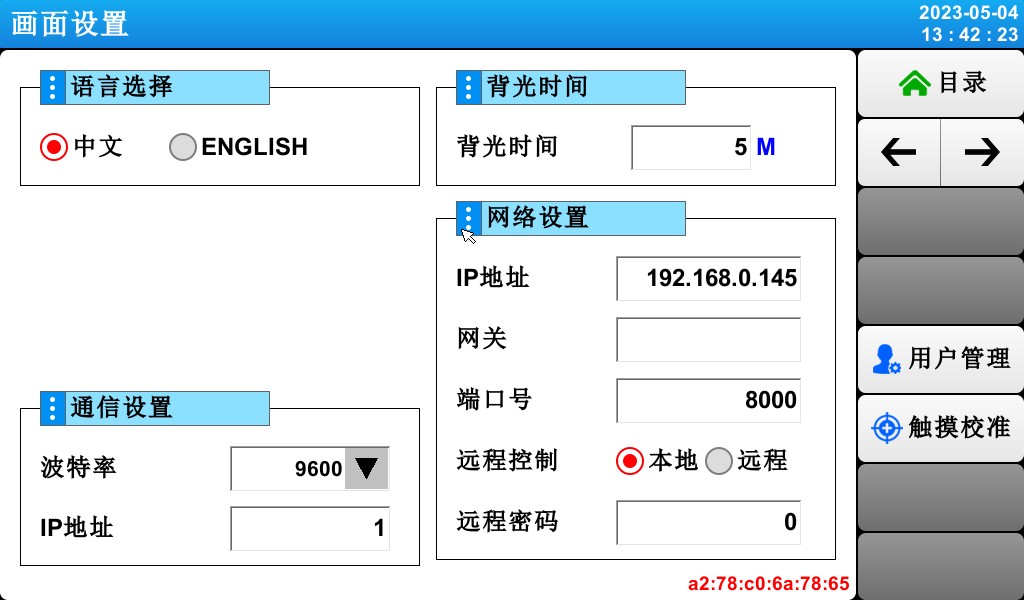
[Figura 7-1] Setări de afișare pe ecran
① Language selection.
② Setați adresa de comunicare
Whether the setting button is displayed on the monitoring screen.
③ You can set the backlight power-saving timer.
☞ The “Energy-Saving Timer” setting determines how long it takes for the backlight to turn off when no buttons are pressed.
④ Set the network address and user password.
7.2 Viewing DI Failure Logs
▶ A screen displaying the type of DI fault that occurred, along with the date and time.
▶ Up to 30 fault records can be displayed.
☞ Dacă numărul de defecțiuni depășește 30, începeți ștergerea acestora începând cu cel mai vechi număr de defecțiune; defecțiunile ulterioare vor fi adăugate la sfârșit.
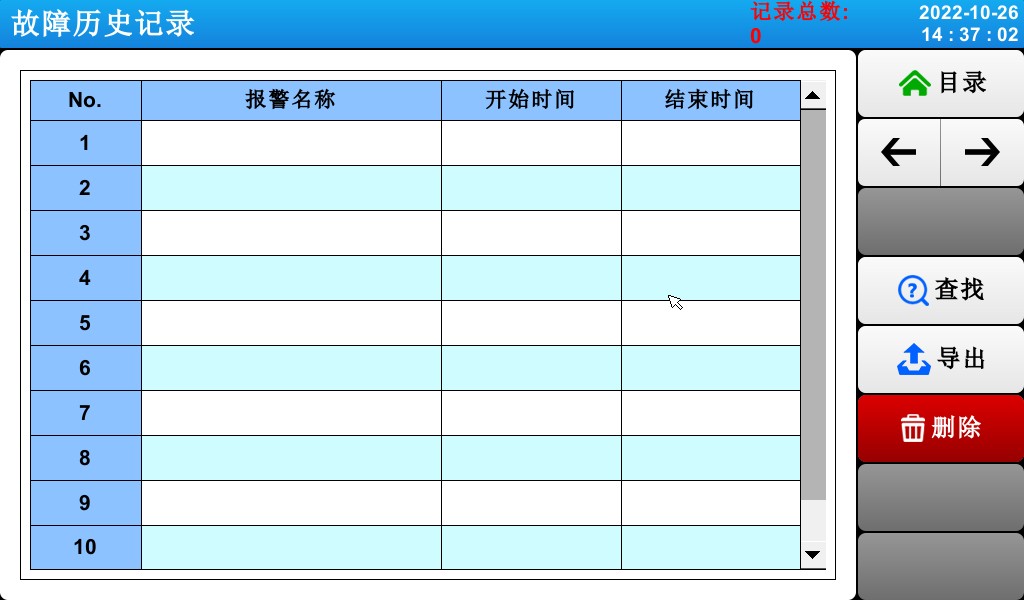
[Figure 7-2] DI Fault Log Screen
① Afișează o înregistrare a erorilor DI.
☞ Displays the name specified in [11.2 Fault Name] of the [Installation Manual].
☞ Stare doar pentru citire; nu poate fi modificată.
② Delete all records of DI failures.
③ You can view the previous or next fault record.
8. Setări de timp
▶ Screen for setting the current time and scheduled run times.


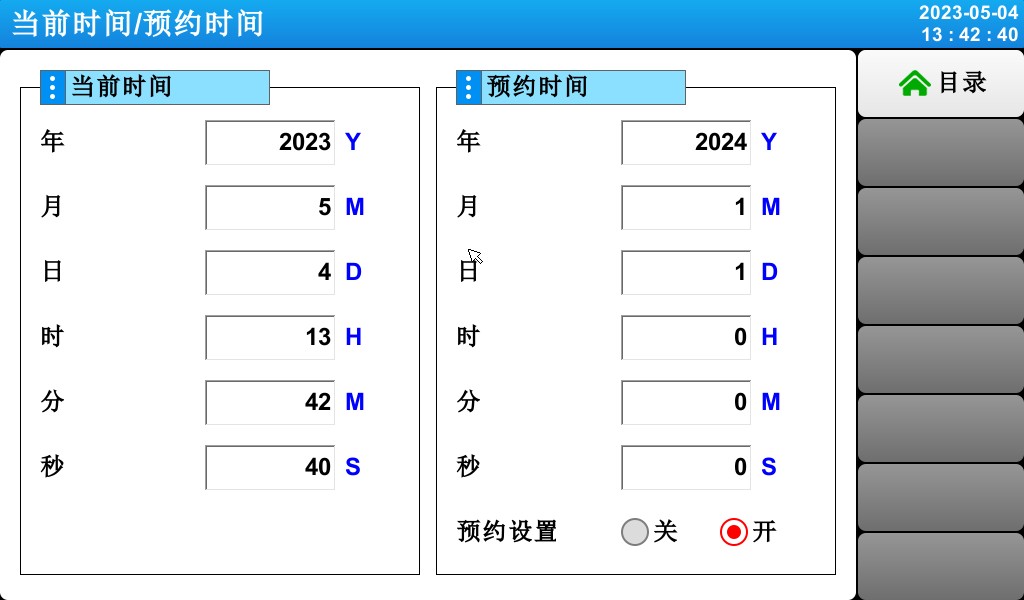
[Figure 8-1] Time Settings Screen
① Set the current year, month, day, and time.
☞ Do not change the current time while the program is running.
② Setați anul, luna, ziua și ora pentru rularea programată.
③ Click the (Schedule) button to run the program at the scheduled time.
☞ Click the (Schedule) button; as shown in [Figure 8-2: Operation Schedule Settings Screen], the scheduled time will appear on the operation screen.
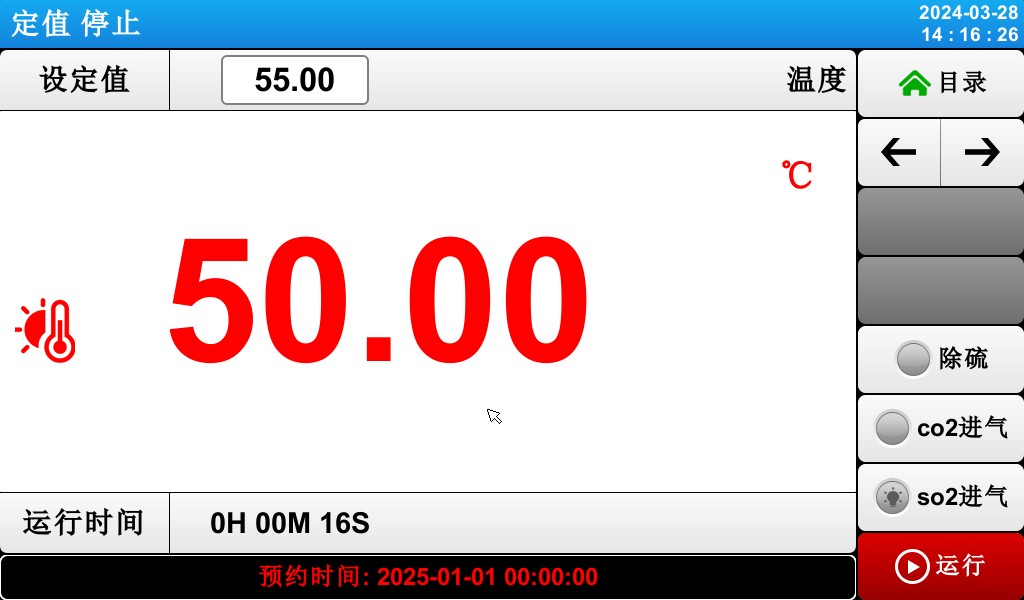
[Figure 8-2] The appointment reminder displays the monitoring screen
9 Eșecuri de comunicare
▶ If the connection to the control board is abnormal, a “Control Module Not Connected” message will appear.
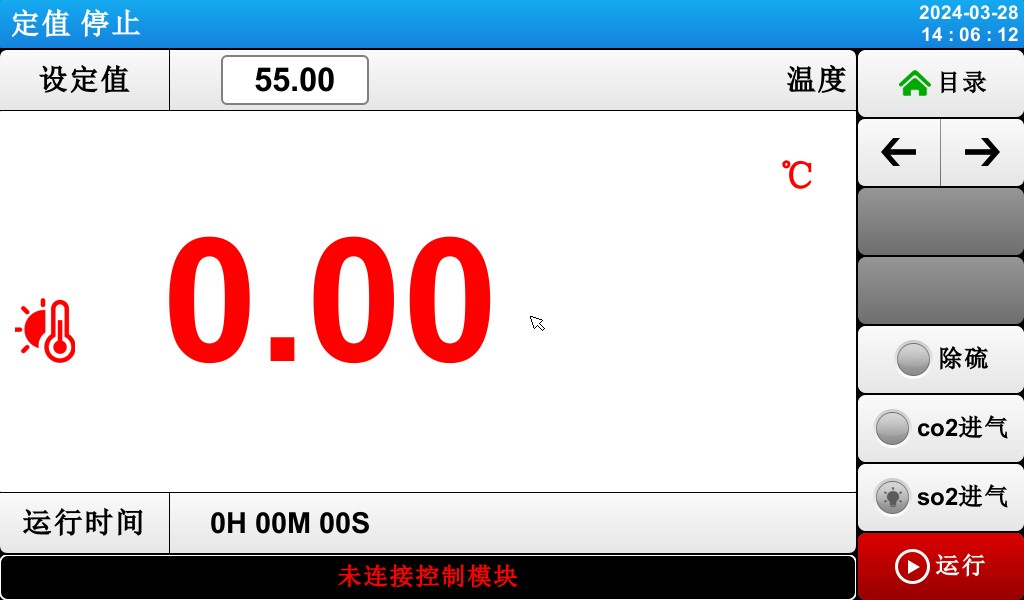
[Figura 10-1] Ecranul Eroare de Comunicare
Cauzele întreruperilor de comunicare:
Poor Communication Connection
Poor connection status of the communication link
Soluții de testare fotometrice, colorimetrice și a performanței de siguranță pentru LED-uri
Sistem goniofotometric: LSG-6000, LSG-1890B, LSG-1800ACCD
Spectroradiometru și sistem de testare a sferei integratoare: LPCE-2 or LPCE-3
LED Life menține un sistem de testare în conformitate cu LM-84: LEDLM-84PL
Sistem de testare a siguranței la radiații fotobiologice: EN 62471-C sau EN 62471-P
Pornirea lămpii, timpul de funcționare și sistemul de testare a pâlpâirii: LSRF-3 și LSP-500VARC-Pst
Testere de drivere de putere LED: LS2090, M9822 și LSP-500VARC
Tester de nivel IK | Tester de impact cu ciocan cu arc: IK07-10, IK01-06
Sistem generator de vibrații electrodinamice: LVD-100KG-6D
Testere de siguranță electrică: LS9955, ZRS-3H, ZY-3, TTC-1
Soluție de testare a camerei de mediu pentru corpuri de iluminat cu LED
Test de impermeabilitate pentru IPX5 și IPX6: JL-56
Mașină de testare a etanșeității la praf pentru IP5X și IP6X: SC-015
High and Low Temperature and Humidity Chamber: GDJS-015B
Mașină de testare cu pulverizare cu sare: YWX/Q-010
Camera de testare a îmbătrânirii cu lampă UV: UV-263LS
Camera de testare a îmbătrânirii lămpii cu xenon: XD-80LS
Camera de testare a ozonului: OTC-150A
Camera de testare a dioxidului de sulf: SQ-010
Soluții de testare EMC și EMI pentru corpuri de iluminat CFL și LED
Sistem de testare EMI: EMI-9KB or EMI-9KA
Simulator de descărcare electrostatică: ESD61000-2
Măsurarea imunității EFT: EFT61000-4
Generator de supratensiune: SG61000-5
Generator de căderi de tensiune și întreruperi: CSS61000-11
Generator de unde inelare: RWG61000-12

www. Lisungroup.com
Brevete depuse
Toate drepturile rezervate de Lisun grup
Sub rezerva modificării fără notificare